Discord Message Sender
approvedby okawak
Send messages from a Discord channel to your Vault
discord_message_sender
Overview
This is a Obsidian plugin that allows you to take notes in Discord and automatically sync them to Obsidian.
Key Features:
- Automatically converts Discord messages into Obsidian Markdown files and saves them
- Automatically clips web page contents from URLs and saves them as Markdown by using
!urlcommand - Syncs multiple Discord channels and stores each channel in its own subfolder
- Stores regular messages as individual, daily, weekly, or monthly Markdown files
- Lets you disable or customize the Discord notification messages sent after sync
- Can be triggered on Obsidian desktop startup or via the command palette
Usage Flow
-
Prepare Your Discord Environment
- Create a dedicated Discord server for Obsidian integration
- Create a bot and invite it to your server
- Specify one or more integration channels (using their channel IDs)
-
Message Processing
- When you launch Obsidian, the plugin fetches messages from Discord via the API
- Regular messages → Saved using the selected storage mode under channel-specific folders
- Special commands (messages starting with the prefix) → Processed with custom handlers
- After processing, a completion notification is optionally sent to Discord
⚠️ Notes
- Security: Since this uses the Discord API, avoid sending sensitive or confidential information.
- Supported Environment: Requires Obsidian 1.13.0 or later and only works on desktop.
Setup Guide
1. Create a Discord Bot
- Go to the Discord Developer Portal
- Click New Application to create a new app

- Bot Settings
- Select Bot from the left menu
- Enable Message Content Intent

- Save the bot token (⚠️ Important: Keep it secure)
2. Invite the Bot to Your Server
- Go to OAuth2 → OAuth2 URL Generator in the left menu
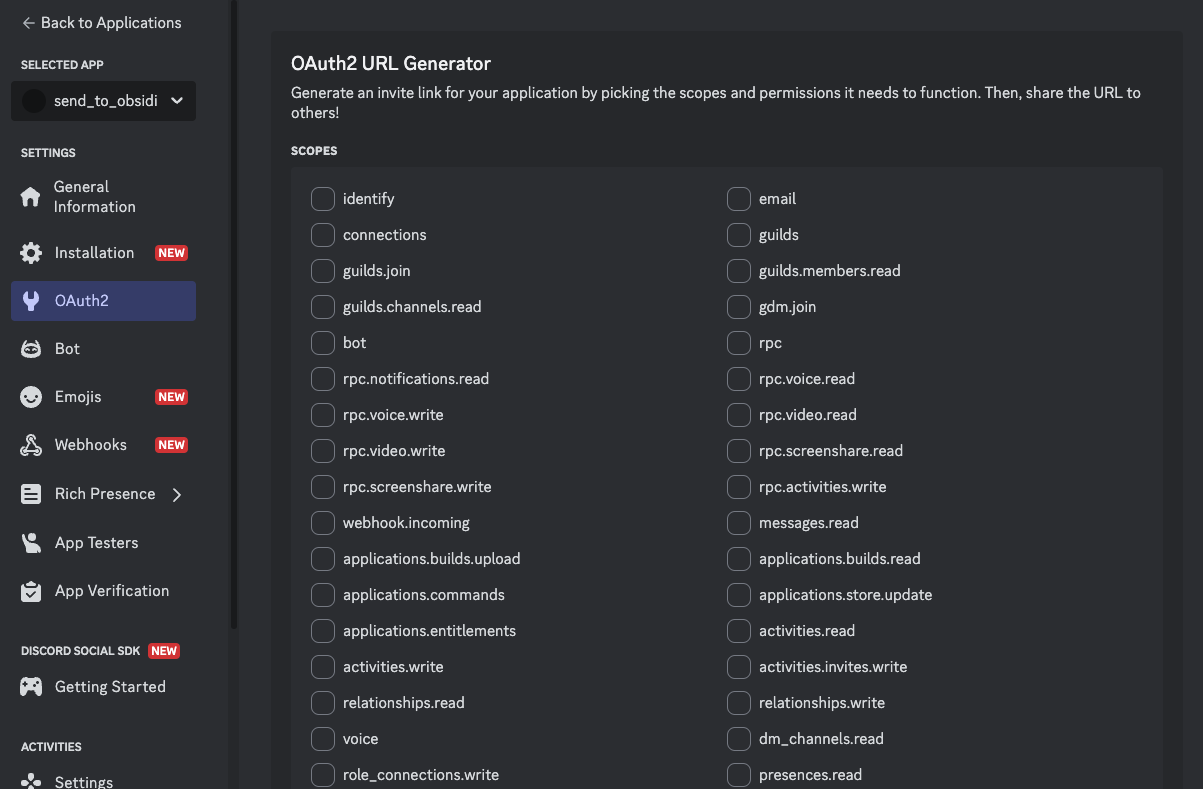
- Under Scopes, select
bot - Under Bot Permissions, enable:
- View Channels
- Send Messages (only required when sync notifications are enabled)
- Read Message History
- Use the generated URL to invite your bot
3. Get Channel IDs
- In Discord settings, enable Developer Mode (in Advanced settings)
- Right-click each channel you want to sync → Copy Channel ID
4. Required Plugin Settings
Please enter the following information in the plugin settings:
- Bot Token
- Channels: Add each Discord channel ID. A channel name is optional and is used as the Obsidian subfolder name. Channel names must resolve to unique folder names.
- Message storage: Choose one file per message, or daily, weekly, or monthly logs.
- Show author names: Include the Discord author in daily, weekly, and monthly logs.
- Show message time: Include the local message time in daily, weekly, and monthly logs.
- Send sync notifications: Disable this to prevent the plugin from posting completion messages to Discord.
- Notification templates: Optional templates for the Discord messages sent after sync. Available variables:
{count},{channelName},{channelId}
By default, messages are saved under DiscordLogs/<channel name or ID>/, and URL clippings are saved under DiscordClippings/<channel name or ID>/. Duplicate folder names are rejected in settings, and sync also stops if manually edited settings contain a duplicate.
Channel names cannot contain \ / : * ? " < > | # ^ [ ]. The names . and .. are also not allowed. Invalid names are not saved.
Message Storage
Regular messages are stored under DiscordLogs/<channel name or ID>/. Choose one of the following modes:
- One file per message:
YYYYMMDD_HHMMSS_<message ID>.md - Daily log:
YYYY-MM-DD.md - Weekly log:
<ISO week-year>-W<week>.md; weeks start on Monday - Monthly log:
YYYY-MM.md
Dates, times, and individual file names use the computer's local time zone when synchronization starts. Daily logs use the date as the level-one heading. Weekly and monthly logs use the period as the level-one heading and each date as a level-two heading. Messages do not create their own headings.
With author names and message times disabled, an aggregated entry is stored like this:
<!-- discord-message-id: 1520291078606028900 -->
yes
With both options enabled, the same entry is stored like this:
<!-- discord-message-id: 1520291078606028900 -->
**Alice** · 21:34

yes
The plugin also writes managed-log and date markers as HTML comments. These markers are hidden in Obsidian Reading view and prevent duplicate messages when a sync is retried or the storage mode changes. Do not remove or edit them.
Existing settings are automatically migrated to One file per message, preserving channels and synchronization cursors. Changing the storage mode only affects new messages. Existing files are not converted, moved, or renamed, so files from different modes can coexist safely.
URL clippings always remain individual files under DiscordClippings/<channel name or ID>/.
Discord API behavior
The plugin uses Discord API v10 and requests up to 100 messages at a time. The first synchronization imports the latest 100 messages. Later synchronizations request only pages needed to reach the saved per-channel cursor, so daily, weekly, and monthly logs do not cause the entire period to be downloaded again. Requests are paginated when more than 100 new messages exist and observe Discord rate-limit responses.
Command List
Messages starting with the configured prefix (default: !) are treated as special commands.
!url - Web Page Clipping (under development)
Example:
!url https://www.example.com
Behavior:
- Fetches the contents of the specified URL
- Saves it as a Markdown file
- Save location: Channel-specific directory under the clipping directory (default: DiscordClippings)
Roadmap
Additional useful commands will be added in future releases.
Development
References
This plugin was inspired by the following project(s):
For plugin developers
Search results and similarity scores are powered by semantic analysis of your plugin's README. If your plugin isn't appearing for searches you'd expect, try updating your README to clearly describe your plugin's purpose, features, and use cases.