InkedMark
approvedby Liqpil
Handwrite inside your markdown notes with pressure-aware ink, a searchable text layer, inline sketches, and Apple Pencil support. - This plugin has not been manually reviewed by Obsidian staff.

InkedMark
Handwriting that lives inside your notes — pressure-aware ink, fused with markdown, searchable and graphable like everything else in your vault.
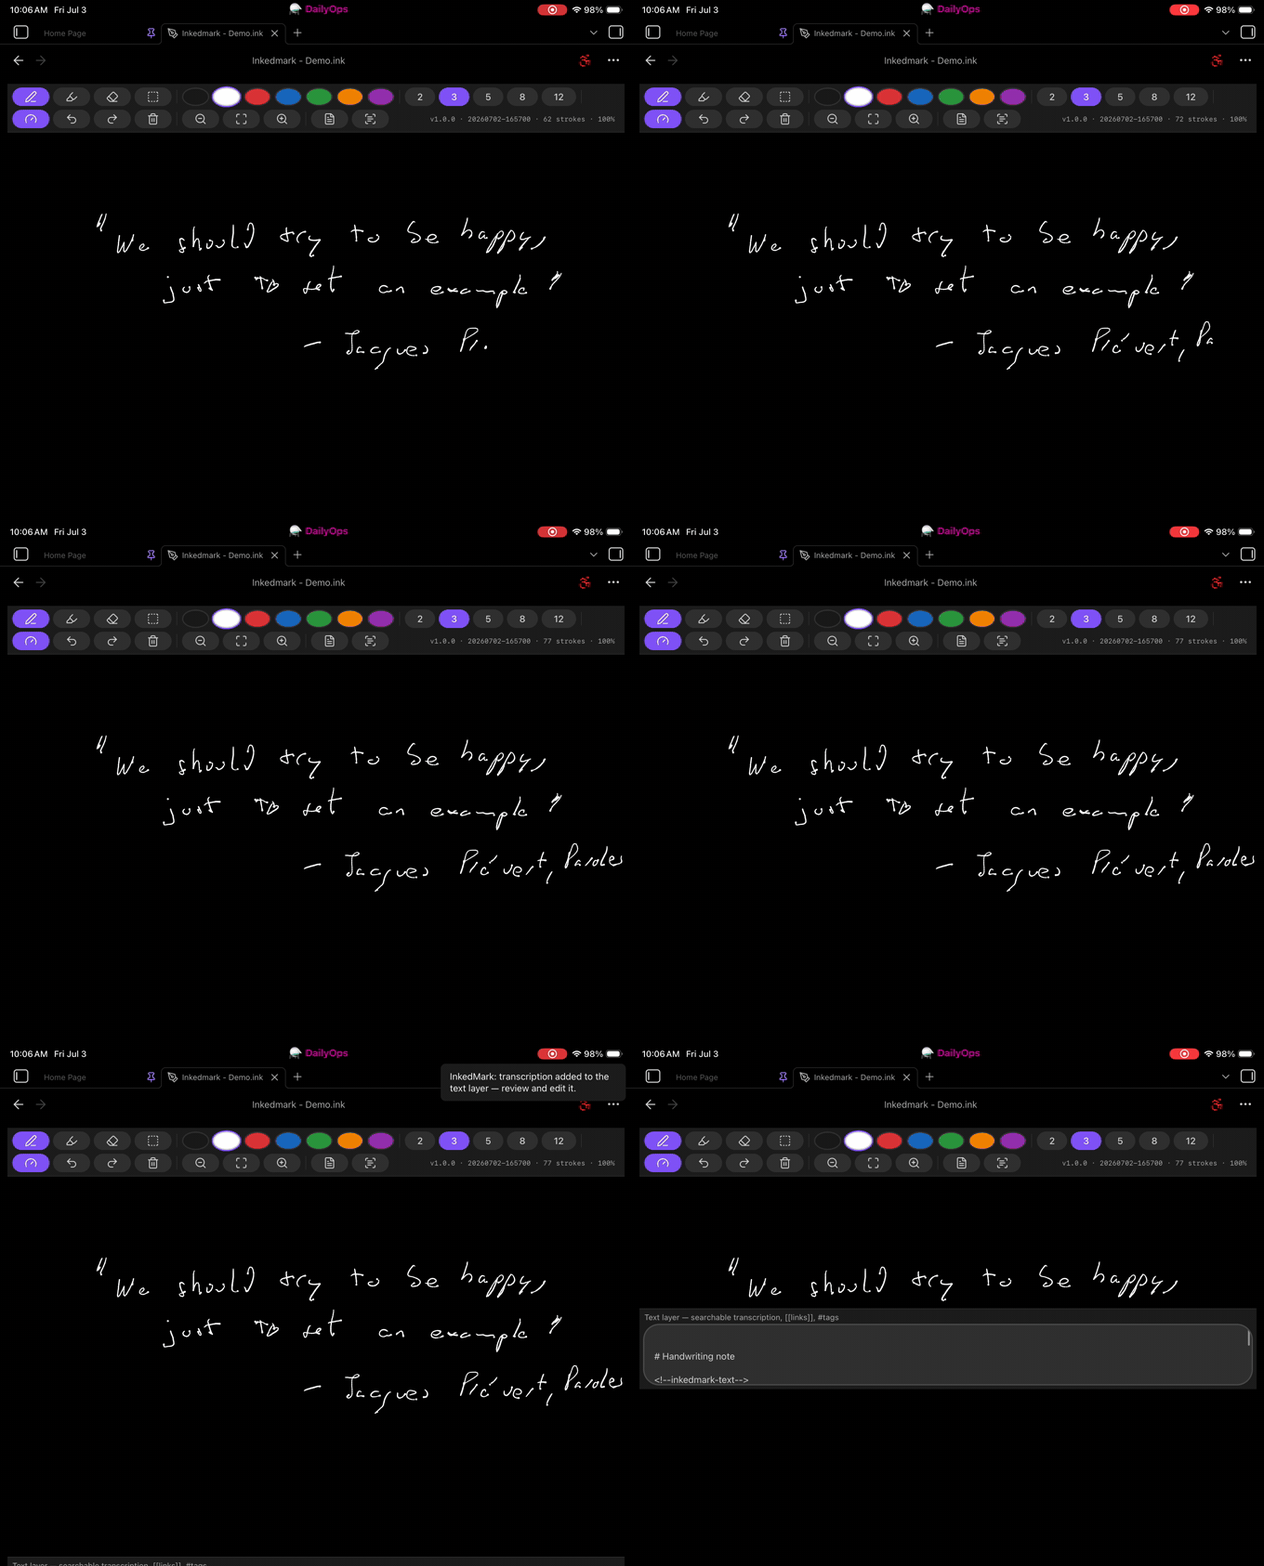
Write by hand, hit recognize, and the transcription lands in the note's searchable text layer — full demo on inkedmark.com.
InkedMark makes handwriting a first-class block inside ordinary markdown notes. You write by hand where handwriting is better (diagrams, math, marginalia, fast capture) and type where typing is better — in the same note — and Obsidian's search and graph see all of it through a first-class text layer.
- Handwriting notes —
*.ink.mdfiles open in a pen-first canvas view, yet stay plain markdown files that sync, diff, and link like any other note. - Searchable ink — every handwriting note carries a typed text layer
(transcription, key points,
[[links]],#tags) that Obsidian's core search, graph, backlinks, and Quick Switcher index with no extra work. - Inline sketches — embed a handwriting note with
![[Sketch.ink.md]], or drop a small```inkedmarkblock right inside any note and draw into it from a full-size editor. - Built for Apple Pencil — pressure-variable ink (perfect-freehand), full-rate capture via coalesced events, palm rejection, and a low-latency wet/dry canvas split. Works on desktop, iPad, and mobile.
Getting started
- Install and enable InkedMark (see Install).
- Click the pen ribbon icon or run “Create handwriting note” — a new
*.ink.mdnote opens in the canvas view. - Write with your pen (or mouse). One finger scrolls; two fingers pinch-zoom.
Toolbar & tools
| Tool | Key | Notes |
|---|---|---|
| Pen | P | Pressure-sensitive ink |
| Highlighter | H | Translucent, multiply-blended |
| Eraser | E | Drag across strokes; one undo step per gesture |
| Select | V | Drag a box to select; drag inside it to move; Delete removes |
Plus: color swatches (add your own in settings), stroke sizes, a pressure
toggle, undo/redo (Cmd/Ctrl+Z, Cmd/Ctrl+Shift+Z), clear, and zoom
out / fit / in. The right side of the toolbar shows version, build, stroke
count, and zoom.
Commands
- Create handwriting note — new
*.ink.mdin the current folder. - Insert inline handwriting — inserts a
```inkedmarkblock and opens the drawing editor for it. - Toggle canvas / markdown view — see the raw markdown of an ink note.
- Toggle text layer panel — open the transcription panel.
- Recognize handwriting in this note — runs the selected recognition provider (see below).
- Zoom in / Zoom out / Fit / reset view, Toggle input debug overlay.
- View changelog — what changed in each release. After an update, the news is shown once automatically.
Handwriting recognition
Three providers (Settings → Handwriting recognition):
-
Manual (default) — you type the transcription in the text-layer panel. Never uses the network.
-
Cloud AI (bring your own key) — renders the note's ink to an image and asks a vision model for a markdown transcription, which lands in a clearly marked section of the text layer for you to review and edit. Supports Anthropic (Claude), OpenAI (GPT), and Google (Gemini); you pick the vendor and model and paste your own API key. Typical cost is a fraction of a cent per page. The OpenRouter vendor lets you try any vision model on the market (e.g.
google/gemini-3.5-flash,anthropic/claude-haiku-4.5) with a single key — and its Connect OpenRouter button sets the key up for you in one click (you approve it in your browser; no copy/paste). The Custom endpoint vendor points recognition at any self-hosted OpenAI-compatible server (Ollama, LM Studio, llama.cpp, vLLM, LocalAI) so your ink never leaves your own network — see SELF_HOSTING.md for setup guides and honest quality expectations. -
On-device (experimental, desktop only) — an offline TrOCR model transcribes the ink line-by-line, entirely on your machine. Enable it under On-device recognition (experimental) in settings. First run downloads the model from Hugging Face (~250 MB Fast / ~1.3 GB Accurate; cached afterwards). English handwriting only, and noticeably less accurate than Cloud AI — treat it as the privacy/offline fallback, not the quality path. Mobile webviews can't run the models, so it is desktop only.
Run it from the toolbar's scan button, the command palette, or turn on Recognize automatically in settings to have it run in the background ~30 seconds after you stop writing. Recognition is skipped when the ink hasn't changed since the last run, and clearing the page clears the transcription section too (your own prose in the text layer is never touched).
Network use disclosure
InkedMark makes network requests only for recognition, and only in three
cases: (1) Cloud AI sends a rendered PNG of the ink being recognized (an ink
note, or an inline block open in its editor) to your
chosen vendor (Anthropic, OpenAI, Google, or OpenRouter) — or to the custom
endpoint URL you configured — using your API key, after a one-time
confirmation; (2) clicking Connect OpenRouter opens openrouter.ai in your
browser and exchanges a one-time code with openrouter.ai/api/v1/auth/keys —
nothing is sent until you approve in the browser; (3) the experimental
on-device provider downloads its model from the Hugging Face CDN (and the
ONNX runtime from jsDelivr) on first use — your ink never leaves the
device with that provider. Nothing else is ever transmitted — no telemetry,
no analytics, and the manual provider works fully offline. Your API key is
stored locally in the vault's plugin data (data.json).
The text layer (search & graph)
Open the text-layer panel (toolbar 📄 button or command) and type a
transcription, key points, [[links]], and #tags. That text is stored as the
note's markdown body, so handwritten notes show up in search, the graph,
backlinks, and the Quick Switcher — find a sketch by its transcription, and
its links become real graph edges.
Inline handwriting in regular notes
![[Sketch.ink.md]]renders the sketch inside any note (reading mode and live preview).```inkedmarkblocks hold a small drawing in place, with an optionalcaption:line that doubles as its searchable text.
Editing an inline block
Inline blocks are drawn in a full-size editor, not in place: tap the expand icon in the block's corner (reading mode or Live Preview) and the block opens in a modal with the same toolbar as an ink note (full-screen on iPad). Or run Insert inline handwriting to insert a block and open the editor at once. Good to know:
- Closing saves. Done, the ✕ button, or
Escwrite the strokes back into the block; Discard changes throws the session away. The note updates as soon as the editor closes. - The caption is the block's text layer. Open the text panel (toolbar
📄) to type it, or press the scan button to have the recognition provider fill it in (collapsed to a single line). With Recognize automatically on, this happens by itself when you close the editor after drawing. - Nothing outside the block is touched. The plugin rewrites only the
caption:and payload lines of that one fenced block. If the note changed underneath and the block can't be located unambiguously, the save is refused with a notice rather than guessed; a block whose payload can't be decoded has no edit icon and is never overwritten.
File format
An ink note is a single markdown file: frontmatter (inkedmark: true), your
text layer as the body, and the stroke data in a trailing
%%inkedmark … %% comment (quantized, compressed, invisible in reading view).
No sidecar files; atomic sync and version control.
Install
- Community plugins: search for “InkedMark” (once accepted).
- BRAT (beta): add
pcrausaz/obsidian-inkedmark. - Manual: copy
main.js,manifest.json, andstyles.cssfrom a release into<vault>/.obsidian/plugins/inkedmark/, then enable it.
What changed between versions is documented in the changelog; each GitHub release carries the matching section as its release notes.
iPad / Apple Pencil setup — important
Turn off iPadOS Scribble: Settings → Apple Pencil → Scribble (off).
iPadOS “Scribble” (the system handwriting-to-text feature) intercepts fast Apple Pencil strokes at the OS level, before they reach Obsidian's web view — so with it on, quick handwriting drops strokes. This is an iPadOS/WebKit behavior no plugin can disable or detect. With Scribble off, capture is smooth (verified on an iPad Pro 12.9″ 4th-gen, Apple Pencil 2). InkedMark shows a one-time reminder and a settings note on iPad.
Troubleshooting
- Strokes go missing on iPad → turn off Scribble (above).
- Diagnosing input problems → enable Input debug overlay (settings → Support and diagnostics, or the command). It shows the raw event stream, timing gaps, and stroke counts — include a screenshot of it when reporting input bugs.
- Ink looks corrupted → try turning off Desynchronized canvas in settings (some WebKit versions are flaky with it).
- Not sure which build you're running → the toolbar's right side shows the exact version and build stamp.
Support
- Email: support@inkedmark.com
- Bugs & feature requests: GitHub issues
- Website: inkedmark.com
- If InkedMark is useful to you: buy me a coffee ☕
Development
npm install
npm run dev          # esbuild watch (inline sourcemap)
npm run test         # vitest (pure modules)
npm run lint         # eslint, zero-warning gate
npm run typecheck    # tsc --noEmit
npm run build        # typecheck + production bundle
The build emits main.js; together with manifest.json and styles.css it
forms the Obsidian plugin. See SPECIFICATION.md for the
technical brief, QA.md for the on-device test pass,
GitHub issues for tracked bugs, and
RELEASE.md for the release flow.
Deploying to a test vault (incl. iPad via iCloud)
Point the build at a vault's plugin folder by creating a gitignored
.deploy-target file at the repo root containing that path, e.g.
/Users/you/Library/Mobile Documents/iCloud~md~obsidian/Documents/MyVault/.obsidian/plugins/inkedmark
(or set OBSIDIAN_PLUGIN_DIR in the environment). Then:
npm run dev— watch build; auto-copies the three artifacts into the target on every rebuild.npm run deploy— copy the current artifacts without rebuilding.
A .hotreload marker is written alongside so the desktop
Hot-Reload plugin reloads on change.
iPad note: point
.deploy-targetat an iCloud-stored vault — iCloud syncs the copied files to the iPad (symlinks do not sync, which is why the build copies real files). After a deploy, wait for iCloud to sync, then reload the plugin on the iPad.
License
MIT © 2026 liqpil.com
For plugin developers
Search results and similarity scores are powered by semantic analysis of your plugin's README. If your plugin isn't appearing for searches you'd expect, try updating your README to clearly describe your plugin's purpose, features, and use cases.