OCR Extractor
approvedby Johnathan Ritzi
Extract text from attachments and store it as Markdown in your notes.
OCR Extractor



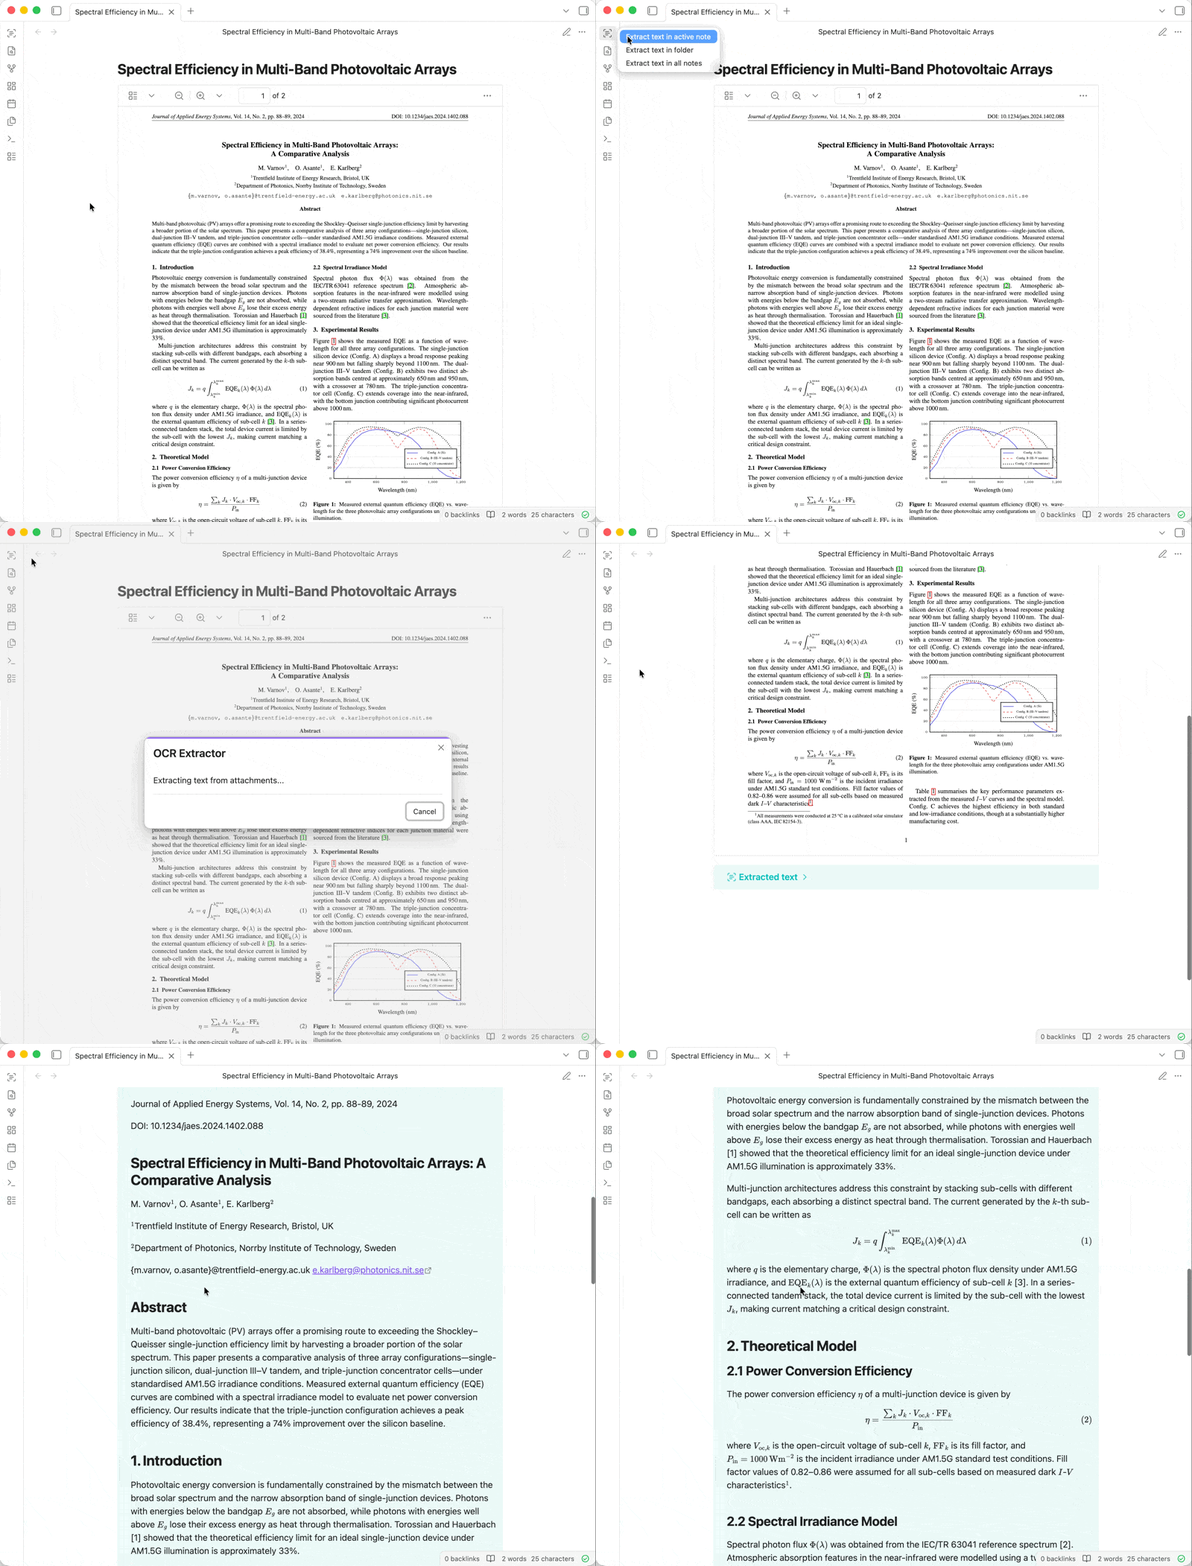
OCR Extractor is an Obsidian plugin that uses OCR to extract text from PDFs, documents, images, etc. embedded in your notes. Different OCR engines (free or paid, local or cloud-based) are available, depending on your needs.
Following Obsidian's philosophy of storing data in an open, future-proof file format, the extracted text is added below the embedded attachment as an expandable callout. This means that the text will be searchable via Obsidian's built-in search, other search plugins, and even your operating system's native file search.
Installation
Install from Obsidian Community, or go to Settings → Community plugins → Browse and search for "OCR Extractor".
Usage
Click on the ribbon icon (or use the command palette) and select one of the options:
- Extract text in active note
- Extract text in folder
- Extract text in all notes
You can also right-click on notes, folders, or a selection of notes to extract only those files. On mobile, text can only be extracted from the active note.
When extracting from multiple notes, you can track progress in the status bar and click it to cancel (or use the Cancel extraction command).
Additional options are available in the plugin settings, including Auto-extract attachments (automatically extract text when a new attachment is added to a note) and Prefer embedded PDF text (use text already embedded in a PDF instead of extracting with OCR).
OCR engines
Depending on your needs, you can choose which OCR engine to use. Select the OCR engine in the plugin settings and follow the setup steps below.
Tesseract
Tesseract (the default option) is a popular open source OCR engine. It has some limitations (only supports English text, can only process PDFs and images, is often less accurate), but it's completely free and local (ensuring your data is never sent to a third-party provider). This option requires no additional setup.
Mistral OCR
Mistral OCR is a powerful AI model for quickly extracting text from complex documents (including handwriting) and converting it to Markdown. It supports many different languages and file types. This option requires a paid Mistral AI account (at the time of writing, it costs $4 per 1000 pages processed). Attachments are sent to Mistral's OCR service for text extraction (see their privacy policy).
First, you need to create a Mistral AI account. Follow their Quickstart guide:
- Create an account
- Add payment information
- Recommended: Set a monthly spending limit, to avoid any unexpected charges
- Create an API key
Then, enter your API key in the plugin settings.
OpenAI-compatible API
This option allows you to use any AI model (LLM), either locally (e.g. with Ollama or LM Studio), or via a cloud provider like OpenRouter. This requires more setup, has higher system requirements, and is often slower, but, when used with a local model, it can allow you to get great results without ever sending attachments to a third-party service.
Example (Ollama with glm-ocr):
- Download and install Ollama
- Download a vision-capable model compatible with your hardware (e.g. glm-ocr):
ollama pull glm-ocr - In plugin settings, set OCR engine to OpenAI-compatible API
- Set Base URL to the Ollama server's URL:
http://localhost:11434/v1 - Set Model to
glm-ocr - Click Test to confirm the connection works
Custom command
For advanced use cases, you can provide a custom command that will be used to process attachments. This can be used, for example, to use a third-party API that isn't supported by the plugin, Tesseract with a custom configuration, native OS OCR options, or even a script that does custom preprocessing or postprocessing. Note that custom commands are not supported on mobile, so the plugin will use Tesseract instead.
Enter your command in Command in the plugin settings, where {input} is the path to the input attachment file and {output} is the path to the produced Markdown or text file containing the extracted text. To skip an unsupported attachment, don't create the output file.
Click Test to run the command on a sample image and confirm it correctly extracts the text. If the custom command only supports images, enable Convert PDFs to images.
Example (native OCR on macOS with macOCR):
macOCR (a third-party tool, review before installing) allows you to easily use Apple's built-in Vision OCR engine (which runs locally and is more accurate than Tesseract).
- Install macOCR
- Set Command in plugin settings:
ocr -i {input} > {output} - Enable Convert PDFs to images
- Click Test to confirm the command works
Examples
The following examples show text extracted from four sample documents processed with each OCR engine: a study guide (a straightforward typed document with headers and bullet points), an academic paper (a complex multi-column document with equations and charts), handwritten meeting notes (a photo of handwritten text), and a chapter excerpt from a Chinese book (non-Latin script). Each link opens a note (using Obsidian Publish) showing the original attachment alongside the extracted text, so you can see exactly what the plugin produces:
- Tesseract: Study guide · Academic paper · Meeting notes · Chinese book
- Mistral OCR: Study guide · Academic paper · Meeting notes · Chinese book
- OpenAI-compatible API (GLM-OCR): Study guide · Academic paper · Meeting notes · Chinese book
- Custom command (macOCR): Study guide · Academic paper · Meeting notes · Chinese book
API (for plugin developers)
Other Obsidian plugins can use OCR Extractor's public API to run the user's configured OCR engine and receive the extracted text. See the ocr-extractor-api npm package for details.
Contributing
For details on how to report a bug, share a feature request, or contribute code, see the Contribution Guidelines. To report a security issue, see the Security Policy.
Translations
OCR Extractor is available in several languages. To request a new language (or to suggest an improvement for an existing translation), start a discussion.
License
OCR Extractor is licensed under the MIT License.
For plugin developers
Search results and similarity scores are powered by semantic analysis of your plugin's README. If your plugin isn't appearing for searches you'd expect, try updating your README to clearly describe your plugin's purpose, features, and use cases.