Drive Image Uploader
unlistedby Maurilio
Paste/drag images → upload to Google Drive → embed a working URL (lh3.googleusercontent.com). Falls back to alt=media or local save.
🖼️ Google Drive Image Uploader for Obsidian 🔮
Upload images into your notes with a simple paste or drag — automatically stored on Google Drive, made public, and embedded as ready-to-use Markdown.
A simple plugin that lets you paste or drag images into Obsidian, and it will automatically:
- Upload the image to your Google Drive
- Make it public (anyone with the link → Viewer)
- Insert a working image link
→ - If that fails, it tries a backup link:
→https://www.googleapis.com/drive/v3/files/FILE_ID?alt=media&key=YOUR_API_KEY - If all else fails, it saves the image locally in your vault (so you never lose it).
✨ Why use this
- Works fully inside Obsidian Preview (tested).
- No need for Imgur or third-party hosts.
- You stay in control — your images live in your own Google Drive.
- Smart fallback: Drive CDN → API → local.
About Google Drive API
The Drive API itself has a generous free tier.
- You get 10 requests per second per user, and thousands per day.
- Uploading images from Obsidian and setting them to “anyone with link → viewer” uses tiny requests — basically nothing.
You won’t ever hit a quota unless you’re uploading thousands of images per minute.
No charges are applied for:
- Uploading files you own.
- Reading public files (
alt=media). - Managing permissions.
So: Drive API = free ✅
🚀 Quick Start
Step 1 — Get the plugin (online)
Install the plugin via the Community Plugins tab within Obsidian or clone/download this repo to your computer.
The important contents are in the following files:
manifest.json
package.json
main.ts
README.md
Alternative — Get the plugin (manual)
🔮 How to Install Plugin Locally in Obsidian
- In your Obsidian vault folder, go to:
.obsidian/plugins/
and create a folder named:
obsidian-drive-image-uploader
- Copy these files inside it:
manifest.json
main.js
README.md
- Restart Obsidian or reload plugins.
🧰 Developer Notes (optional)
- Built with TypeScript + esbuild
- Main entry:
main.ts - Commands:
npm install
npm run dev   # live rebuild
npm run build # minified build
- Output:
main.js→ copy into your vault plugin folder.
🧰 Step 2 — Google Cloud Setup (One-Time)
You need a few keys so the plugin can talk to your Drive.
If you’ve never used Google Cloud, don’t worry — follow this carefully:
🗂️ Create a Project
-
Go to https://console.cloud.google.com/
(Sign in with the Google account where you’ll store your images.)

-
On the top bar, click Select Project → New Project


-
Give it a name like “Obsidian Drive Uploader”. Click Create.

-
Go here,

⚙️ Enable the Google Drive API
- In the left menu, click “APIs & Services → Enable APIs and Services.”


- Search for “Google Drive API.”

- Click Enable.

This tells Google you’ll use Drive from an external app (our plugin).
🧾 Set up the OAuth Consent Screen
- Still under APIs & Services, open “OAuth consent screen.”


- Fill these:
- App name: Drive Image Uploader
- User support email: your Gmail
- Developer contact email: your Gmail

- Choose External,

- Click Save and Continue all the way — you don’t need to add scopes or test users. → click Create.

- Done! This step just lets Google show a simple “Allow access” page when you connect.
✅ Required: Add the Drive scope
After you create the consent screen:
-
Go to Google Auth Platform → Data access → Add or remove scopes.

-
Click Add scopes and include:
https://www.googleapis.com/auth/drive.file(This lets the plugin create & manage files it uploads only.)


✅ Required: Add yourself as a Test user
While your app is in Testing, only test users can authorize:
-
Go to Google Auth Platform → Audience.
-
In Test users, click ➕ Add users.

-
Add the Google account(s) you’ll use in Obsidian (e.g.,
you@gmail.com).
You don’t need to “Publish app.” Keeping it in Testing is fine for personal use.
🔑 Create OAuth Client (Get Your Client ID)
After completing the OAuth Consent Screen, you need to create the actual credentials (the “keys”) that your plugin will use to connect to your Google Drive.
- Click here,

- Or, in the left sidebar, go to Google Auth Platform → Clients. Click the ➕ Create Client button.

(Note: If you don’t see it, refresh the page and make sure you’re in the same project — e.g., “Obsidian Drive Uploader.” 1. Go to APIs & Services → Credentials. 2. Click Create Credentials → OAuth client ID.)
- Choose Application type: “TVs and Limited Input”
- Name it (e.g., “Obsidian Client).
- Click Create.

A popup appears — copy your:
- Client ID
- Client Secret (if shown)

These identify your plugin as “you” when connecting to Google Drive.— copy both of these and save them somewhere safe. You’ll later paste them into your Obsidian plugin’s settings later...
✅ Done!
You’ve now created your OAuth client — the key that lets your Obsidian plugin upload files to your Drive under your account.
🧩 Create an API Key (for backup method)
This key is used by the plugin’s fallback system — in case the standard lh3.googleusercontent.com link doesn’t load (for example, in some corporate or regional Google accounts).
- Use Left Panel: Go back to APIs & Services → Credentials. (Create Credentials → API key)

- How to create your API key (Leave everything as it is):
- Name: You can keep
API key 1or rename it toObsidianBackupKey. - Do NOT check “Authenticate API calls through a service account.”
- Under Application restrictions → None ✅
- Under API restrictions → Don’t restrict key ✅ (That’s important, because the plugin might call both the Drive API and the alt=media endpoint — unrestricted keeps it simple.)
- Name: You can keep
- Click Create.

- Copy the key (looks like
AIzaSy...).

This one is for the alt=media fallback link.
🔗 (Optional) Pick a Drive folder for uploads
-
Create a folder in Drive (e.g.,
Obsidian_Image_Folder). -
Get its ID from the URL (Share Link):
https://drive.google.com/drive/folders/1YA0BxbQ9zNQVKg7q-gNxQsRAayGpdTjn
                                    ^^^^^^^^^^^^^^^^^^^^^^^^^^^^^^^^^^^
Paste
1YA0BxbQ9zNQVKg7q-gNxQsRAayGpdTjninto Target Drive Folder ID in the plugin. -
(Optional) Make the folder “Anyone with the link → Viewer.” The plugin also sets each uploaded file to public (if Make files public is on).
🔮 Step 3 — Install & Connect in Obsidian
- Open Obsidian.
- Go to Settings → Community Plugins → Browse
- Search for “Drive Image Uploader” and install it.
- In Settings → Community Plugins, enable “Drive Image Uploader.”

- Open its Settings tab and fill:
| Field | What to paste |
|---|---|
| Google Client ID | From your OAuth credentials |
| Google Client Secret | (optional) if shown |
| Google API Key | From your API key credentials |
| Target Drive Folder ID | (optional) if you want uploads to a specific folder |
| Make files public | Keep enabled so images render in notes |
Example:
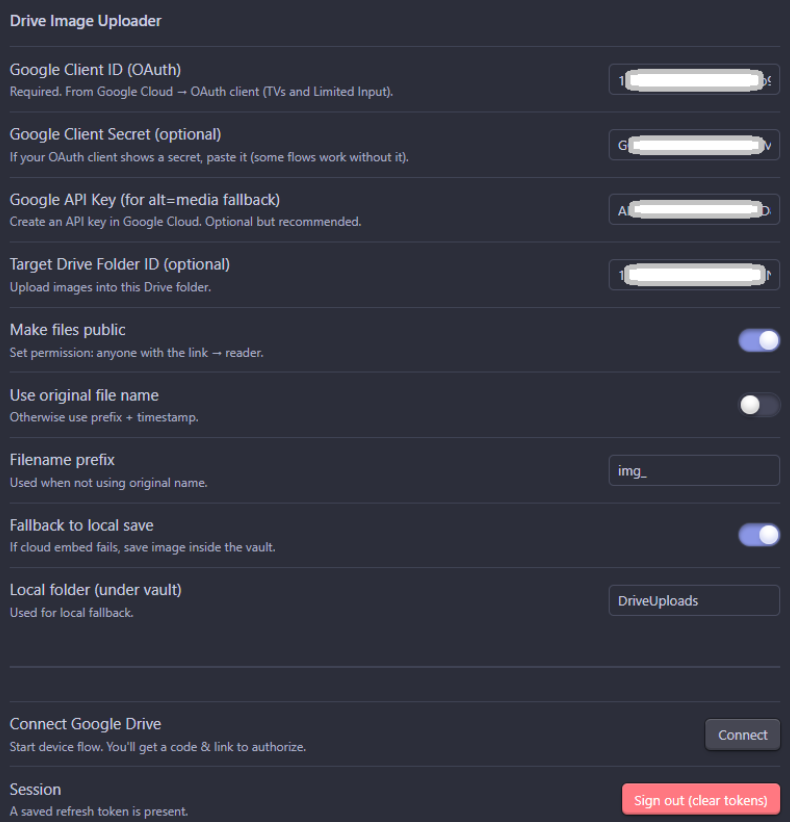
- Click Connect Google Drive.
You’ll see a code and a link — open the link, log in, paste the code, and allow access.


After a few seconds, Obsidian should say:
✅ “Google Drive connected”
🖼️ Step 4 — Test It!
- Open any note.
- Paste an image (Ctrl+V) or drag it in.
- Wait a moment — your note should now contain:

- The image should render inside Obsidian’s preview.
If the upload fails or you’re offline:
- It tries the alt=media link.
- If that fails too, the image is saved locally inside your vault under
DriveUploads/.
🧩 How it Works
| Step | Action | Result |
|---|---|---|
| 1 | You paste or drag an image | Plugin intercepts it |
| 2 | It uploads to Google Drive using your OAuth token | File gets an ID |
| 3 | Plugin makes file public | Anyone can view |
| 4 | It inserts Markdown |  |
| 5 | If that fails | It tries alt=media&key=API_KEY |
| 6 | Final fallback | Saves to local folder |
Paste or drag an image → plugin uploads to Drive → makes it public → inserts

with alt=media and local vault as smart fallbacks.
🧠 Notes & Tips
lh3.googleusercontent.comis Google’s CDN — the same server used by Photos — and works inside Obsidian.alt=mediais Google’s direct-download endpoint. Some corporate accounts blocklh3, so this ensures compatibility.- Local fallback prevents losing pasted images when offline.
- Tokens are stored only inside your Obsidian vault (in
data.json) — keep your vault private. - Public sharing: only the files the plugin uploads are public; your Drive itself remains private.
🧯 Troubleshooting
| Problem | Fix |
|---|---|
| ❌ Image not showing | Try reloading Preview mode |
| ⚠️ "Authorization Error" | Reconnect Google Drive in settings |
| 🚫 “alt=media” not working | Make sure file is “Anyone with the link → Viewer” |
| 🕸️ CORS or iframe errors | Obsidian sandbox mode sometimes blocks certain domains — lh3 should still work |
| 🧱 Nothing happens on paste | Check Obsidian Console: Ctrl + Shift + I → Console for logs |
🔐 Safety & Privacy
- Your Google credentials are stored locally, never sent anywhere else.
- Uploaded files are placed in your Google Drive (your account, your data).
- You can revoke the plugin’s access anytime at
https://myaccount.google.com/permissions
❤️ Credits
- Built using the Obsidian Sample Plugin
- Inspired by early community Imgur uploaders
- Designed for people who want full control over their image hosting
License
MIT – use freely, improve, and share.
For plugin developers
Search results and similarity scores are powered by semantic analysis of your plugin's README. If your plugin isn't appearing for searches you'd expect, try updating your README to clearly describe your plugin's purpose, features, and use cases.