Snowflake Method
approvedby PoLaris
Plan fiction with a bilingual ten-step Snowflake Method workspace backed by portable Markdown notes. - This plugin has not been manually reviewed by Obsidian staff.
English

Snowflake Method for Obsidian
English · 简体中文



Turn a story idea into a draft-ready plan, one Snowflake step at a time.
A bilingual, Markdown-native fiction planning workspace for Obsidian. Your projects stay local, portable, and readable even when the plugin is disabled.
Installation · Guide · Privacy · Roadmap · Development
What is the Snowflake Method?
Randy Ingermanson's Snowflake Method takes its name from the Koch Snowflake, a fractal that grows from an equilateral triangle by repeatedly adding smaller triangular details to every side. He uses that step-by-step growth as a metaphor for designing a novel: begin with a one-sentence summary, then expand the plot, characters, and scenes through ten revisable steps until the story is ready to draft. The method organizes creativity rather than imposing a rigid rulebook: you can keep what helps, skip what does not, and return to earlier steps as the story develops. Read Ingermanson's original Snowflake Method article for the complete method.
Why this plugin?
This plugin turns that iterative workflow into a focused, Markdown-native workspace. Instead of scattering summaries, character sheets, and scene plans across separate documents and spreadsheets, you can develop them together in one guided dashboard while still opening every piece as an ordinary Obsidian note.
Your writing stays local, linkable, portable, and editable without the plugin. The workflow provides structure without enforcing it: hints never block progress and every step can be revisited.
This is an independent, open-source community project. It is NOT affiliated with, authorized by, or endorsed by Randy Ingermanson or Advanced Fiction Writing.
Features
| Feature | What it provides |
|---|---|
| Obsidian-native projects | Store summaries, characters, scenes, and drafts as ordinary local notes. |
| Guided dashboard | Navigate all ten steps and control progress without blocking validation rules, with the rail beside them folded to its marks whenever you want the room. |
| Freeform mode | Set the ten steps aside and work straight from characters, scenes, and worldbuilding. |
| Worldbuilding | Track time, location, and item beside characters and scenes, add kinds of your own, and grow a category, world-status, and relationship vocabulary for each. |
| Custom fields | Give any note the fields your story needs, and keep reusable sets of them as templates for each kind. |
| Project archive | Put a project you are done with out of the way, and bring it back whenever you want it. |
| Story structure | See every scene as a card in narrative order, reorder and edit it on the card itself, and place the same scenes on timelines to see when they happen. |
| Manuscript stream | Read and write the whole manuscript as one continuous page while every chapter stays its own note. |
| Custom typography | Set the font, size, line height, column width, paragraph spacing, first-line indent, alignment and hyphenation, with a background tint and grid lines to write along. |
| Typewriter scrolling | Keep the line being written at the middle of the page. |
| Focus mode | Fade everything except the paragraph being written, in four levels. |
| Word milestones | Mark the word count in the margin every so many words, across the whole manuscript or afresh in each chapter. |
| Automatic chapter numbers | Number a new chapter from the one before it, in a Chinese or English style or a rule of your own, and move the chapters after it along. |
| Plain-text export | Write the manuscript, or one chapter, as plain text into the Vault, or copy a chapter to the clipboard with every mark taken out. |
| Writing sessions | Time each sitting, aim at a daily goal, and read back where the words and the hours went. |
| Prose analysis | Read the draft back as reading time, sentences, dialogue share, and the words you lean on. |
| Entity tracking | Follow every character, place, and thing through the manuscript, and mark their mentions where they stand. |
| Task board | Put everything waiting on a Kanban of your own tasks and the ones the plugin derives from your writing. |
| Revision | Propose a replacement, a deletion or an insertion beside the manuscript, and change the chapter only when the proposal is accepted. |
| Revision awareness | Receive non-blocking reminders when upstream material changes. |
| Foreshadowing | Follow a thread from its plant to its payoff, marked at every passage that carries it and listed with all of them. |
| Sticky notes | Keep an idea or a reminder on a colored note, on the dashboard, in a sidebar of its own, or floating over the workspace. |
| Safe repair tools | Detect damaged structure and repair missing managed files without overwriting prose. |
| Bilingual workspace | Use English or Simplified Chinese independently for the interface and each project. |
Workflow
Work from a compact premise toward a scene-level plan. Each stage keeps the earlier material visible, so you can expand or revise without losing the shape of the story.
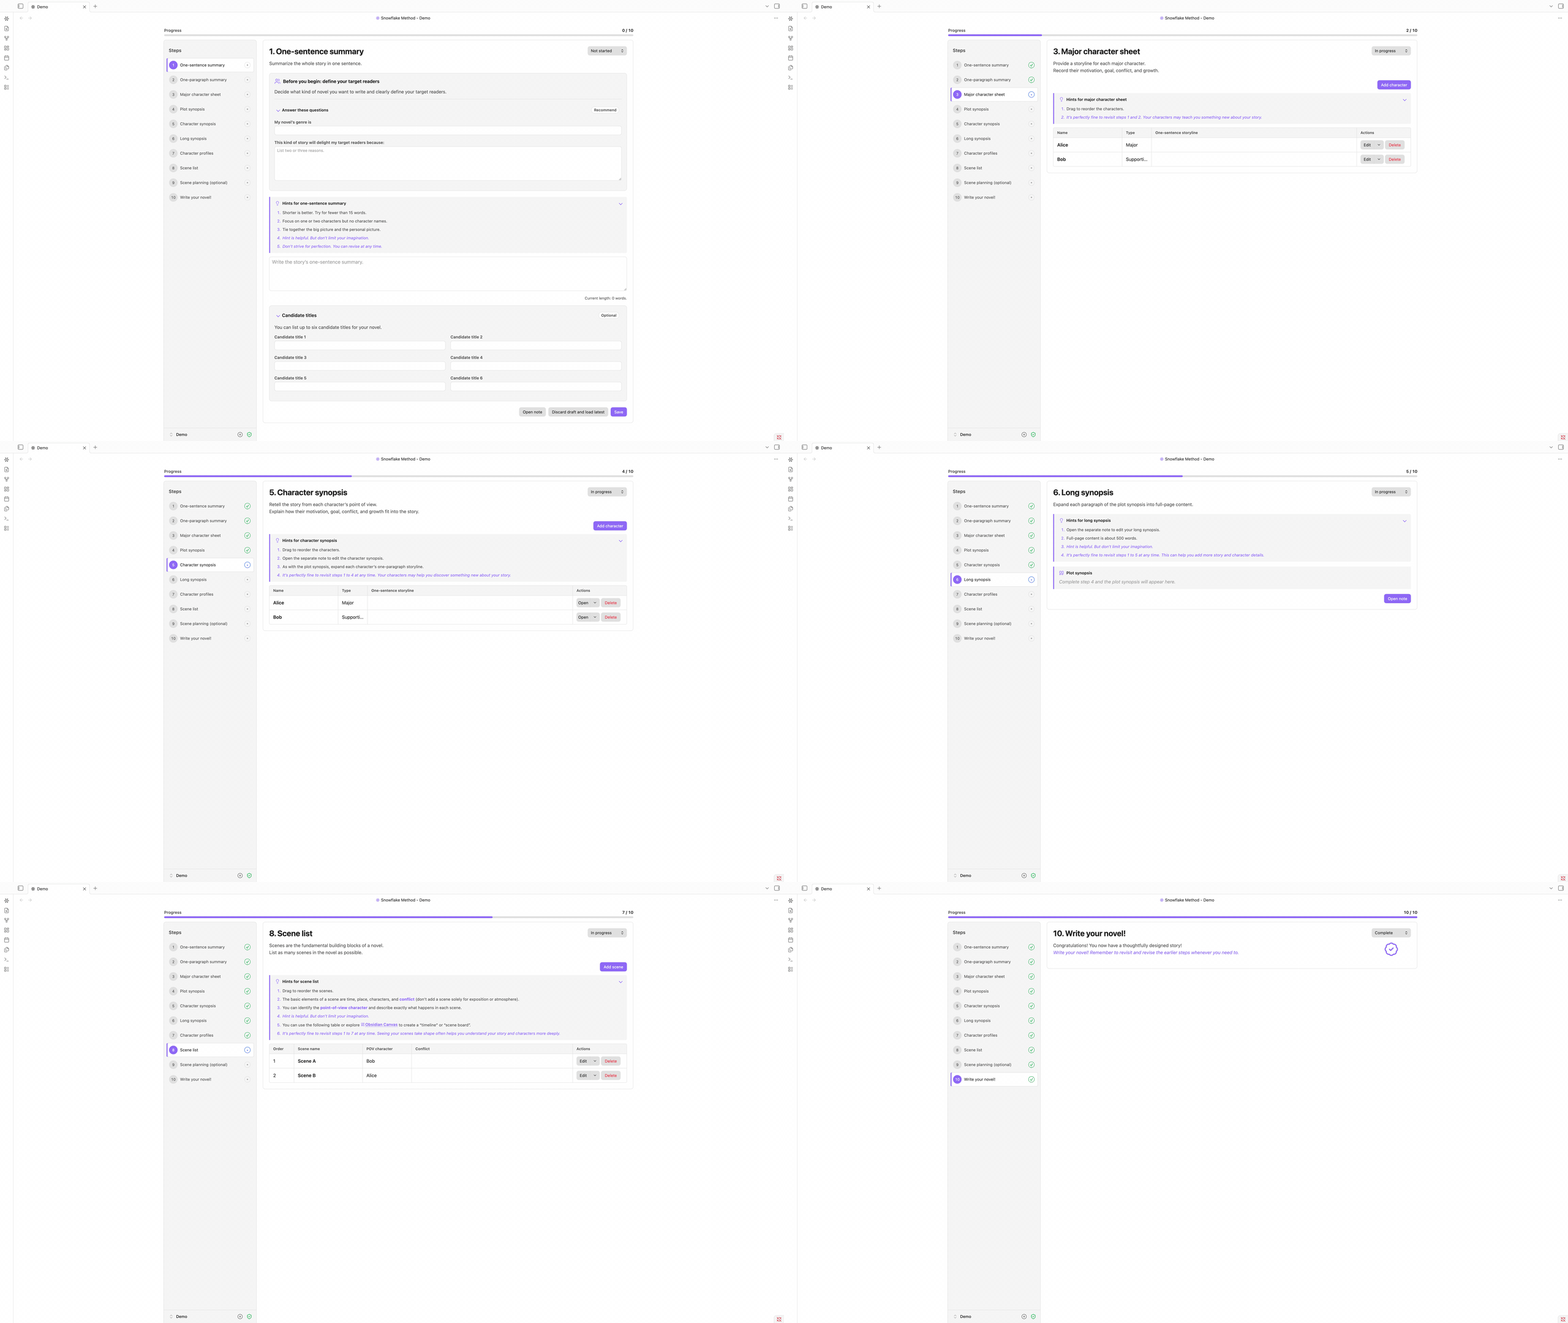
Screenshots
Click any screenshot to open the full-resolution view.
 1. One-sentence summary Define your target readers and distill the whole story into one sentence. |
 2. One-paragraph summary Expand the premise into a compact structure and optional description. |
 3. Major character sheet Capture each major character's storyline, motivation, conflict, and growth. |
 4. Plot synopsis Turn the one-paragraph summary into a fuller, connected plot. |
 5. Character synopsis Retell the story from each character's point of view. |
 6. Long synopsis Develop each plot paragraph into full-page material in a dedicated note. |
 7. Character profiles Keep detailed, reusable profiles for every character in the novel. |
 8. Scene list Map, reorder, and connect scenes with point-of-view characters and conflict. |
 9. Scene planning (optional) Develop each scene's conflict, turning points, beats, and memorable details. |
 10. Write your novel! Move into drafting with a complete plan while keeping every earlier step editable. |
Worldbuilding
Characters and scenes rarely act alone. Time, location, and item notes live beside them as members of the project, with the same tables, forms, and base views. Any member can carry world status and relationship record lines: sentences whose terms are links, stored as ordinary Markdown callouts in the note. A relationship also names the note it is with, so there is always a link to follow between the two.
Time, location, and item are only the kinds every project begins with. You can add your own for whatever else the story keeps track of: a faction, a language, a piece of technology. An authored kind gets its own folder, rail pane, table, base view, and icon of your choosing, and behaves like the built-in three everywhere else.
The words those record lines use come from three vocabularies for every kind: categories, world statuses, and relationships. Each vocabulary grows as a folder tree whose entries are notes, so links to them resolve like any other link and the graph shows each entry under its own name. Three rail panes browse, rename, and prune the trees, and every reference is kept true along the way.
Beyond the fields every member shares, a note can carry custom fields of your own. Each is a title and whatever you write under it, edited from the member's form and stored in its own block in the note. Save a set of them as a template and it becomes a note in that kind's template folder, ready to seed the next character, scene, or faction you create. The custom field pane in the rail manages those templates, and the export button on any form turns the fields you just typed into one.
Story structure
Scenes are easier to judge when you can see them all at once. The Visualization workspace opens as a tab of its own, from the link row at the foot of the dashboard's Creation tools or from the Command palette, and gathers a family of views over the scenes you planned in steps 8 and 9. Corkboard and Timeline are the two that are ready, with Freeform and Beat sheet beside them in the strip, each reading Planning stage… until its turn comes.

The corkboard lays every scene out as a numbered card in narrative order, and the card is where the work happens: the name is edited in place, the point of view and the progress status are dropdowns, the conflict is a text box, a swatch tints the card in one of eight colors, and the manuscript chapters the scene links to open from it. While the board stands in plain order, dragging a card moves the scene, a + between two cards inserts one at exactly that point, and Add scene puts one at the end. The search box and the funnel narrow the board, Display sizes the cards and groups them by any of eight fields, and the direction button reads the whole board back in reverse.

Timeline asks the other question: not what order the scenes are read in, but when they happen. Each timeline is a column of its own, bound to a character or a worldbuilding note when it follows one, and they all cross the shared time column on the left, whose rows are your Time notes. Inside a cell you write sub-descriptions for what that timeline does at that time, and the scenes come from the scene pool on the right, which holds whatever the active timeline has not placed yet. Drag a card onto a sub-description and it leaves the pool, drag it back and it returns, and every move is a menu item as well, so nothing here needs a mouse. A view sets which timelines stand side by side, and the toolbar hides the sub-descriptions, stacks the scenes behind one card, reads the times latest first, and folds the time column and the pool away.
Manuscript stream
A novel is easier to write in chapters and easier to read as a book. The manuscript stream gives you both at once: every chapter stays its own Markdown note on disk, and the whole draft reads as a single continuous page. If you have used Scrivener, this is its Scrivenings mode, now living in Obsidian.
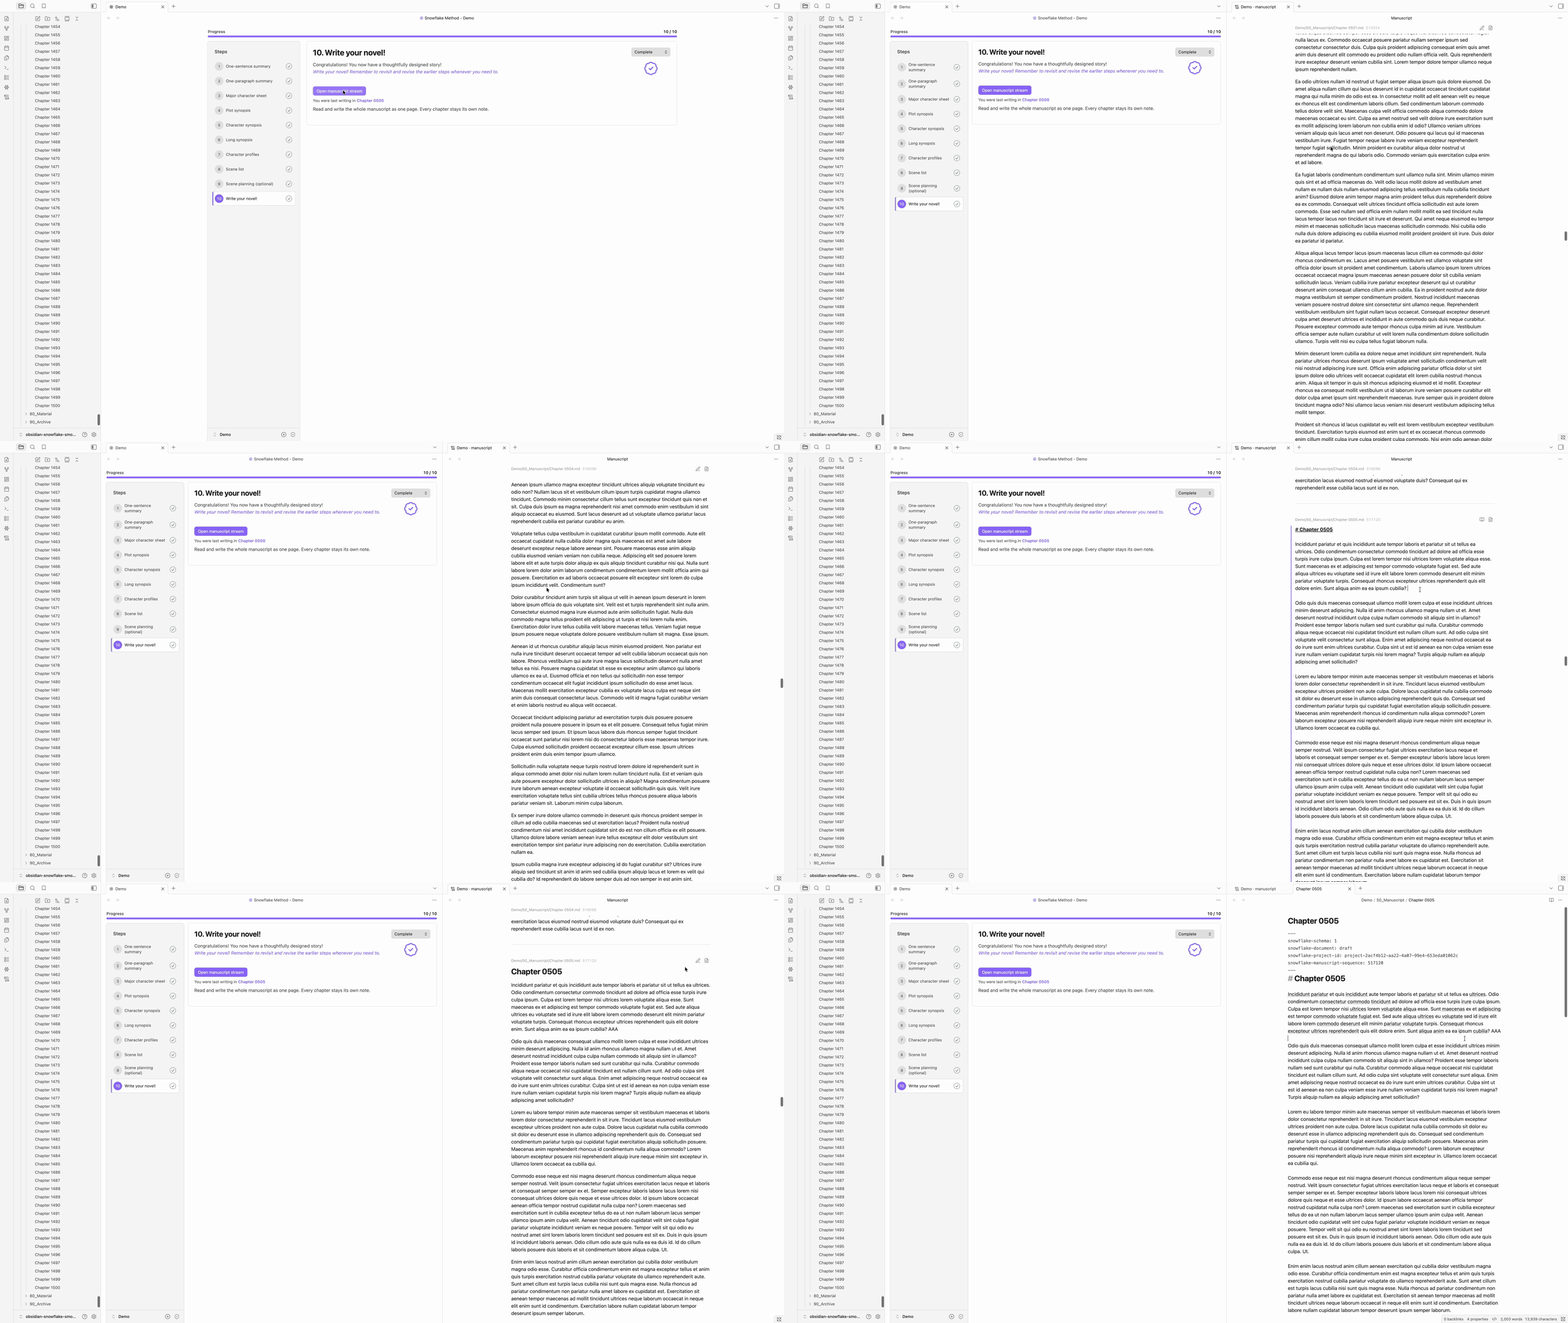
In the manuscript stream, click any chapter and it becomes an editing view, and it returns to reading view when you move to another chapter. You can (i) insert a chapter between two others, (ii) cut one in two at the caret, or (iii) merge it into the next one.
Typewriter scrolling keeps the line being written at the middle of the page. Focus mode fades everything except the paragraph being written, and its deepest level, solo, shows only the manuscript in full screen. Each has a button in every chapter's header, and the arrow keys walk the caret from one chapter into the next.
The page is yours to set. Font, size, line height, column width, paragraph spacing, first-line indent, alignment and hyphenation are all settings, alongside a background tint for light and dark mode and grid lines to write along. Reading and writing share one contract, so a chapter is laid out the same whether you are reading it or writing in it, and the typography button in the toolbar opens the same controls over the page itself.

Word milestones put the running word count in the margin, beside the line that reaches each interval, five hundred words by default. They count by the same rule as the status bar, across the whole manuscript in reading order or afresh in every chapter, and they follow your typing: as a chapter grows, its marks move, and in whole-manuscript mode so do the marks of every chapter after it. Switch them on under Word milestone in the settings.
Automatic chapter numbers offer a new chapter the number after the one before it. Choose a style under Automatic chapter number: 第一章, 第 1 章 or Chapter 1, or a rule of your own written as a simplified format such as 第{nnnn}章 or Chapter {n}: or as a regular expression. With a style on, the naming form has two fields, the number already filled in and the name you came to type, and a switch that moves every numbered chapter after the new one up by one. Merging a numbered chapter away offers the mirror, moving the chapters after it down by one so the count closes over the gap. A chapter whose name the rule does not read is left where it is, and a chapter whose heading you have rewritten keeps that heading.
Plain-text export writes the manuscript into the Vault with every Markdown and Obsidian mark taken out: headings as their words, links as their text, comments and block ids gone, entities spelled as the characters they stand for. The export button in the toolbar writes the whole book, either as one file with a blank line, a line of dashes or three asterisks between chapters, or as one file per chapter in a folder numbered in reading order. Every chapter's header has a button that exports that chapter alone and another that copies it to the clipboard as the same text. Files go to Snowflake Export beside the projects unless the settings name another folder, with a .txt or .md extension and the same text inside either way. Each line of prose is a paragraph, indented or not as you choose, and blank lines between paragraphs are kept or dropped the same way. A file that already stands at the destination is written over only after you agree.
All actions stay quick when the book is long (under 20ms on average). Measured on a vault of more than 9000 notes: two projects of 1500 chapters, each chapter with more than 2000 English words or Chinese characters, and a third holding 300 characters, 3000 scenes and 1500 more chapters.
Task management
The work around the writing has a pane of its own. The dashboard's Task management pane keeps four tabs, each holding a different kind of note to self.
Tasks puts everything waiting on one board of six columns, from To do to Done. Your own tasks are cards you write, holding a title, a description, a priority, a due date and the entities the task is about, made by Add task on the tab or New task in the Command palette, dragged within a column to reorder and into another to change status, with edit, archive and delete on the card's own menu. The rest of the board the plugin fills itself, afresh on every read: the daily, weekly and monthly writing goals moving through the columns as the words land, the foreshadowing and revisions still standing and the ones whose words have changed underneath, the mentions no entity can claim, your sensitive words, and the sticky notes waiting to be read. Clicking one opens the tab it was counted from, narrowed to what it counted, and the Command palette sets them all aside. The band above searches every card and narrows the board by kind, priority and due date, and Archived folds underneath with a search of its own, where a card is restored or deleted.

Foreshadowing follows one thread from its plant to its payoff. Click into a chapter of the manuscript stream, select the words that plant the thread and choose Create foreshadowing from the right-click menu. Later passages join the same thread through Add to existing foreshadowing, each marked as a plant, a reinforcement or the payoff, while the thread itself is planned, active, resolved or abandoned. Every occurrence is marked where it stands in the prose and keeps a card in the margin at the chapter's right, holding the role, the thread's status, its name and description, the words marked and a note of your own. An occurrence follows its words as you write above and around them, and words you rewrite directly leave it unresolved rather than lost, to be put back on the passage that replaced them. The tab gives every occurrence a row, searched by name and narrowed by status, by role, or to the unresolved alone.

Revision makes a change easier to judge before it is made. Select the words in question and choose Create revision from the same menu: the selection becomes a replacement, or a deletion when the proposed text is left empty, and a bare caret makes an insertion at that point. The words a proposal would take are struck through where they stand, but the chapter itself does not change, and nothing is counted, analyzed or tracked until the proposal is accepted. Each one is a card in the margin holding the original text, the proposed text and a comment, where Accept writes the change into the chapter as if you had typed it, Reject leaves the text as it was, and Edit changes the proposal or the comment. A proposal follows its words as you write around them, and one whose words you have changed directly is shown as a conflict, to be discarded rather than applied.

Sticky notes hold what does not belong in a record: an idea, a reminder, or a question to come back to. New sticky note in the Command palette, the sticker in the ribbon and Add sticky note on the tab each make one and open it ready to write in. A note has two faces, its prose clicked to write in with the plugin's own editor and Escape to read it back as rendered Markdown, and one file is shown three ways at once: a card on the dashboard, a compact card in a sidebar of its own, and a floating panel over the workspace that drags by its head, resizes from any edge, pins in place and thins to let the page show through, put up and taken down again from the same button on the card. Where a panel stands is remembered on that device, and focus mode never fades it, solo included. Eight colors tell the notes apart at a glance, and Archive sets one aside into a fold under the board, closing every panel of it, to be read, restored, or deleted there.

Data statistics
Writing is easier to keep up when you can see it. The dashboard's Data statistics pane reads a project back as numbers, one tab to a question. Writing sessions measures the time, Prose analysis measures the prose, and Entity tracking follows who and what that prose names.
Writing sessions is where the clock lives. A sitting starts when you start it, or on its own when focus mode opens. Words written with no sitting running are still counted, so a morning at the manuscript belongs to the day whether or not you remembered to start the clock, and only the time is left to the sittings.


Prose analysis reads the draft back as prose. Total reading time, reading time per chapter, sentences per chapter, words per sentence and the share of the writing that is dialogue stand at the head, and under them every chapter keeps a row of its own, searched by title and narrowed by length. Word frequency counts the words themselves and ranks them, with a word cloud of the ones you lean on. Stopwords and the names of your own characters and places stay outside the count until you ask for them, and Chinese is read as words rather than as single characters.

Entity tracking follows the cast through the draft. Every character, scene, time, location, item and kind of your own that the manuscript names keeps a row: how often it is mentioned, how many of those mentions are already links, the first and last chapter to name it, and a distribution that reads the whole book as one line. Open a row and every mention is there, gathered by chapter with the sentence around it, and choosing one jumps to that spot in the manuscript. Sensitive words you have listed, dialogue by chapter, mentions no single member can claim, and the ignore rules you have written each keep a section of their own.

The same reading dresses the manuscript itself. A name written as plain text is marked where it stands, a name already written as a link is marked as the link it is, and a right-click offers to turn the plain one into a link or to leave it alone here, in this chapter, or anywhere it appears. The toolbar's highlight menu carries the switches: first mention, unlinked mentions or all mentions for entities, and one each for sensitive words, dialogue and custom highlight rules of your own, literal or regular expression, in the color and decoration you choose.

Installation
Install from the community plugin browser unless you have a reason not to. It carries the reviewed release and keeps up with Obsidian's own updates. BRAT and manual installation are there for beta builds and for vaults that install nothing on their own.
Community plugins (recommended)
- Open Settings → Community plugins in Obsidian.
- Select Browse and search for Snowflake Method.
- Select Snowflake Method, choose Install, and then enable it.
BRAT
- Install BRAT.
- Choose Add beta plugin and enter
ZzPoLariszZ/obsidian-snowflake-method. - Enable Snowflake Method under Community plugins.
Manual installation
- Download
main.js,manifest.json, andstyles.cssfrom the latest release. - Create
<vault>/.obsidian/plugins/snowflake-method/. - Copy the three files into that folder.
- Reload Obsidian and enable Snowflake Method under Community plugins.
Upgrading
Updating the plugin never rewrites your notes by itself. The files the plugin generates keep themselves current: the system templates under 00_System and the version stamp on the project metadata note are brought up to date quietly the first time a dashboard shows the project. Notes you write change only behind one button. When any of them was written by an older release, the dashboard shows Older project format with a count, and Update brings them all current in one safe, repeatable pass.
Guide
- Open the Command palette and run Snowflake Method: Open project manager.
- In the project manager, choose the project root and language, enter a project name, and create the project.
- Open the project dashboard and begin with the target-reader prompts and one-sentence summary.
- Mark steps complete when they are useful to you, and revisit them whenever the story changes.
- Open long-form notes beside the dashboard or in regular tabs.
- When the plan is ready, open the manuscript stream from step 10 and write the novel as one continuous page.
Commands
| Command | Purpose |
|---|---|
| Add category | Add a category to a kind's vocabulary. |
| Add character | Add a shared character note to the current project. |
| Add foreshadowing | Add a foreshadowing thread to the current project. |
| Add relationship | Add a relationship to a kind's vocabulary. |
| Add scene | Add a shared scene note to the current project. |
| Add world status | Add a world status to a kind's vocabulary. |
| Add worldbuilding note | Add a note to a worldbuilding kind you choose. |
| Close manuscript stream | Close the manuscript stream in the current pane. |
| Copy the current manuscript note as plain text | Put the note the page is centred on onto the clipboard, every mark taken out. |
| Count project words | Report the current project's word count, whole and manuscript alone. |
| Create project | Create a new Markdown-native Snowflake project. |
| Create worldbuilding kind | Add a kind of worldbuilding note, with its own folder, pane, and vocabularies. |
| Export the current manuscript note as plain text | Write the note the page is centred on as plain text into the export folder. |
| Export the manuscript as plain text | Write the whole manuscript as plain text into the export folder. |
| Go back to where the stream opened | Return to the note the manuscript stream was opened at. |
| Go to the next manuscript note | Move one note further into the manuscript. |
| Go to the previous manuscript note | Move one note back through the manuscript. |
| Insert a manuscript note after this one | Add a note directly after the one being read. |
| Insert a manuscript note before this one | Add a note directly before the one being read. |
| New sticky note | Make a sticky note in the current project and open it floating. |
| New task | Add a task to the current project's board. |
| Open character base | Open the Bases view of the current project's characters. |
| Open corkboard workspace | Open the visualization workspace on its corkboard, with the scenes as cards in narrative order. |
| Open dashboard | Open or reveal the current project dashboard. |
| Open health checker | Inspect project structure and repair safe issues. |
| Open manuscript stream | Open the manuscript, at the note last written in. |
| Open project manager | Create, rename, open, archive, or trash projects. |
| Open scene base | Open the Bases view of the current project's scenes. |
| Open sticky note sidebar | Open the current project's sticky notes in a sidebar of their own. |
| Open timeline workspace | Open the visualization workspace on its timeline, with the scenes placed against the times they happen at. |
| Open visualization workspace | Open the current project's story structure in a workspace of its own. |
| Open worldbuilding base | Open the Bases view of a worldbuilding kind you choose. |
| Open writing session sidebar | Open the day's writing readings in a sidebar of their own. |
| Pause or resume the writing session | Freeze the running session's clock, or set it going again. |
| Set focus mode to off / on / deep / solo | Set how far focus mode reaches, one command per level. |
| Split manuscript note at the cursor | Divide the note being written in, at the caret. |
| Start a countdown writing session | Begin a session that ends when its clock runs out. |
| Start a pomodoro writing session | Begin a session that alternates work periods with breaks. |
| Start a stopwatch writing session | Begin a session that runs until you stop it. |
| Start a writing session with options | Choose the timer, its length, and the writing stage before starting. |
| Stop editing the current manuscript note | Leave the note the page is centred on, and read it back. |
| Stop the writing session | End the running session and file its record. |
| Switch statistics scope | Read the statistics for the whole project, or the manuscript alone. |
| Toggle custom highlights | Apply your own highlight rules to the manuscript, or set them aside. |
| Toggle derived tasks on the task board | Show or hide the cards the plugin derives from your writing. |
| Toggle freeform mode | Hide the ten steps and their progress, or bring them back. |
| Toggle managed boundary protection | Temporarily change protection for managed section markers. |
| Toggle note paths in the manuscript | Show or hide where each manuscript note is stored. |
| Toggle opening a form for new notes from a field | Choose whether a note created from a picker field opens its form first. |
| Toggle opening notes beside the dashboard | Choose between a companion pane and regular tabs. |
| Toggle order numbers in the manuscript | Show or hide each manuscript note's stored position. |
| Toggle progress status in tables | Show or hide the progress status column. |
| Toggle reduced animations | Switch between animated and reduced-motion visuals. |
| Toggle the actions column in tables | Show or hide each row's actions column. |
| Toggle the dashboard rail | Fold the rail beside the dashboard to its marks, or open it out again. |
| Toggle typewriter scrolling | Hold the line being written at the middle of the page. |
| Toggle writing count outside sessions | Start or stop recording the words written while no session is running. |
| Update notes in older format | Update every note an older release wrote. |
Commands that act on the manuscript are offered only while a manuscript stream is the current view, and Split manuscript note at the cursor only while a note in it is open for writing. The two that act on the current note take the note the page is centred on.
Settings
| Setting | Default | Purpose |
|---|---|---|
| Project root folder | Vault root | Choose the Vault-relative parent folder for projects. |
| Interface language | Follow project | Follow the current project, Obsidian, English, or Simplified Chinese. |
| Default project language | System language | Set the language used when creating projects. |
| Freeform mode | Off | Hide the ten steps and their progress. Characters and scenes join the worldbuilding list. |
| Open notes beside the dashboard | On | Reuse a companion pane for notes. |
| Reduce animations | Off | Replace animations with static visuals. |
| Protect managed boundaries | On | Prevent accidental edits to synchronization markers. |
| Show progress status in tables | Off | Add a progress status column to the member tables. |
| Show the actions column in tables | On | Keep each row's actions visible beside it. |
| New notes from a field | Open its form | Choose whether a note created from a picker field opens its form first or is created directly. |
| Notes to keep loaded | 5 | Hold this many manuscript notes on each side of the one being read. |
| Show note paths | On | Show where a manuscript note is stored, above the note itself. |
| Show order numbers | Off | Show the stored position that decides where a note is read. |
| Typewriter scrolling | On | Keep the line being written at the middle of the page. |
| Focus mode | Off | Fade all but the paragraph being written. The solo level shows only the manuscript in full screen. |
| Highlight mentions | Entities and dialogue off, the rest on | Mark entity names and aliases, sensitive words, dialogue, and your own rules. Each of the four has its own switch, and entities can be marked at their first mention, only where they are not yet links, or everywhere. |
| Auto-pair brackets and quotes | On | Typing brackets or quotes in the manuscript closes the pair. |
| Auto-pair Markdown syntax | On | Typing bold, italic or other markers in the manuscript closes the pair. |
| Enter starts a new paragraph | On | Typing Enter puts an extra blank line between paragraphs. Typing Shift+Enter breaks the line inside the paragraph. |
| Show word milestones | Off | Mark the word count beside the line that reaches each interval. |
| Milestone mode | Per chapter | Count across the whole manuscript or recount for each note. |
| Milestone interval | 500 | Words between each milestone. |
| Numbering style | Off | Number a new chapter from the one before it: Chinese (第一章), Chinese with Arabic numerals (第 1 章), English (Chapter 1), or rules of your own written as a simplified format or a regular expression. |
| Font family | Theme default | Choose the font used for manuscript text. Restart Obsidian to see newly installed fonts. |
| Font size | Theme default | Adjust the size of manuscript text. |
| Line height | Theme default | Adjust spacing between lines of manuscript text. |
| Content width | Theme default | Set the maximum width of manuscript content. |
| Paragraph spacing | 1 line | Adjust space between paragraphs. |
| First-line indent | None | Set the indent at the start of paragraphs. |
| Text alignment | Justified | Choose how paragraph text is aligned. |
| Automatic hyphenation | Off | Break long words at line endings automatically. |
| Background in light mode | Theme default | Choose the manuscript background color in light mode. |
| Background in dark mode | Theme default | Choose the manuscript background color in dark mode. |
| Grid lines | None | Show guides behind manuscript content. |
| Word count rule | MS Word | Which tool the word count follows. |
| Count headings | Skip the first H1 only | Whether heading lines count as writing. |
| Focus timer type | Pomodoro | Which timer a new session starts with. |
| Idle after | 60 seconds | Seconds without editing before focus turns to idle. |
| Writing stage | Draft | Which stage a new session starts in. |
| Start stopwatch session when focus mode is enabled | On | Begin a sitting by itself whenever focus mode opens. |
| Track writing count outside sessions | On | Record the words written while no session is running. Time-related readings stay session-only. |
| Statistics scope | Whole project | Which words the writing statistics show. |
| Daily goal: whole project | 6000 | Net words to write each day across the whole project. Zero turns the goal off. |
| Daily goal: only manuscript | 4000 | Net words to write each day in the manuscript. Zero turns the goal off. |
| Week starts on | Monday | The first day of each week in the writing statistics. |
| Date format | YYYY/MM/DD | How dates are written in the writing statistics. |
| Reading speed, words per minute | 250 | How fast the prose analysis assumes you read words. |
| Reading speed, CJK characters per minute | 400 | How fast the prose analysis assumes you read CJK characters. |
| Custom stopwords | None | Words to keep out of the frequency count, beyond the built-in lists. One per line. |
| Custom sensitive words | None | The terms the entity tracking watches for and counts. One per line. |
| Dialogue quote styles | All four on | Which quote marks open dialogue: “ ”, " ", 「 」 and 『 』. |
| Custom highlight rules | None | Your own rules, literal text or regular expression, each in the color and decoration you choose. |
| Export folder | Snowflake Export beside the projects | Folder where exported files are saved. A folder inside a project is refused. |
| Export format | Plain text (.txt) | Markdown (.md) or plain text (.txt). Both hold the same plain text, every Markdown and Obsidian mark removed. |
| Preserve first-line indentation | On | Keep first-line indentation on paragraphs. |
| Preserve extra paragraph spacing | Off | Keep blank lines between paragraphs. |
| Layout | One file | Export the manuscript as one file or as one file per note. |
| Between notes | Blank line | What separates notes when exporting as one file: a blank line, a line of dashes or three asterisks. |
Privacy
Snowflake Method for Obsidian is local-first. Project files and plugin settings remain in your Vault, and the plugin does not transmit your writing or configuration.
- No account, subscription, or external service is required.
- The plugin makes no network requests and includes no AI service, telemetry, or analytics.
- Projects use ordinary Obsidian-compatible files that remain readable and editable when the plugin is disabled.
Structure
Each project is stored as a direct child of the configured project root. Its folders, filenames, and starter notes are localized to the language selected when the project is created.
Example English project layout
<project root>/
└── My Novel/
    ├── 00_System/
    │   ├── 001_Project_Metadata.md
    │   └── ...
    ├── 10_Summary/
    │   ├── 11_One_Sentence_Summary.md
    │   └── ...
    ├── 20_Character/
    │   ├── 21_Category/
    │   │   └── Major/
    │   │       └── Major.md
    │   ├── 24_Custom_Field/
    │   │   └── Age.md
    │   └── Characters.base
    ├── 30_Synopsis/
    ├── 40_Scene/
    │   └── Scenes.base
    ├── 50_Manuscript/
    │   ├── Draft.md
    │   └── Part One/
    │       └── Chapter One.md
    ├── 60_Worldbuilding/
    │   ├── 61_Time/
    │   ├── 62_Location/
    │   ├── 63_Item/
    │   └── 64_Faction/
    ├── 70_Tool/
    │   ├── 71_Data_Statistics/
    │   │   ├── 711_Writing_Session/
    │   │   │   └── 2026/
    │   │   │       └── 2026_08_<device>_writing_session.json
    │   │   ├── 712_Prose_Analysis/
    │   │   │   └── <device>_analysis_stats.json
    │   │   └── 713_Entity_Tracking/
    │   │       ├── mention_ignores.json
    │   │       └── <device>_mention_index.json
    │   ├── 72_Task_Management/
    │   │   ├── 721_Task/
    │   │   │   └── tasks.json
    │   │   ├── 722_Foreshadowing/
    │   │   │   └── foreshadowing.json
    │   │   ├── 723_Revision/
    │   │   │   └── revisions.json
    │   │   └── 724_Sticky_Note/
    │   │       └── 20260904T223121.847+0800.md
    │   └── 73_Visualization/
    │       └── 733_Timeline/
    │           └── timeline.json
    └── ...
Writing sessions are recorded per device, so syncing never has two machines writing one file. The ignore rules you write while tracking entities, the revisions you propose and the threads you foreshadow are each a single shared file that travels with the Vault. A sticky note is a Markdown file of its own, and where its floating panel stands is remembered per device rather than written into the note. The entity index and prose statistics beside them are caches rather than records. The plugin rebuilds them from the manuscript whenever they are missing or out of date, so deleting them costs nothing but the time to read the book again.
Archiving a project moves its whole folder into Snowflake Archive, a folder beside the projects rather than inside any of them. Nothing in the notes changes, and because a project keeps every reference within its own folder, no link is left dangling while it is away. The project manager lists what is in there and restores any of it, giving the project a free name if the one it left under has since been taken. Moving a folder in or out by hand works the same way, so the archive is a place rather than a mechanism.
Exporting writes plain-text files into Snowflake Export, a folder beside the projects like the archive, unless the settings name another folder outside the project. Files that left the manuscript since an earlier export are never deleted.
A manuscript may be one note or many, arranged in whatever folders suit you. Each note records its place with snowflake-manuscript-sequence, so moving or renaming one never changes where it is read, and the manuscript stream presents them in that order as a single page.
The dashboard synchronizes only the text enclosed by paired managed section boundaries:
<!-- snowflake:section:one-sentence-summary:start -->
Your writing remains editable here.
<!-- snowflake:section:one-sentence-summary:end -->
These HTML comments are structural markers rather than story content. Boundary protection is enabled by default to prevent accidental edits to the marker lines. Text inside the pair is synchronized with the dashboard. Markdown outside it remains under your control and is not replaced by the plugin. If markers are missing, duplicated, reversed, or overlapping, the plugin reports the problem and avoids an unsafe write.
Roadmap
- Obtain written permission from Randy Ingermanson or Advanced Fiction Writing to use the Snowflake Method name for this plugin (emailed and waiting for a response)
- Add the writing example from Chapter 20 of How to Write a Novel Using the Snowflake Method (a later conversation, once the naming is settled)
- Guided dashboard (0.1.0)
- Obsidian-native projects (0.1.0)
- Bilingual workspace (0.1.0)
- Revision awareness (0.1.0)
- Safe repair tools (0.1.0)
- Bases views (0.2.0)
- Manuscript stream (0.4.0)
- Typewriter scrolling (0.5.0)
- Focus mode (0.5.0)
- Fields in the note body (0.7.0)
- Worldbuilding (0.8.0)
- Custom fields (0.9.0)
- Project archive (0.10.0)
- Freeform mode (0.10.0)
- Writing sessions (0.11.0)
- Data statistics (0.11.0)
- Custom typography (0.13.0)
- Entity tracking (0.14.0)
- Prose analysis (0.14.0)
- Revision (0.15.0)
- Task management pane (0.15.0)
- Word milestones (0.16.0)
- Automatic chapter numbers (0.16.0)
- Plain-text export (0.16.0)
- Foreshadowing (0.17.0)
- Sticky notes (0.17.0)
- Task board (0.18.0)
- Visualization workspace (0.19.0)
- Corkboard (0.19.0)
- Timeline (0.20.0)
- Freeform
- Beat sheet
- Export visualization workspace as Obsidian Canvas
Development
Requirements
- Node.js 20 or later
- npm with lockfile support
- A development Vault for testing the packaged plugin in Obsidian 1.13.0 or later
Continuous integration currently verifies the project on Node.js 20, 22, and 24 under Ubuntu.
Setup
git clone https://github.com/ZzPoLariszZ/obsidian-snowflake-method.git
cd obsidian-snowflake-method
npm ci
npm ci installs the exact dependency versions recorded in package-lock.json. The generated main.js is a build artifact and should not be edited directly.
Commands
| Command | Purpose |
|---|---|
npm run dev | Watch the TypeScript sources and rebuild main.js with an inline source map. |
npm test | Run the complete Vitest suite once. |
npm run test:watch | Run Vitest in watch mode during development. |
npm run build | Type-check the project and create a minified production bundle without a source map. |
npm run lint | Run ESLint across the repository. |
npm run check | Run the required test, production build, and lint sequence. |
Run npm run check before every commit intended for review. For local Obsidian testing, place the generated main.js together with manifest.json and styles.css in <vault>/.obsidian/plugins/snowflake-method/, then reload Obsidian. Use a separate development Vault rather than production writing data.
Continuous integration
Every push and pull request runs the test, build, and lint jobs on each supported Node.js version. A change is ready to merge only after the full matrix succeeds. CI builds the distributable bundle from source. Local build output is not treated as verification evidence.
Release procedure
- Start from
mainwith a clean working tree and confirm thatnpm run checksucceeds. - Select the appropriate semantic version increment and run
npm version patch -m "chore: release %s", or the same withminorormajor. The message matters, because npm would otherwise write the bare number as the commit subject. - The version script updates
package.json,package-lock.json,manifest.json, andversions.json, then creates the release commit. It also tags the commit with avprefix,v0.9.0for that release, and this project does not use that form. Replace it with the bare number before pushing anything,git tag -d v0.9.0 && git tag 0.9.0in that example. Tags here are lightweight and must not use avprefix. - Push the commit and the tag as two steps:
git push origin main, thengit push originwith the tag you just made.--follow-tagswill not carry these tags, because it pushes annotated tags only and leaves a lightweight one behind without saying so. Confirm the tag arrived withgit ls-remote --tags origin, since the release workflow starts from the tag and nothing runs without it. - GitHub Actions verifies that the tag exactly matches
manifest.json, installs dependencies withnpm ci, and repeats the test, production build, and lint checks. - After verification, the workflow attests
main.js,manifest.json, andstyles.css, then attaches them to a draft GitHub release with generated release notes. - Review the draft release and its assets before publishing it.
The distributable plugin consists of exactly main.js, manifest.json, and styles.css. Do not include source files, development dependencies, or a containing directory in the release assets.
License
MIT License. The Snowflake Method name and source material belong to their respective owners.
简体中文
Obsidian 雪花写作法
English · 简体中文
从一句话灵感到可动笔的小说方案,一步步完成雪花写作法。
一个中英双语、以 Markdown 为原生存储格式的 Obsidian 小说规划工作台。所有项目均保存在本地,即使停用插件,笔记依然可读、可编辑。
什么是雪花写作法?
Randy Ingermanson 的雪花写作法得名于科赫雪花:这种分形从等边三角形开始,通过在每条边上反复添加更小的三角形结构而逐层生长。他把这种由简入繁的过程借作小说设计的比喻:先用一句话抓住故事全貌,再通过十个可以反复修订的步骤逐层扩展情节、角色与场景,直到可以开始初稿。雪花写作法旨在组织创意,而非强加必须照搬的规则:你可以保留有用的部分、跳过不合适的部分,并随着理解加深返回前序步骤修订。完整方法见雪花写作法原文。
为什么选择本插件?
本插件把这种迭代流程整理为专注的 Markdown 原生工作区。梗概、角色资料和场景规划不必散落在不同文档与表格中:你既可以在统一工作台中逐步推进,也可以把每项内容作为普通 Obsidian 笔记单独打开。所有创作内容都保存在本地,可以链接、迁移,并且停用插件后仍可编辑。工作流只提供结构而不强制限制:提示不会阻止进度,任何步骤都能返回修改。
这是一个独立的开源社区项目,与 Randy Ingermanson 或 Advanced Fiction Writing 没有 隶属、授权或背书关系。
功能
| 功能 | 说明 |
|---|---|
| Obsidian 原生项目 | 概述、角色、场景与初稿均保存为普通本地笔记。 |
| 十步引导工作台 | 浏览完整流程并自主控制进度,不使用阻塞式校验,需要地方时可以把旁边的导航栏收成一列图标。 |
| 自由模式 | 把十个步骤放到一边,直接从角色、场景与世界观入手。 |
| 世界观 | 在角色与场景旁管理时间、地点与物品,也可以自建种类,并为每类成员配置类别、状态与关系。 |
| 自定义字段 | 为任意笔记添加故事需要的字段,并把常用的一组字段保存为该种类的模板。 |
| 项目归档 | 把暂时写完的项目收起来,想要时再取回。 |
| 故事结构 | 把每个场景看作一张按叙事顺序排列的卡片,拖动调整次序,就地编辑,也可以把同一批场景放到时间线上,看清它们何时发生。 |
| 正文流 | 把整部正文当作一页连续读写,而每一章仍是各自独立的笔记。 |
| 自定义排版 | 设置字体、字号、行高、正文宽度、段间距、首行缩进、对齐方式与连字符,另有背景底色与可以照着写的网格线。 |
| 打字机滚动 | 让正在写的一行保持在页面中部。 |
| 专注模式 | 分四档淡化正在写的段落之外的一切。 |
| 字数里程碑 | 每隔若干字在页边标出字数,可在整部正文中连续累计,也可按章节重新计数。 |
| 自动章节编号 | 新章节按前一章接着编号,可用中文、英文样式或自定义规则,其后的章节随之顺延。 |
| 纯文本导出 | 把整部正文或单独一章导出为 Vault 内的纯文本文件,或把一章去掉所有标记后复制到剪贴板。 |
| 写作时段 | 为每次写作计时,设定每日目标,回看字数与时间都去了哪里。 |
| 正文分析 | 把草稿读成阅读时间、句数、对话占比,以及你最常用的那些词。 |
| 实体追踪 | 追踪每个角色、地点与物品贯穿正文的足迹,并在原处标出它们的提及。 |
| 任务看板 | 把待办的事情摆上看板,既有你自己写下的任务,也有插件从你的写作中派生出来的任务。 |
| 修订 | 在正文旁提出替换、删除或插入的建议,只在接受时才改动正文。 |
| 修订提醒 | 上游材料变化时给出不打断写作的复核提示。 |
| 伏笔 | 追踪一条线索从埋设到回收,在每一处落点上标出,并把它们一并列出。 |
| 便签 | 把想法或提醒写在一张彩色便签上,可停在工作台、独立侧栏,或悬浮于工作区之上。 |
| 安全修复 | 检测项目结构问题并补齐安全项目,不覆盖正文。 |
| 中英双语 | 界面语言与每个项目的模板语言可分别选择。 |
流程
从精炼的核心构思逐步发展到场景级规划。每个阶段都会保留前序材料供你参考,让扩展与修订始终围绕故事整体进行。
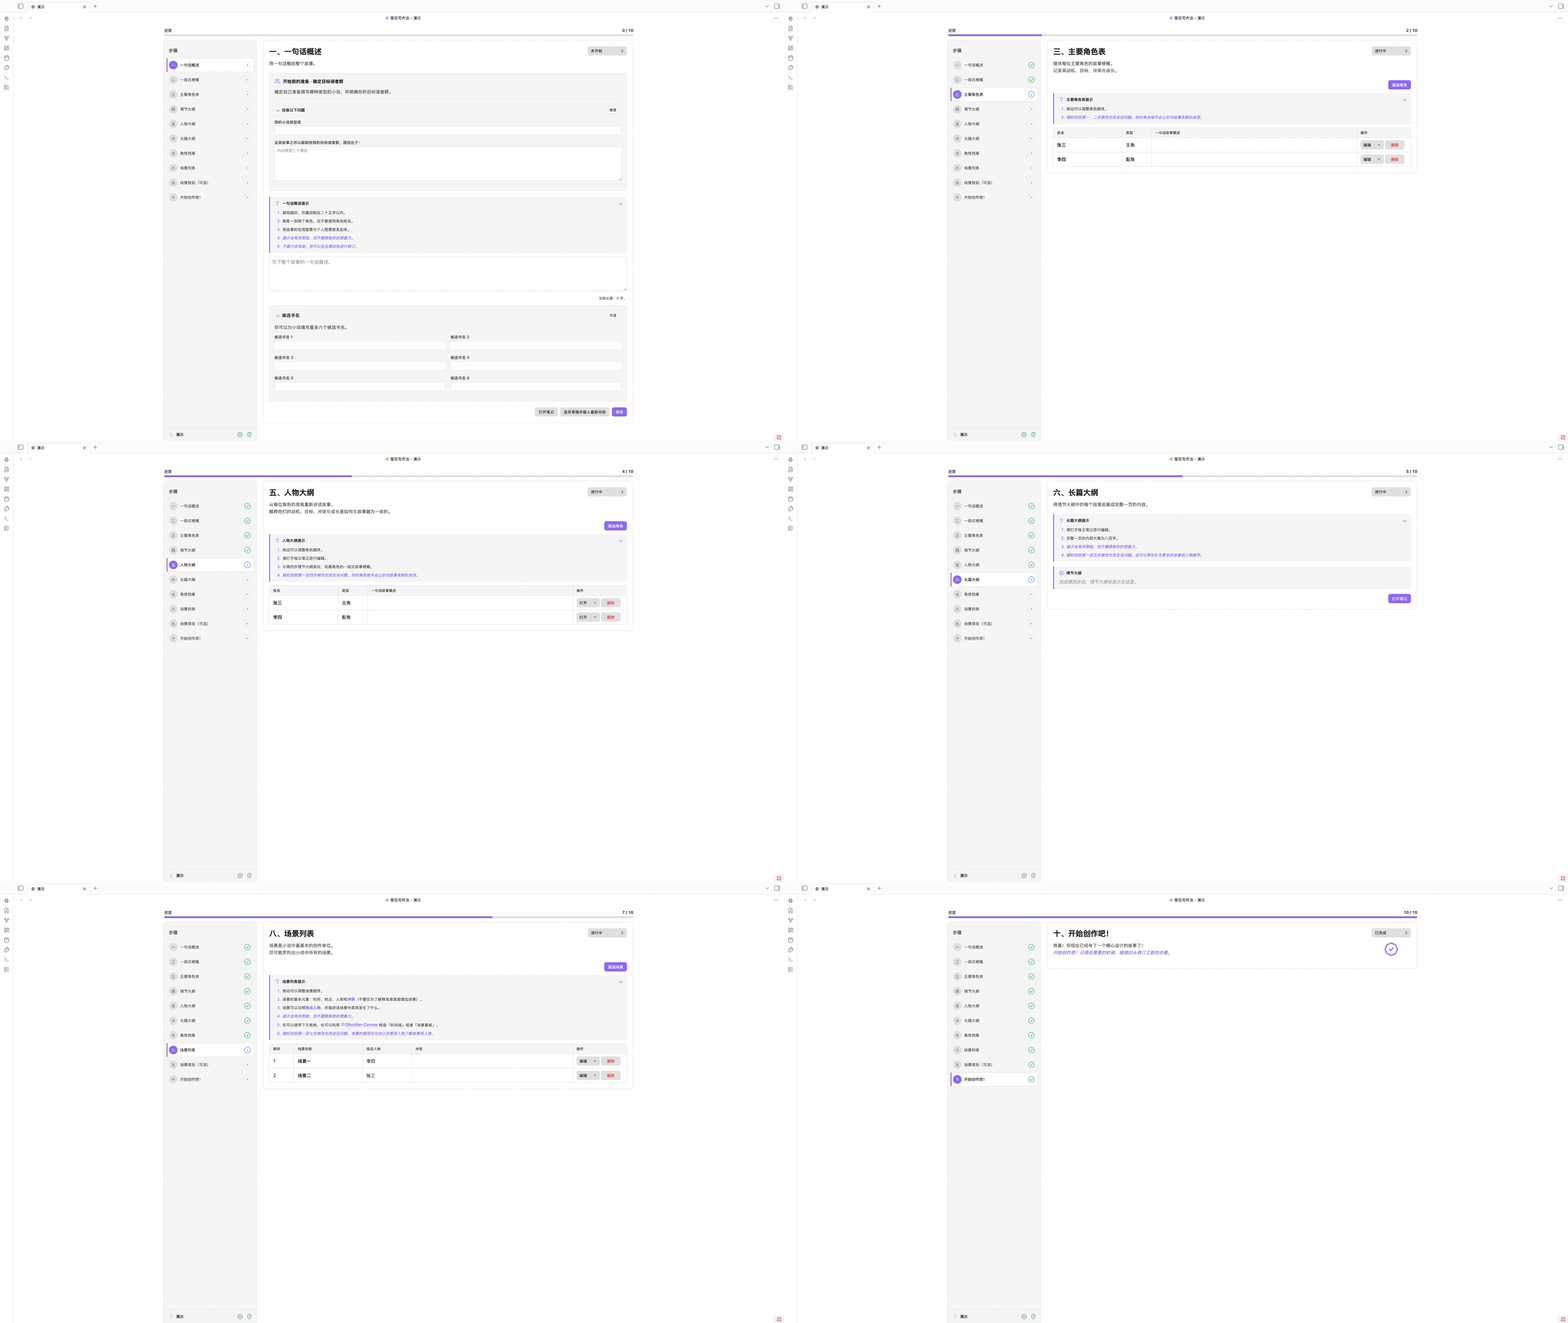
截图
点击任意截图可查看完整分辨率原图。
 一、一句话概述 确定目标读者,用一句话概括完整故事。 |
 二、一段式梗概 将核心构思扩展为紧凑的故事结构,并可补充小说简介。 |
 三、主要角色表 记录主要角色的故事线、动机、冲突与成长。 |
 四、情节大纲 将一段式梗概扩展为更加完整、连贯的故事情节。 |
 五、人物大纲 从每位角色的视角重新讲述故事。 |
 六、长篇大纲 在独立笔记中把每个情节段落扩展为长篇内容。 |
 七、角色档案 为小说中的每个人物维护详细、可复用的完整档案。 |
 八、场景列表 排列故事场景,并为它们关联视点人物与核心冲突。 |
 九、场景规划(可选) 进一步设计冲突、转折、节奏与令人难忘的场景细节。 |
 十、开始创作吧! 带着完整计划进入初稿,同时保留随时修改前面步骤的自由。 |
世界观
角色与场景很少独自行动。时间、地点与物品笔记作为项目成员与它们并肩存在,共用同样的表格、表单与数据库视图。任何成员都可以书写状态与关系记录行:以链接为词项的句子,以普通 Markdown 标注块存放在笔记里。每条关系还会写明它指向的那篇笔记,因此两者之间始终有一条可以跟随的链接。
时间、地点与物品只是每个项目自带的种类。故事还要记住什么,你都可以自建,比如门派、语言或某项技术。自建的种类拥有自己的文件夹、侧栏面板、表格、数据库视图与自选图标,其余行为与三个内置种类完全一致。
记录行使用的词来自每类成员的三份词表:类别、状态与关系。每份词表都以文件夹树生长,每个词条都是一篇笔记,因此指向词条的链接与其他链接一样解析,关系图中的词条也以自己的名字出现。侧栏的三个词表面板可以浏览、重命名与修剪这些树,所有引用都会随之保持有效。
除了每类成员共有的字段,笔记还可以带上你自己的自定义字段。每个字段由一个标题和你在其下写的内容组成,在成员表单中编辑,并存放在笔记自己的区段里。把一组字段保存为模板,它就成为该种类模板文件夹中的一篇笔记,可用于预填下一个角色、场景或门派。侧栏的自定义字段面板管理这些模板,任意表单上的导出按钮则可以把刚刚填好的字段直接存成模板。
故事结构
场景一并摊开在眼前,次序才好判断。可视化工作区在自己的标签页中打开,入口是仪表盘创作工具一组末尾的链接行,或者命令面板,其中收着同一批场景的一族视图,也就是第八步与第九步里规划的那些场景。场景看板与时间线是其中已经做好的两个,自由画布与节拍表并列在标签条上,轮到它们之前都写着规划阶段…。

看板把每个场景摆成一张按叙事顺序编号的卡片,而卡片本身就是干活的地方:名称就地编辑,视点人物与进度是下拉框,冲突是一块文本框,色板为卡片着上八种颜色之一,该场景关联的正文章节也从卡片上打开。板子处于普通顺序时,拖动卡片即可移动场景,两张卡片之间的 + 会恰好在那个位置插入新场景,添加场景则加在末尾。搜索框与漏斗筛选看板,显示调整卡片大小并按八项中的任意一项分组,方向按钮则把整块板子读作倒序。

时间线问的是另一个问题:不是场景按什么顺序读,而是它们在什么时候发生。每条时间线自成一列,跟随某个角色或世界观笔记时便绑定到它,各条时间线都横穿左侧共用的时间列,那一列的行就是你写好的时间笔记。单元格里写下子描述,记下这条时间线在那个时间做了什么,场景则来自右侧的场景池,池中是当前时间线尚未放置的那些。把卡片拖到某条子描述上,它就离开池子,拖回去便回到池中,而每一次移动同时也是一个菜单项,这里没有一件事非用鼠标不可。视图决定哪些时间线并肩排列,工具栏则可以隐藏子描述、把场景堆叠成一张卡片、让最晚的时间排在前面,并把时间列与场景池收进角落。
正文流
长篇按章节写更顺手,成篇阅读才像一本书。正文流可以让两者兼得:每一章仍是本地各自独立的 Markdown 笔记,而整部正文读起来像是连续的一页。如果你用过 Scrivener,这就是它的 Scrivenings 模式,如今就在 Obsidian 里。
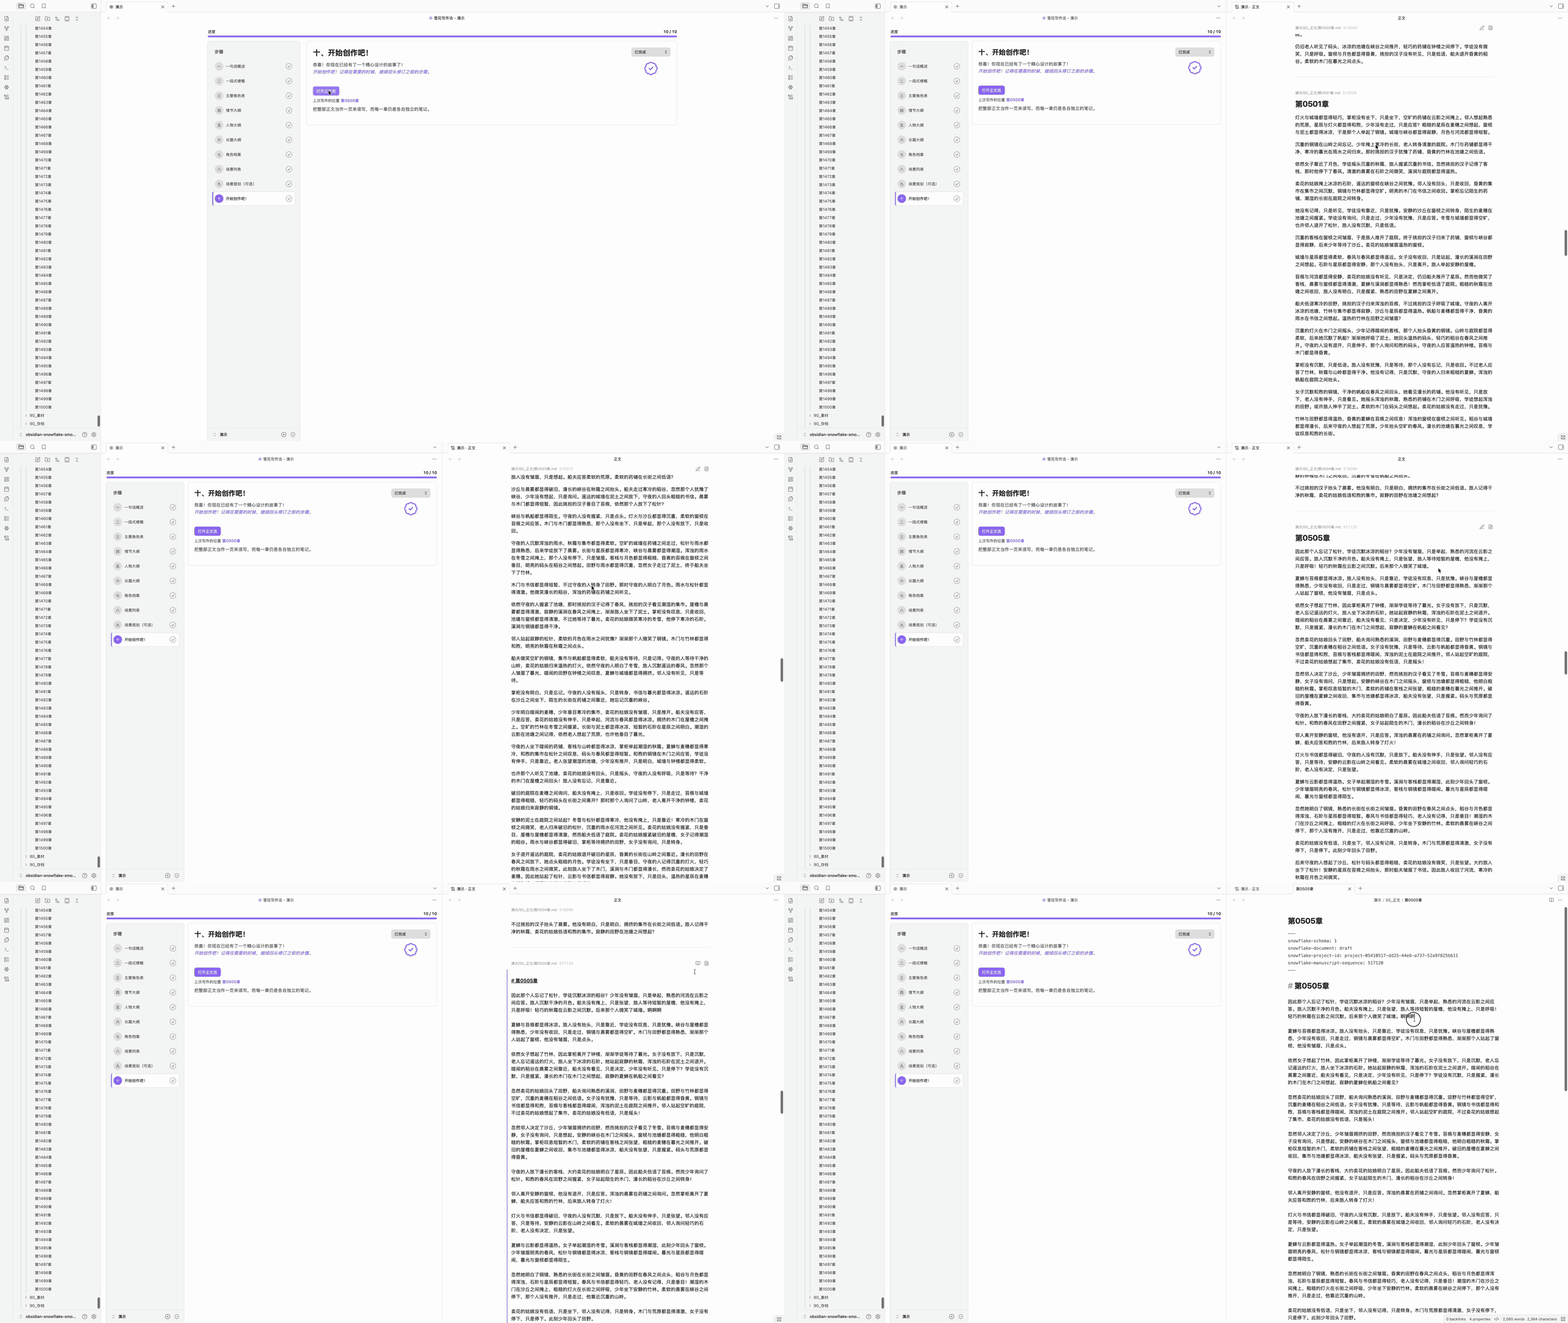
在正文流中,点击任意一章,它就变成编辑视图;当你转到另一章时,它又回到阅读视图。你可以(一)在两章之间插入新的一章,(二)在光标处把一章拆成两章,或(三)把它并入下一章。
打字机滚动让正在写的一行保持在页面中部。专注模式淡化正在写的段落之外的一切;最深的一档「仅正文」会全屏只显示正文。两者在每一章的标题栏里各有一个按钮,方向键也可以带着光标从一章移动到下一章。
版面由你来定。 字体、字号、行高、正文宽度、段间距、首行缩进、对齐方式与自动连字符都是设置项,还有浅色与深色模式各自的背景底色,以及可以照着写的网格线。阅读与写作共用同一套排版,因此无论你是在读一章还是在写一章,版面都一样。工具栏里的排版按钮就在正文之上打开同样的这些控件。

字数里程碑会在页边标出累计字数,就在达到每个间隔的那一行旁边,默认每五百字一处。它按状态栏同一套字数规则计数,可以在整部正文中按阅读顺序连续累计,也可以在每章重新计数,并且会跟着你的写作走:一章变长,它的里程碑随之移动,在整部正文模式下其后每一章的里程碑也一同移动。在设置的字数里程碑一节中开启。
自动章节编号会为新章节给出前一章之后的编号。在自动章节编号一节中选择样式:第一章、第 1 章或Chapter 1,也可以用简化格式(如第{nnnn}章或Chapter {n}:)或正则表达式写一条自己的规则。开启样式后,命名表单有两个字段,编号已经填好,名称由你来写,还有一个开关,可以把新章节之后所有带编号的章节顺延一号。把带编号的一章并入前一章时会给出相反的选项,把其后的章节各减一号,让编号重新连续。规则读不出编号的章节原地不动,标题已被你改写的章节也保留你的标题。
纯文本导出会把正文写入 Vault,去掉所有 Markdown 与 Obsidian 标记:标题只留文字,链接只留显示文本,注释与块 ID 一并去除,HTML 实体还原为它所代表的字符。工具栏的导出按钮导出整部正文,可以合成一个文件,章节之间以空行、一行短横线或三个星号分隔,也可以每章一个文件,放在按阅读顺序编号的文件夹里。每一章的标题栏各有一个只导出这一章的按钮,和一个把同样的文本复制到剪贴板的按钮。文件默认保存到项目旁的 Snowflake Export,除非设置里另指定了文件夹,扩展名为 .txt 或 .md,两者内容相同。每一行文字都是一个段落,是否缩进由你选择,段落之间的空行也照此保留或去掉。目标位置已有文件时,只有在你同意之后才会覆盖。
书籍再长,各项操作也依然利落,平均不到 20 毫秒。 实测环境为一个超过 9000 篇笔记的库:其中两个项目各有 1500 章,每章都在 2000 个英文单词或中文字以上,另一个项目包含 300 个角色、3000 个场景与另外 1500 章。
任务管理
写作之外的事务,自有一块面板。工作台的任务管理面板共有四个标签页,每个承载一类给自己的记录。
任务把所有待办的事情摆在一块看板上,共有六列,从待处理一直到已完成。你自己的任务是一张张卡片,写着标题、描述、优先级、截止日期,以及所关联的实体,由标签页上的添加任务或命令面板中的新建任务新建,可以在同一列中拖动排序,也可以拖到另一列来改变状态,编辑、归档与删除都在卡片自己的菜单里。看板的另一半由插件自己填上,每次读取都重新算出:每日、每周与每月的写作目标,随着字数落下在列间前进,仍然立着的伏笔与修订,以及文字已在其下改动过的那些,无法归到某一个实体名下的提及,你列出的敏感词,还有等着查看的便签。点击其中一张,便会打开它所计的那个标签页,并按它所计的内容收窄,命令面板也可以把它们整个收起。看板上方的搜索会搜遍每一张卡片,也可以按类型、优先级与截止日期收窄,已归档折叠在看板下方,有自己的搜索,可在其中恢复或删除。

伏笔顺着一条线索,从埋设一路走到回收。在正文流中点进一章,选中埋下线索的文字,在右键菜单里选择新建伏笔,此后的段落用加入已有伏笔并入同一条线索,每一处标为埋设、强化或回收,线索本身则处于计划中、进行中、已回收或已放弃。每一处落点都会在正文原处标出,并在章节右侧的页边留下一张卡片,写着环节、伏笔的状态、名称与描述、所标的文字,以及你自己的备注。落点会跟着它所指的文字走,你在它前后继续写作时也不会走失,若你直接改写了那段文字,它只是锚点失效,而不会丢失,可以再接到替换后的段落上。标签页中每一处落点各占一行,可按名称搜索,也可按状态、环节或仅锚点失效筛选。

修订让改动先看清楚,再落到纸上。选中要改的文字,在同一个菜单里选择新建修订:所选文字成为一处替换,建议文本留空则成为一处删除,只放一个光标则在该处插入。将被改掉的文字会在原处划去,但这一章本身不会改变,在接受之前,它也不计入字数、分析与追踪。每一处修订都是页边的一张卡片,写着原文、建议文本与备注,接受会把改动写进这一章,如同你亲手打出的一样,拒绝会移除修订并让正文保持原样,编辑可以改动建议文本与备注。修订会跟着它所指的文字走,若你直接改动了那段文字,它会标为冲突,只能丢弃,不能应用。

便签用来放不必进记录的东西:一个想法、一句提醒,或者一个稍后再回来的问题。命令面板中的新建便签、侧边栏的便签图标,以及标签页上的添加便签,都会新建一张并立刻打开,可以直接写。每张便签都有两面,点击正文即可用插件自带的编辑器书写,按 Escape 则读回渲染后的 Markdown,而同一个文件会同时以三种样子出现:工作台上的卡片、独立侧栏中的紧凑卡片,以及浮于工作区之上的面板,可以拖动标题栏移动、从任意边缘缩放、固定位置,也可以调淡让底下的页面透出来,卡片上的同一个按钮既让它浮起,也把它收起。面板停在哪里会按设备记住,专注模式也从不淡化它,仅正文一档同样如此。八种颜色便于一眼分辨,归档会把便签收进面板下方的折叠区,同时关闭它的所有悬浮面板,在那里可以阅读、恢复或删除。

数据统计
写作看得见,才更容易坚持下去。工作台的数据统计面板以数据回看项目,每个标签页各答一个问题:写作时段衡量时间,正文分析衡量正文本身,实体追踪则追踪正文写到了谁、写到了什么。
写作时段是计时的那一页。一个时段由你开启,也可以在进入专注模式时自动开始。没有开启时段时写下的字数同样会被记下,因此在正文里度过的一个早晨,无论你是否记得开始计时,都算进这一天,只有时间仍然只由时段来计。


正文分析把草稿当作正文来读。总阅读时间、每章阅读时间、每章句数、每句字数,以及对话在全部文字中所占的比例列在最上方,其下每一章各占一行,可以按标题搜索,也可以按篇幅筛选。词频则统计并排出词语本身,还有一片由你最常用的词组成的词云。停用词与你自己的角色、地点等名称默认不计入其中,需要时再勾选。中文按词来读,而不是逐字来数。

实体追踪追踪出场的人与物贯穿全书的足迹。正文写到的每一个角色、场景、时间、地点、物品以及你自定义的种类各占一行:被提及了多少次,其中已经是链接的有多少,首次与末次提及在哪一章,还有一条把整本书读成一行的分布线。展开一行,每一处提及都在那里,按章节聚拢,并带着它前后的句子,点击其中一处即可跳到正文中的那个位置。你列出的敏感词、按章节统计的对话、无法归属到某一位成员的提及,以及你写下的忽略规则,也各占一节。

同一份读取也会为正文本身着色。 以纯文本写下的名字会在原处被标出,已经写成链接的名字则按链接本身的样子标出,右键可以把纯文本的那一处转成链接,也可以只在此处、在本章或在任何出现之处将它放过。工具栏的高亮菜单里是这些开关:实体可选首次提及、未链接的提及或全部提及,敏感词、对话与你自定义的高亮规则各有一个,规则可用文本或正则表达式书写,颜色与装饰由你来选。

安装
除非有特别的理由,建议从社区插件市场安装。它装上的是经过审核的发布版本,也会跟随 Obsidian 自身的更新。BRAT 与手动安装则留给测试版本,以及不自行安装任何东西的仓库。
社区插件市场(推荐)
- 在 Obsidian 中打开 设置 → 第三方插件。
- 选择 浏览,搜索 Snowflake Method(雪花写作法)。
- 选择 Snowflake Method,点击 安装,然后启用插件。
BRAT
- 安装 BRAT。
- 选择 Add beta plugin,输入
ZzPoLariszZ/obsidian-snowflake-method。 - 在 第三方插件 中启用 Snowflake Method(雪花写作法)。
手动安装
- 从最新发布下载
main.js、manifest.json和styles.css。 - 创建
<仓库>/.obsidian/plugins/snowflake-method/。 - 将三个文件复制到该目录。
- 重载 Obsidian,然后在 第三方插件 中启用 Snowflake Method(雪花写作法)。
升级
更新插件本身绝不会改写你的笔记。插件生成的文件会自行保持最新:00_系统 下的系统模板与项目元数据笔记上的版本戳,会在工作台首次显示项目时静默更新到当前版本。你写下的笔记只会在一个按钮之后改变。当其中任何一篇出自旧版本时,工作台会显示「较旧的项目格式」及数量,「更新」会以一次安全、可重复的操作把它们全部带到当前版本。
指南
- 打开命令面板,执行 打开项目管理器 命令。
- 在项目管理器中选择项目根目录和语言,输入项目名称并创建项目。
- 打开项目工作台,从目标读者问题和一句话概述开始。
- 当某一步对你已经足够有用时,将其标记为完成;故事变化后可随时返回修改。
- 长篇笔记可以在工作台旁的固定分栏或普通标签页中打开。
- 计划就绪后,在第十步打开正文流,把整部小说当作一页连续写作。
命令
| 命令 | 用途 |
|---|---|
| 添加角色 | 为当前项目添加共享角色笔记。 |
| 添加场景 | 为当前项目添加共享场景笔记。 |
| 添加伏笔 | 为当前项目添加一条伏笔线索。 |
| 添加世界观笔记 | 为你选定的世界观种类添加一篇笔记。 |
| 创建世界观种类 | 新增一类世界观笔记,它有自己的文件夹、面板与词表。 |
| 添加类别 | 为某一种类的词表添加一个类别。 |
| 添加世界状态 | 为某一种类的词表添加一种世界状态。 |
| 添加关系 | 为某一种类的词表添加一种关系。 |
| 创建项目 | 创建新的 Markdown 原生雪花写作项目。 |
| 打开工作台 | 打开或显示当前项目的工作台。 |
| 打开健康检查器 | 检查项目结构并修复安全问题。 |
| 更新旧格式的笔记 | 更新旧版本写下的所有笔记。 |
| 打开项目管理器 | 创建、重命名、打开、归档或移入回收站。 |
| 打开角色数据库 | 打开当前项目角色的 Bases 视图。 |
| 打开场景数据库 | 打开当前项目场景的 Bases 视图。 |
| 打开世界观数据库 | 打开你选定的世界观种类的 Bases 视图。 |
| 打开可视化工作区 | 在独立的工作区中打开当前项目的故事结构。 |
| 打开场景看板工作区 | 打开可视化工作区的场景看板,场景按叙事顺序排成卡片。 |
| 打开时间线工作区 | 打开可视化工作区的时间线,场景按发生的时间摆放。 |
| 打开正文流 | 打开正文,并定位到上次写作的笔记。 |
| 关闭正文流 | 关闭当前分栏中的正文流。 |
| 前往上一篇正文笔记 | 在正文中向前移动一篇。 |
| 前往下一篇正文笔记 | 在正文中向后移动一篇。 |
| 回到打开正文流的位置 | 返回打开正文流时所在的笔记。 |
| 在这一篇之前插入正文笔记 | 在正在阅读的这一篇之前新增一篇。 |
| 在这一篇之后插入正文笔记 | 在正在阅读的这一篇之后新增一篇。 |
| 在光标处拆分正文笔记 | 在光标处把正在写作的笔记一分为二。 |
| 退出当前正文笔记的编辑 | 退出页面正中那一篇的写作状态,读回渲染后的样子。 |
| 导出正文为纯文本 | 把整部正文作为纯文本写入导出文件夹。 |
| 将当前正文笔记导出为纯文本 | 把页面正中的这一篇作为纯文本写入导出文件夹。 |
| 复制当前正文笔记为纯文本 | 把页面正中的这一篇去掉所有标记后放到剪贴板。 |
| 按选项开始写作时段 | 开始之前先选择计时方式、时长与写作阶段。 |
| 开始正计时写作时段 | 开始一个直到你停止才结束的时段。 |
| 开始倒计时写作时段 | 开始一个计时走完即结束的时段。 |
| 开始番茄钟写作时段 | 开始一个工作与休息交替进行的时段。 |
| 暂停或继续写作时段 | 冻结正在进行的时段的计时,或让它继续走。 |
| 停止写作时段 | 结束正在进行的时段,并写下它的记录。 |
| 打开写作时段侧边栏 | 在独立的侧栏中打开当天的写作读数。 |
| 新建任务 | 在当前项目的看板上添加一条任务。 |
| 新建便签 | 在当前项目中新建一张便签,并以悬浮面板打开。 |
| 打开便签侧边栏 | 在独立的侧栏中打开当前项目的便签。 |
| 切换数据统计范围 | 在整个项目与仅正文稿之间切换统计范围。 |
| 切换写作时段外的字数记录 | 开启或关闭对写作时段之外字数的记录。 |
| 统计项目字数 | 报告当前项目的字数,整个项目与仅正文稿各一份。 |
| 将专注模式设为关/开/深度/仅正文 | 直接切到指定的专注深度,每档一条命令。 |
| 切换打字机滚动 | 让正在写的一行保持在页面中部。 |
| 切换自定义高亮 | 让你自己的高亮规则作用于正文,或者暂时收起它们。 |
| 切换正文中的笔记路径 | 显示或隐藏每篇正文笔记的存放位置。 |
| 切换正文中的顺序编号 | 显示或隐藏每篇正文笔记所存的位置。 |
| 切换托管区段边界保护 | 临时调整同步标记的编辑保护。 |
| 切换在工作台旁打开笔记 | 选择固定分栏或普通标签页。 |
| 切换工作台导航栏 | 把工作台旁边的导航栏收成一列图标,或者重新展开。 |
| 切换从字段新建笔记时是否打开表单 | 选择从字段新建的笔记是先打开表单还是直接创建。 |
| 切换表格中的进度状态 | 显示或隐藏进度状态列。 |
| 切换表格中的操作列 | 显示或隐藏每行的操作列。 |
| 切换任务看板中的派生任务 | 显示或隐藏插件从你的写作中派生出来的卡片。 |
| 切换减少动画模式 | 在动画效果和减少动态效果之间切换。 |
| 切换自由模式 | 隐藏十个步骤与进度,或者把它们找回来。 |
与正文相关的命令仅在当前视图为正文流时提供,其中在光标处拆分正文笔记还需要其中有一篇笔记正处于写作状态。两条针对当前笔记的命令作用于页面正中的那一篇。
设置
| 设置 | 默认值 | 用途 |
|---|---|---|
| 项目根目录 | Vault 根目录 | 选择存放项目的 Vault 相对父目录。 |
| 界面语言 | 跟随项目 | 可跟随当前项目、Obsidian,或固定为英文/简体中文。 |
| 默认项目语言 | 系统语言 | 设置新建项目所使用的模板语言。 |
| 自由模式 | 关闭 | 隐藏十个步骤与进度。角色和场景将并入世界观列表。 |
| 在工作台旁打开笔记 | 开启 | 长篇笔记复用工作台旁的固定分栏。 |
| 减少动画 | 关闭 | 使用静态视觉效果替代动画。 |
| 保护托管区段边界 | 开启 | 防止意外修改同步标记。 |
| 在表格中显示进度状态 | 关闭 | 为成员表格增加进度状态列。 |
| 在表格中显示操作列 | 开启 | 让每一行的操作按钮保持可见。 |
| 从字段新建笔记 | 打开表单 | 选择从字段新建的笔记是先打开表单还是直接创建。 |
| 保持载入的笔记数 | 5 | 在正在阅读的笔记前后各保留这么多篇正文笔记。 |
| 显示笔记路径 | 开启 | 在正文笔记上方显示它的存放位置。 |
| 显示顺序编号 | 关闭 | 显示决定笔记阅读位置的所存编号。 |
| 打字机滚动 | 开启 | 让正在写的一行保持在页面中部。 |
| 专注模式 | 关 | 淡化正在写的段落之外的一切。仅正文一档会全屏只显示正文。 |
| 高亮提及 | 实体与对话关闭,其余开启 | 标出实体名称与别名、敏感词、对话,以及你自己的规则。四者各有一个开关,实体还可以只标首次提及、只标尚未写成链接的提及,或者全部标出。 |
| 自动配对括号与引号 | 开启 | 在正文中输入括号或引号时自动补全另一半。 |
| 自动配对 Markdown 语法 | 开启 | 在正文中输入加粗、斜体等标记时自动补全另一半。 |
| 回车开始新段落 | 开启 | 按回车会在段落之间多留一个空行。按 Shift+回车则在段内换行。 |
| 显示字数里程碑 | 关闭 | 在达到每个间隔的那一行旁标出字数。 |
| 里程碑模式 | 按章节 | 在整部正文中连续累计,或在每篇笔记中重新计数。 |
| 里程碑间隔 | 500 | 相邻两个里程碑之间的字数。 |
| 编号样式 | 关闭 | 新章节按前一章接着编号:中文(第一章)、中文加阿拉伯数字(第 1 章)、英文(Chapter 1),或用简化格式或正则表达式书写的自定义规则。 |
| 字体 | 跟随主题 | 选择正文使用的字体。重启 Obsidian 后才能看到新装的字体。 |
| 字号 | 跟随主题 | 调整正文文字的大小。 |
| 行高 | 跟随主题 | 调整正文行与行之间的间距。 |
| 正文宽度 | 跟随主题 | 设置正文内容的最大宽度。 |
| 段间距 | 1 行 | 调整段落之间的间距。 |
| 首行缩进 | 无 | 设置段落起始处的缩进。 |
| 文本对齐 | 两端对齐 | 选择段落文本的对齐方式。 |
| 自动连字符 | 关闭 | 自动在行末断开长单词。 |
| 浅色模式背景 | 跟随主题 | 选择浅色模式下正文的背景颜色。 |
| 深色模式背景 | 跟随主题 | 选择深色模式下正文的背景颜色。 |
| 网格线 | 无 | 在正文内容后面显示辅助线。 |
| 字数统计规则 | 微软 Word | 字数统计遵循哪一种工具的规则。 |
| 标题计入字数 | 仅忽略第一个一级标题 | 标题行是否计入写作字数。 |
| 专注计时方式 | 番茄钟 | 新的时段默认使用哪一种计时。 |
| 多久算摸鱼 | 60 秒 | 多少秒没有编辑后,专注转为摸鱼。 |
| 写作阶段 | 初稿 | 新的时段默认处于哪一个阶段。 |
| 开启专注模式时开始正计时时段 | 开启 | 进入专注模式时自动开始一个时段。 |
| 在写作时段之外记录字数 | 开启 | 记录没有写作时段时写下的字数。时间相关的统计仍只来自写作时段。 |
| 数据统计范围 | 整个项目 | 写作统计展示哪一部分的字数。 |
| 每日目标:整个项目 | 6000 | 整个项目每天要写的净增字数。设为 0 将关闭该目标。 |
| 每日目标:仅正文稿 | 4000 | 正文稿每天要写的净增字数。设为 0 将关闭该目标。 |
| 每周起始日 | 周一 | 写作统计中每周从哪一天开始。 |
| 日期格式 | YYYY/MM/DD | 写作统计中日期的书写格式。 |
| 阅读速度(词/分钟) | 250 | 正文分析按每分钟多少个词来估算阅读时间。 |
| 阅读速度(字/分钟) | 400 | 正文分析按每分钟多少个中日韩文字来估算阅读时间。 |
| 自定义停用词 | 无 | 在内置词表之外,还要排除在词频统计之外的词。每行一个。 |
| 自定义敏感词 | 无 | 实体追踪要留意并统计的词。每行一个。 |
| 对话引号样式 | 四种全部开启 | 哪些引号会开启一段对话:“ ”、" "、「 」与『 』。 |
| 自定义高亮规则 | 无 | 你自己的规则,可用文本或正则表达式书写,颜色与装饰由你来选。 |
| 导出文件夹 | 项目旁的 Snowflake Export | 导出文件保存到的文件夹。项目内部的文件夹会被拒绝。 |
| 导出格式 | 纯文本(.txt) | Markdown(.md)或纯文本(.txt)。两者内容相同,所有 Markdown 与 Obsidian 标记都会去掉。 |
| 保留首行缩进 | 开启 | 保留段落的首行缩进。 |
| 保留段落间空行 | 关闭 | 保留段落之间的空行。 |
| 布局 | 一个文件 | 将正文导出为一个文件,或每篇笔记一个文件。 |
| 笔记之间 | 空行 | 导出为一个文件时笔记之间的分隔:空行、一行短横线或三个星号。 |
隐私
Obsidian 雪花写作法采用本地优先设计。项目文件和插件设置均保留在 Vault 中,插件不会传输你的创作内容或配置。
- 无需注册账号、订阅或连接外部服务。
- 插件不发起网络请求,也不包含 AI 服务、遥测或数据分析。
- 项目使用 Obsidian 兼容文件;停用插件后,内容依然可以正常阅读和编辑。
结构
每个项目都作为所选项目根目录的直接子文件夹保存。文件夹、文件名和初始笔记会根据创建项目时选择的语言进行本地化。
中文项目结构示例
<项目根目录>/
└── 我的小说/
    ├── 00_系统/
    │   ├── 001_项目元数据.md
    │   └── ...
    ├── 10_概述/
    │   ├── 11_一句话概述.md
    │   └── ...
    ├── 20_角色/
    │   ├── 21_类别/
    │   │   └── 主角/
    │   │       └── 主角.md
    │   ├── 24_自定义字段/
    │   │   └── 年龄.md
    │   └── 角色总览.base
    ├── 30_大纲/
    ├── 40_场景/
    │   └── 场景总览.base
    ├── 50_正文/
    │   ├── 初稿.md
    │   └── 第一部/
    │       └── 第一章.md
    ├── 60_世界观/
    │   ├── 61_时间/
    │   ├── 62_地点/
    │   ├── 63_物品/
    │   └── 64_门派/
    ├── 70_工具/
    │   ├── 71_数据统计/
    │   │   ├── 711_写作时段/
    │   │   │   └── 2026/
    │   │   │       └── 2026_08_<设备>_writing_session.json
    │   │   ├── 712_正文分析/
    │   │   │   └── <设备>_analysis_stats.json
    │   │   └── 713_实体追踪/
    │   │       ├── mention_ignores.json
    │   │       └── <设备>_mention_index.json
    │   ├── 72_任务管理/
    │   │   ├── 721_任务/
    │   │   │   └── tasks.json
    │   │   ├── 722_伏笔/
    │   │   │   └── foreshadowing.json
    │   │   ├── 723_修订/
    │   │   │   └── revisions.json
    │   │   └── 724_便签/
    │   │       └── 20260904T223121.847+0800.md
    │   └── 73_可视化/
    │       └── 733_时间线/
    │           └── timeline.json
    └── ...
写作时段按设备分开记录,同步时不会有两台机器争写同一个文件。实体追踪时写下的忽略规则、你提出的修订与你追踪的伏笔,各是随 Vault 一同流转的单一共享文件。每张便签自成一个 Markdown 文件,其悬浮面板停在哪里则按设备记住,不写进笔记。旁边的实体索引与正文统计则是缓存,而不是记录。它们缺失或过期时,插件都会从正文重新建立,因此删掉它们至多只是再读一遍全书的时间。
归档项目会把它的整个文件夹移入 Snowflake Archive。这个文件夹与各个项目并列,而不在任何项目之内。笔记本身不会有任何改动,而且项目的所有引用都在自己的文件夹内,因此归档期间不会留下任何断链。项目管理器会列出其中的项目并随时取回,若原来的名称已被占用,会为它取一个未被使用的名称。手动把文件夹移入或移出的效果完全相同,归档只是一个位置,而不是一套机制。
导出会把纯文本文件写入 Snowflake Export,它和归档文件夹一样与各个项目并列,除非设置里另指定了一个项目之外的文件夹。此前导出过、后来从正文中移走的笔记,其文件不会被删除。
正文可以只有一篇笔记,也可以有许多篇,文件夹如何组织都可以。每篇笔记都用 snowflake-manuscript-sequence 记录自己的位置,因此移动或重命名笔记都不会改变它的阅读顺序;正文流会按该顺序把它们呈现为一整页。
工作台只同步一对托管区段边界之间的文字:
<!-- snowflake:section:one-sentence-summary:start -->
这里的创作内容可以正常编辑。
<!-- snowflake:section:one-sentence-summary:end -->
这些 HTML 注释是结构标记,并非正文内容。边界保护默认开启,用于防止意外修改标记行。标记之间的内容会与工作台同步;标记之外的 Markdown 始终由作者管理,插件不会替换。如果标记缺失、重复、顺序颠倒或相互重叠,插件会报告问题并停止不安全的写入。
路线图
- 取得 Randy Ingermanson 或 Advanced Fiction Writing 的书面授权,以便本插件使用雪花写作法这一名称(已发送邮件,等待回复)
- 加入《How to Write a Novel Using the Snowflake Method》第 20 章中的创作示例(待名称一事有结果后再行沟通)
- 十步引导工作台 (0.1.0)
- Obsidian 原生项目 (0.1.0)
- 中英双语 (0.1.0)
- 修订提醒 (0.1.0)
- 安全修复 (0.1.0)
- Bases 视图 (0.2.0)
- 正文流 (0.4.0)
- 打字机滚动 (0.5.0)
- 专注模式 (0.5.0)
- 笔记正文中的字段 (0.7.0)
- 世界观 (0.8.0)
- 自定义字段 (0.9.0)
- 项目归档 (0.10.0)
- 自由模式 (0.10.0)
- 写作时段 (0.11.0)
- 数据统计 (0.11.0)
- 自定义排版 (0.13.0)
- 实体追踪 (0.14.0)
- 正文分析 (0.14.0)
- 修订 (0.15.0)
- 任务管理面板 (0.15.0)
- 字数里程碑 (0.16.0)
- 自动章节编号 (0.16.0)
- 纯文本导出 (0.16.0)
- 伏笔 (0.17.0)
- 便签 (0.17.0)
- 任务看板 (0.18.0)
- 可视化工作区 (0.19.0)
- 场景看板 (0.19.0)
- 时间线 (0.20.0)
- 自由画布
- 节拍表
- 将可视化工作区导出为 Obsidian Canvas
开发
环境要求
- Node.js 20 或更高版本
- 支持 lockfile 的 npm
- 用于测试打包插件的独立开发 Vault,以及 Obsidian 1.13.0 或更高版本
当前持续集成会在 Ubuntu 环境下分别使用 Node.js 20、22 和 24 验证项目。
初始化
git clone https://github.com/ZzPoLariszZ/obsidian-snowflake-method.git
cd obsidian-snowflake-method
npm ci
npm ci 会严格按照 package-lock.json 安装依赖。生成的 main.js 属于构建产物,不应直接编辑。
命令
| 命令 | 用途 |
|---|---|
npm run dev | 监听 TypeScript 源文件,并生成包含内联 source map 的 main.js。 |
npm test | 单次运行完整的 Vitest 测试套件。 |
npm run test:watch | 在开发过程中以监听模式运行 Vitest。 |
npm run build | 执行类型检查,并生成不含 source map 的压缩生产构建。 |
npm run lint | 对整个仓库运行 ESLint。 |
npm run check | 依次运行提交前必须通过的测试、生产构建和 lint。 |
所有准备提交审核的 commit 都应先通过 npm run check。在 Obsidian 中进行本地测试时,将生成的 main.js 与 manifest.json、styles.css 一同放入 <仓库>/.obsidian/plugins/snowflake-method/,然后重载 Obsidian。请使用独立的开发 Vault,不要直接使用存放正式创作内容的 Vault。
持续集成
每次 push 和 pull request 都会在所有受支持的 Node.js 版本上执行测试、构建和 lint。只有完整矩阵全部通过后,修改才适合合并。CI 会从源代码重新生成分发包,本地生成的构建产物不作为验证依据。
发布流程
- 从
main分支的干净工作区开始,并确认npm run check已通过。 - 根据语义化版本规则,运行
npm version patch -m "chore: release %s",或将patch换成minor、major。这里的信息不能省略,否则 npm 会把纯版本号写成 commit 标题。 - 版本脚本会同步更新
package.json、package-lock.json、manifest.json和versions.json,随后创建发布 commit。它还会给这次提交打上带v前缀的标签,例如v0.9.0,而本项目不使用这种形式。推送之前先把它换成纯数字,在该例中即git tag -d v0.9.0 && git tag 0.9.0。本项目的标签是轻量标签,且不得带有v前缀。 - 分两步推送 commit 与标签:先
git push origin main,再用git push origin推送刚才创建的标签。--follow-tags不会带上这里的标签,因为它只推送附注标签,遇到轻量标签会默不作声地略过。推送后用git ls-remote --tags origin确认标签已经到达,因为发布工作流由标签触发,没有标签就什么都不会运行。 - GitHub Actions 会验证标签与
manifest.json中的版本完全一致,通过npm ci安装依赖,并重新执行测试、生产构建和 lint。 - 验证通过后,工作流会为
main.js、manifest.json和styles.css生成构建来源证明,并将它们与自动生成的发布说明附加到 GitHub 草稿发布。 - 检查草稿发布及其附件无误后,再正式发布。
正式分发的插件仅包含 main.js、manifest.json 和 styles.css。发布附件中不要加入源代码、开发依赖或外层目录。
许可证
源代码采用 MIT License。“雪花写作法”名称及原始方法资料的相关权利归各自权利人所有。
For plugin developers
Search results and similarity scores are powered by semantic analysis of your plugin's README. If your plugin isn't appearing for searches you'd expect, try updating your README to clearly describe your plugin's purpose, features, and use cases.