Layout Forge
unlistedby Aventhar
Compose reusable, data-bound page layouts. Free-type markdown into blocks or bind them to note properties.
Layout Forge
Compose reusable, data-bound page layouts for Obsidian.
One layout, applied across many notes, filled from each note's own data — or free-typed. Recipe cards, character sheets, project dashboards, magazine spreads.
Status: v0.1, early. The renderer, the layout library and a form-based editor all work. Drag-and-drop editing is not built yet.
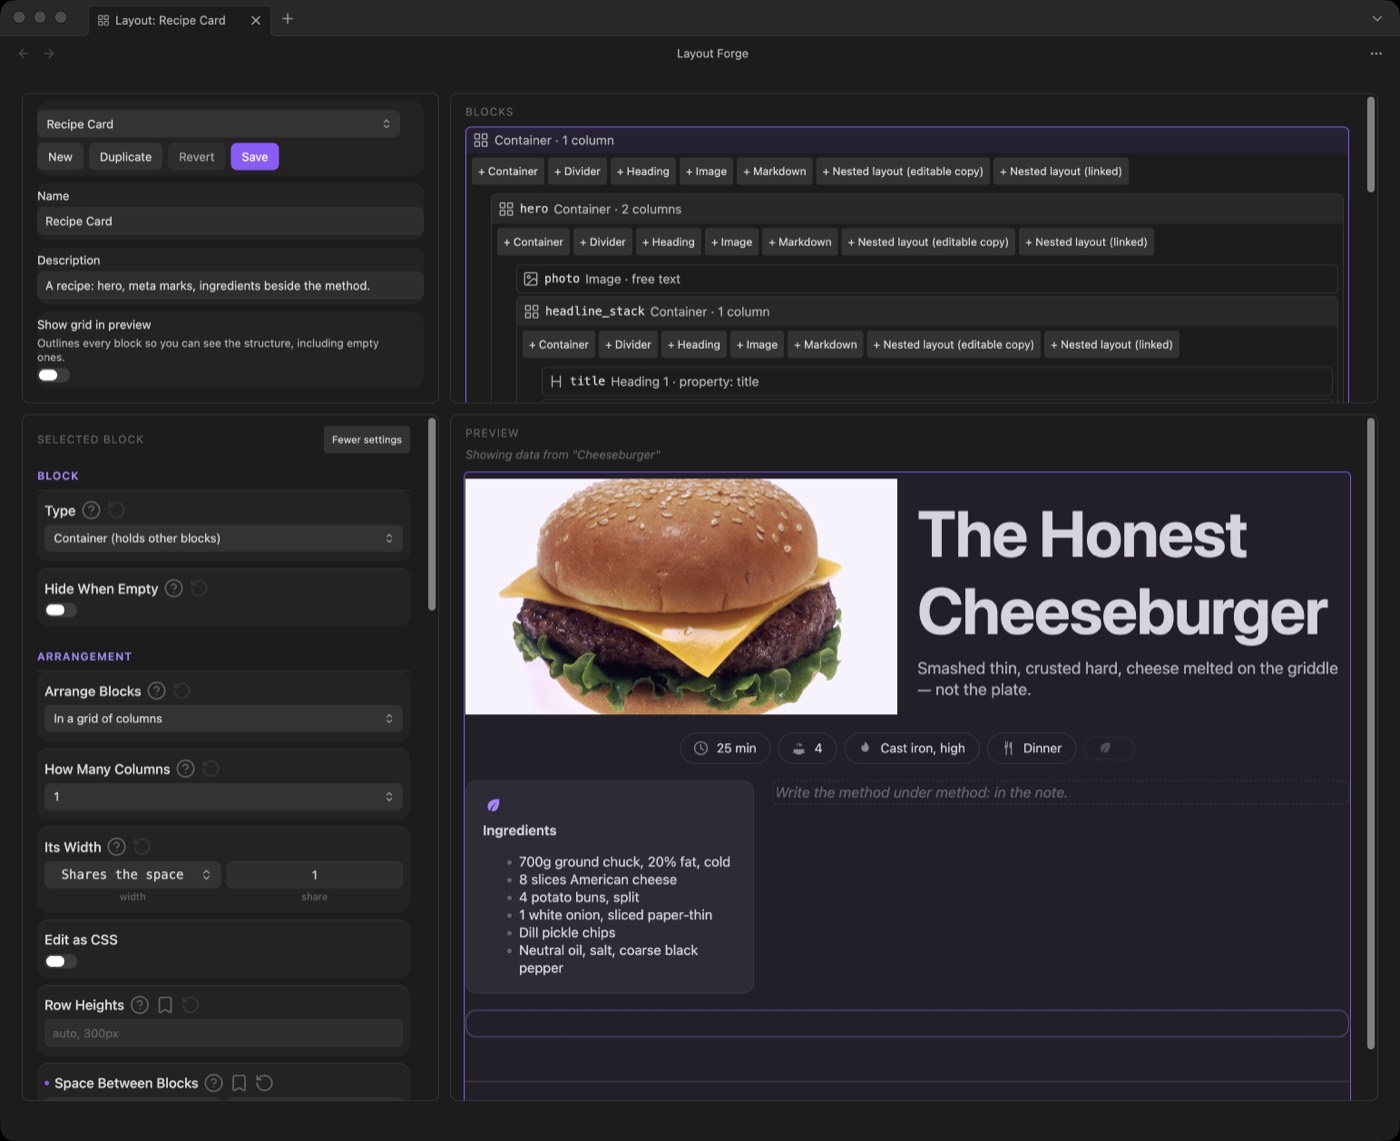
The editor. Blocks on the right, every setting for the selected one on the left, and a preview filled with the current note's data.
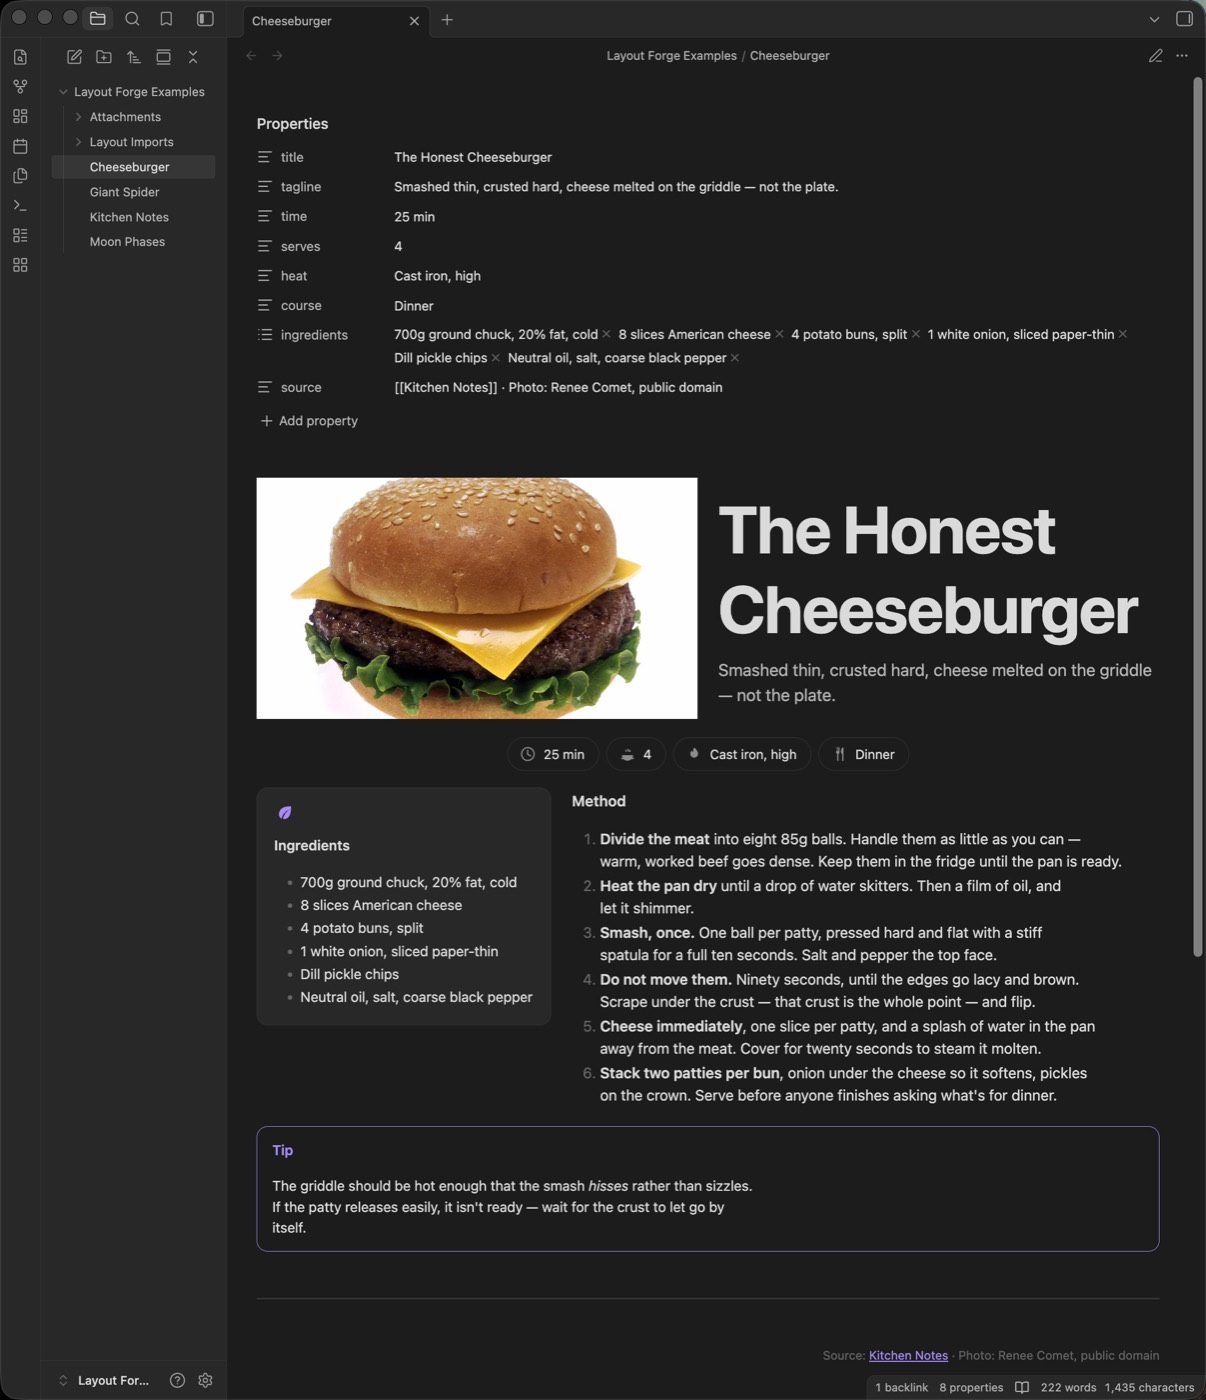 | 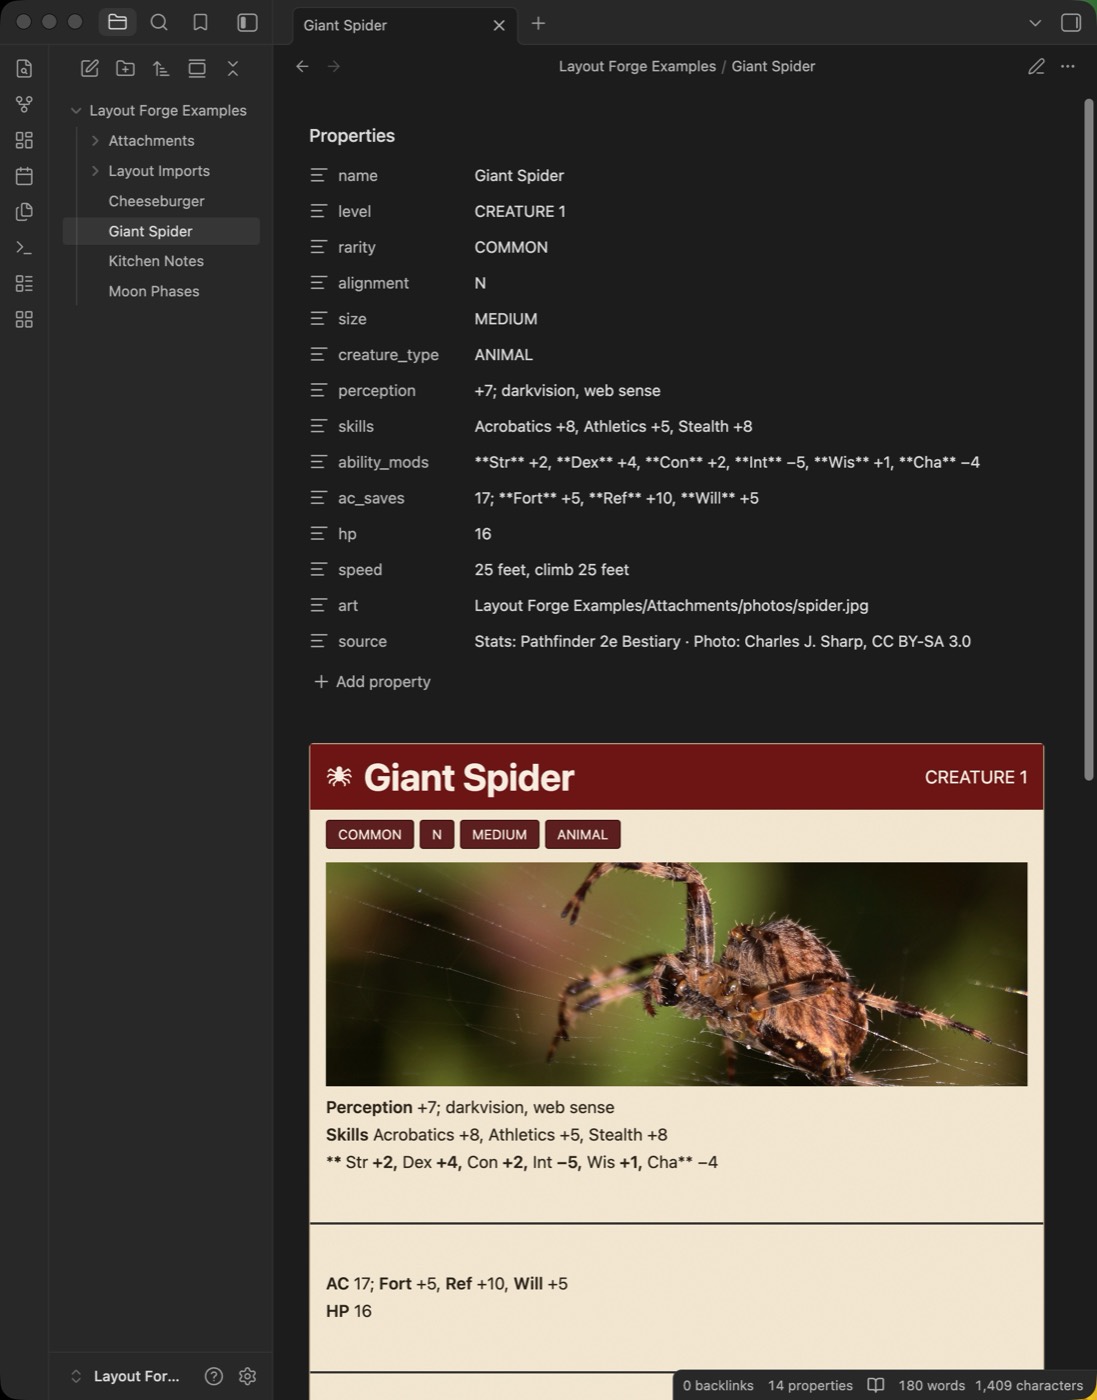 | 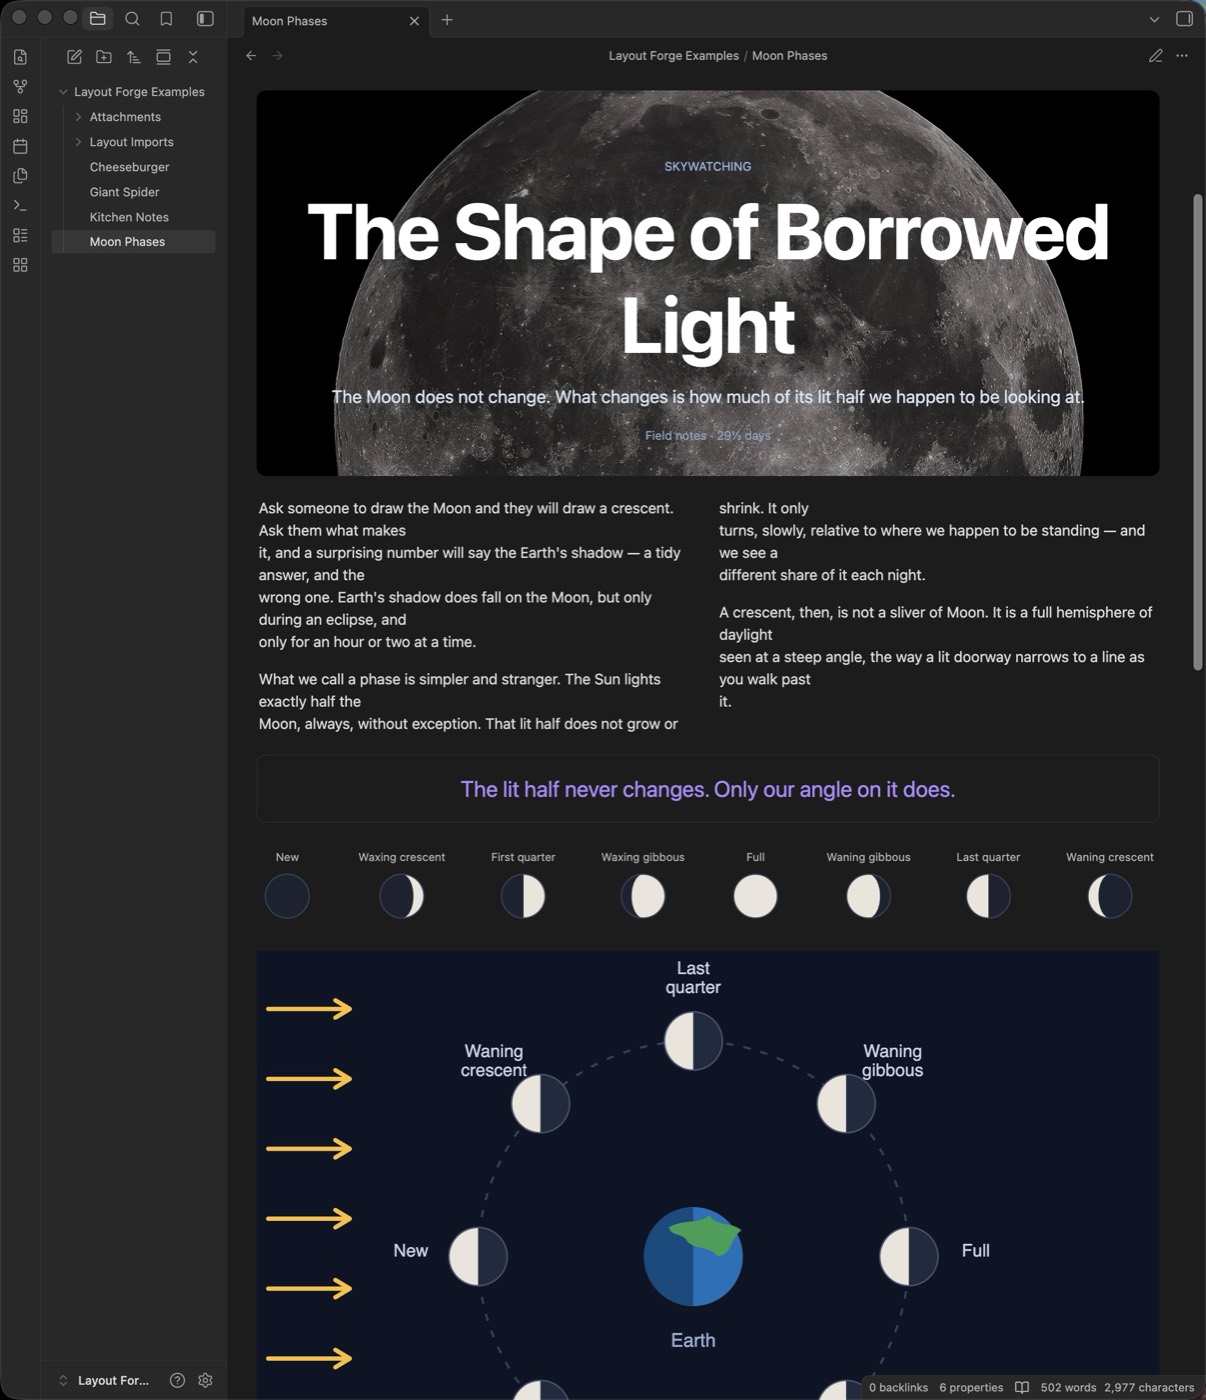 |
| A recipe — meta marks from frontmatter, and the ones the note leaves out simply do not appear. | A statblock — trait pills, art cropped to fit, and five stat lines that hide when unset. | A feature — two-column text flow, a figure with its caption, and a block pulled from the note's own section. |
Contents
- Installing
- Quick start
- The layout block
- The editor
- Blocks
- Where content comes from
- Arranging blocks
- Styling
- Showing only what a note has
- Saving, and what it does to your notes
- Sharing layouts
- Commands
- Settings
- When something will not render
- What it touches
- Development
Installing
Requires Obsidian 1.5.0 or newer. Works on desktop and mobile.
Community plugins
Layout Forge is not in the community plugin list yet. Once it is, the route will be Settings → Community plugins → Browse → search "Layout Forge" → Install → Enable.
Until then, use BRAT or install manually.
BRAT (recommended for testing)
BRAT installs plugins straight from GitHub and keeps them updated as new versions are released — which is what you want while this is still changing.
- Install Obsidian42 - BRAT from Community plugins, and enable it.
- Open the command palette and run BRAT: Add a beta plugin for testing.
- Paste
Aventhar/layout-forgeand confirm. - Enable Layout Forge under Settings → Community plugins.
To update later, run BRAT: Check for updates to all beta plugins.
Manually
- Download
main.js,manifest.jsonandstyles.cssfrom the latest release. - Put all three in
<your vault>/.obsidian/plugins/layout-forge/. - Reload Obsidian, then enable the plugin under Settings → Community plugins.
Those three files are the whole plugin. Nothing else needs to be copied.
Quick start
A fresh install has no layouts. To start from worked examples instead of a blank one, see examples/ — three layouts and the notes that use them, as a folder to drop into your vault.
To make your first layout by hand:
- Click the grid icon in the ribbon, or run Layout Forge: Open layout editor.
- Press New, and give the layout a name.
- In the Blocks pane, press + Heading, then + Markdown.
- Select a block and set what it shows under Comes From in the Selected Block panel — free text, or a note property.
- Press Save.
- In any note, run Layout Forge: Insert layout block. It inserts a fence
naming your first layout, with any property-filled blocks already listed —
change the
layout:line if you meant a different one.
The note now renders the layout. Editing the layout updates every note using it, live — no need to reopen anything.
The layout block
A note uses a layout by way of a fenced code block:
```layout-forge
layout: recipe-card
blocks:
  intro: |
    Free-typed markdown for *this note only*.
  method: Step one, step two.
```
layout: names the layout. It is the layout's id — shown under its name in
the editor — not its display title.
blocks: is optional. Each key is a block's Name, and the value is markdown
that this note contributes to that block. Blocks you do not list fall back to
whatever the layout itself provides.
Use | for anything spanning several lines, and quote any single-line value
containing a colon:
blocks:
  title: "Genus: Quercus"
  notes: |
    Several lines,
    kept as written.
Property-filled blocks
Blocks bound to a note property appear in the fence as a comment, so the note shows where its content comes from:
blocks:
  hero_title: # Property > title
  intro: |
    Free text for this note.
The comment is a signpost, not a setting — the binding lives in the layout. The editor offers to add and update these lines when you save.
Live Preview note: Obsidian shows the raw source of whichever block contains the cursor, so a fence on line 1 of a note appears unrendered when the note opens. Start notes with frontmatter, or leave a blank line above the fence — the Insert layout block command adds one for you when the cursor is on line 1.
The editor
Open it from the ribbon's grid icon, or the Open layout editor command. It opens in its own window by default; a tab instead if you prefer (Settings → Editor).
It opens on the layout the current note uses, so you land where you already are. If the note uses several, it asks which. Editors opened repeatedly stack up as separate tabs rather than replacing one another.
The four panes
| Pane | What it is for |
|---|---|
| Header (top left) | Name, Description, New, Duplicate, Save, Revert, and the preview grid switch |
| Blocks (top right) | The tree of blocks. Select, add, reorder, move, delete |
| Selected Block (bottom left) | Every setting for whatever is selected |
| Preview (bottom right) | The layout as a note will show it |
Save carries a dot — Save • — while there are unsaved changes. Revert
throws them away and returns to the last saved state.
Show grid in preview outlines every block, and makes them clickable: click a block in the preview to select it in the tree.
Editing
- Undo / redo —
Cmd/Ctrl+ZandCmd/Ctrl+Shift+Z(orCtrl+Y). Edits made close together merge into one step, so a typed word undoes as a word. - New blocks are selected automatically and scrolled into view.
- The Selected Block panel keeps its scroll position as you work, and jumps to the relevant section when a setting changes which other settings exist.
Every setting has three controls
- ? — what the field does, with examples and the CSS it drives.
- Bookmark — save this value as a named preset, then reuse it on any layout. Presets belong to the vault, not the layout.
- Reset arrow — return the field to its default. A field holding something other than its default is marked with a dot, so a block's changes can be counted at a glance.
Simple and all settings
The panel title carries a Fewer settings / All settings switch. Fewer is the default: the fields it hides are the ones a first layout can be built without. The choice is remembered between sessions.
Sizes are in pixels
Every size is whole pixels. Type a bare number and the unit is assumed — 12
becomes 12px. Colors accept anything CSS does, including theme variables like
var(--text-muted), which is usually the better answer than a fixed color because
it follows light and dark themes.
Blocks
Add blocks with the + buttons inside a container. Every block has a Name,
which is what notes type under blocks:. Names are slugged as you type, so they
stay safe in YAML, and no two blocks in one layout can share one.
| Type | What it does |
|---|---|
| Container | Holds other blocks and arranges them |
| Markdown | Renders markdown — the everyday block |
| Heading | Renders as H1–H6, with markdown inline |
| Image | A picture, from the vault or a URL |
| Nested layout (linked) | Draws another saved layout, live |
| Divider | A horizontal rule |
Moving blocks
Each row in the tree has, on hover or selection:
- Move up / Move down — among its siblings
- Move into the container above / Move out of this container
- Move into another container — pick any container in the layout
- Delete
Two ways to nest a layout
- + Nested layout (editable copy) copies the other layout's blocks in. They become part of this layout and can be edited freely. It does not follow the original afterwards.
- + Nested layout (linked) keeps a live link. Editing the other layout changes this one. A linked layout can be turned into a copy later with Make It Part of This Layout.
Two layouts cannot link each other — the renderer refuses, since drawing them would never finish.
Where content comes from
Select a block and set Comes From:
| Source | Where the content comes from |
|---|---|
| Free text | Typed in the note under blocks:, or a default carried by the layout |
| Note property (frontmatter) | A named property of whichever note is showing it |
| Note body section | Everything under a given ## Heading in the note |
| Embed another note | A wikilink target, rendered in place |
Binding is always optional and always falls back. If Empty, Fall Back To decides what a note without that property shows: free text, or a fixed message.
Two more fields shape it:
- Label — a prefix, written as markdown and used exactly as typed.
**Name**for bold,Namefor plain. It disappears entirely when the block is empty, so a missing property leaves no orphaned label. - Placeholder — greyed hint shown in an empty block while you are writing.
Folding sections into the fence
A block bound to a note body section shows that section's text in the layout — and the section is still there in the note, so it appears twice.
The command Fold section sources into the layout block moves that text into the fence, where it is only shown once, through the layout. Anything it cannot fold safely is reported with the reason.
Arranging blocks
Select a container and set Arrange Blocks:
| Arrangement | Behavior |
|---|---|
| In a grid of columns | You say how many columns and how wide each is; blocks fill them in order |
| Side by side, wrapping | Each block takes only the width it needs; the line wraps when it fills |
| One under another | No arrangement — blocks stack like ordinary text |
Columns
For a grid, set How Many Columns (up to 20), then each column's width:
| Width | Meaning |
|---|---|
| Shares the space | Takes a portion of what is left after the fixed ones. 2 beside a 1 is twice as wide |
| Fixed width | Always that many pixels |
| At least this wide | Never narrower than the number, and shares the space above it |
| Fits its content | Exactly as wide as what is inside, and no wider |
Edit as CSS swaps the builder for the raw track list, for anything the four
choices cannot describe — repeat(3, max-content), say. A layout written that way
keeps its text box; simplify the value and the builder comes back.
Where a block sits
Inside a grid, a block can claim a specific Column and a Width in columns, or be left automatic. In a row or a stack there are no columns to claim, and the panel says so rather than offering a control that would do nothing.
The root block has Position on the Page — center, left or right — which matters once the layout is narrower than the note.
Styling
Every block has five styling sections. All of them are optional, and everything is stored with the layout, so it travels with an export.
Text — Text Color, Label Color, Align Text, Split Into Columns (magazine flow inside one block), Font Size, Font.
Space — Space Inside (padding, per side), Height at Least, Height at Most, and If It Does Not Fit for when a capped height would clip content.
Edges — Border Thickness, Border Style, Border Color, Rounded Corners (per corner).
Behind the Block — Background Color, Background Image, Image Size, Image Position, Image Repeat, and Dim Image: a wash over the picture so text on top stays readable, toward dark or light.
The Image Itself (image blocks) — Picture Size, Picture Fit, Picture Position, Picture Alignment, Alt Text, and Recolor.
Recoloring an SVG
Recolor paints a single-color SVG in any color, by using its shape as a mask — useful for interface icons that should follow your theme. It is greyed out for photographs and other formats, where masking would flatten the picture to a silhouette.
Showing only what a note has
Hide When Empty, on any block, leaves it out of the note entirely when its content resolves to nothing — rather than drawing an empty box.
The block takes no space when it goes, so the blocks after it move up to fill the gap. A container disappears once everything inside it has gone, so an entire section can vanish when a note supplies none of its parts.
For a row of things whose length varies from note to note, pair it with Side by side, wrapping: a row makes a slot for each block that exists, so there is no gap where a missing one would have been. A grid declares its columns up front and keeps their spacing either way.
The editor's preview deliberately ignores this and shows those blocks as ghosts — dimmed and dashed. A layout is previewed without a note's data, so honoring it there would hide the very blocks you are configuring.
Saving, and what it does to your notes
Saving a layout can change what its notes should say. Layout Forge scans the vault for notes using the layout and offers, in one dialog, to:
- Update renamed blocks — a renamed block changes the key notes must use.
- Reorder the
blocks:list to match the layout's new order. - Add or update the
# Property >comments on property-filled blocks.
It lists exactly which notes it would touch, and declining leaves every note untouched — those blocks fall back to their placeholders until the keys are updated. Turn on Update notes without asking in settings if you would rather it just happened.
The scan runs at save, not at rename, because the editor works on a copy: renaming a block and then discarding the edit must not have rewritten your notes in between.
Sharing layouts
Layouts are portable text. Under Settings → Layout Forge → Layouts:
- Export on any layout copies it to the clipboard, with any layouts it nests, so it never arrives broken. A nested layout can also be exported on its own — the parent is not dragged along.
- Export selected layouts picks several at once.
- Import layouts takes a single layout or a whole package. A layout you already have, unchanged, is skipped, so re-importing your own backup does nothing. One whose id collides but whose content differs is kept under a new id, with every nested reference rewritten to match — importing never silently overwrites your work.
Export config and Import config move your presets and editor preferences separately, so "my setup" and "this design" travel independently.
Commands
| Command | What it does |
|---|---|
| Open layout editor | Opens the editor, on the current note's layout |
| Insert layout block | Inserts a fence at the cursor, naming your first layout and listing its property-filled blocks |
| Fold section sources into the layout block | Moves section text into the fence so it is not shown twice |
Settings
Editor
- Open the editor in its own window — off to use a tab instead. Always a tab on mobile.
- Update notes without asking — apply note updates on save without the dialog.
Config — export and import presets and preferences.
Layouts — export selected layouts, import layouts, and a row per layout with Edit, Export and Delete.
When something will not render
A red box appears in place of the layout, saying what is wrong and what to do about it. The common causes:
- No layout of that name — the box lists the layouts your vault does have. The name is the layout's id, not its title.
- Could not read this block — the YAML is malformed. The box shows a correct
block to copy. Usually an unquoted colon, or the wrong indentation under
blocks:. - Image not found — paths are relative to the vault root, like
Attachments/photo.jpg. Check capitalization: a file the editor finds may not be found by the renderer.
What it touches
Layout Forge makes no network requests of any kind, and reads and writes nothing outside your vault. It has no telemetry and no remote code.
It writes to notes in exactly one situation: when you save a layout and accept the offered note updates. Those writes go through Obsidian's own locked read-modify-write, so an edit you make while the dialog is open is not overwritten.
An imported layout is data, not code — it cannot run anything. It does carry markdown that gets rendered and styling applied to its own blocks, so treat a layout someone sends you the way you would treat a note someone sends you.
Development
Requires Node.js 16+.
npm install
npm run dev     # watch and rebuild on save
npm run build   # typecheck + production bundle
npm run check   # typecheck only
Clone into <vault>/.obsidian/plugins/layout-forge/. A fresh clone has no main.js
until you build. Pair with Hot Reload and add
a .hotreload file here to reload automatically on rebuild.
Release with npm version patch|minor|major, which carries the new number into
manifest.json and versions.json. Attach main.js, manifest.json and
styles.css to a GitHub release tagged with the bare version — 0.2.0, not
v0.2.0, which Obsidian will not match.
Design
Architecture, schema and the reasoning behind the tradeoffs are in
DESIGN.md. Worth reading before changing the schema or renderer — it
records invariants that are not obvious from the code, such as why layout styles
must never live in styles.css.
Prior art
Built after surveying the community plugin registry. Layout Forge deliberately does not compete on callout styling (Callout Manager) or columns (Multi-Column Markdown). Fantasy Statblocks is the closest architectural precedent — frontmatter binding, JSON import/export, a form-based layout editor — but is TTRPG-specific.
License
MIT
For plugin developers
Search results and similarity scores are powered by semantic analysis of your plugin's README. If your plugin isn't appearing for searches you'd expect, try updating your README to clearly describe your plugin's purpose, features, and use cases.