Vale
unlistedby jsade
A (refreshed) Vale client for Obsidian.
Obsidian Vale
Obsidian Vale is a Vale linter client plugin for Obsidian. It integrates the Vale prose linter into the Obsidian markdown editor, providing real-time writing feedback through underlines and a results panel.
![]()
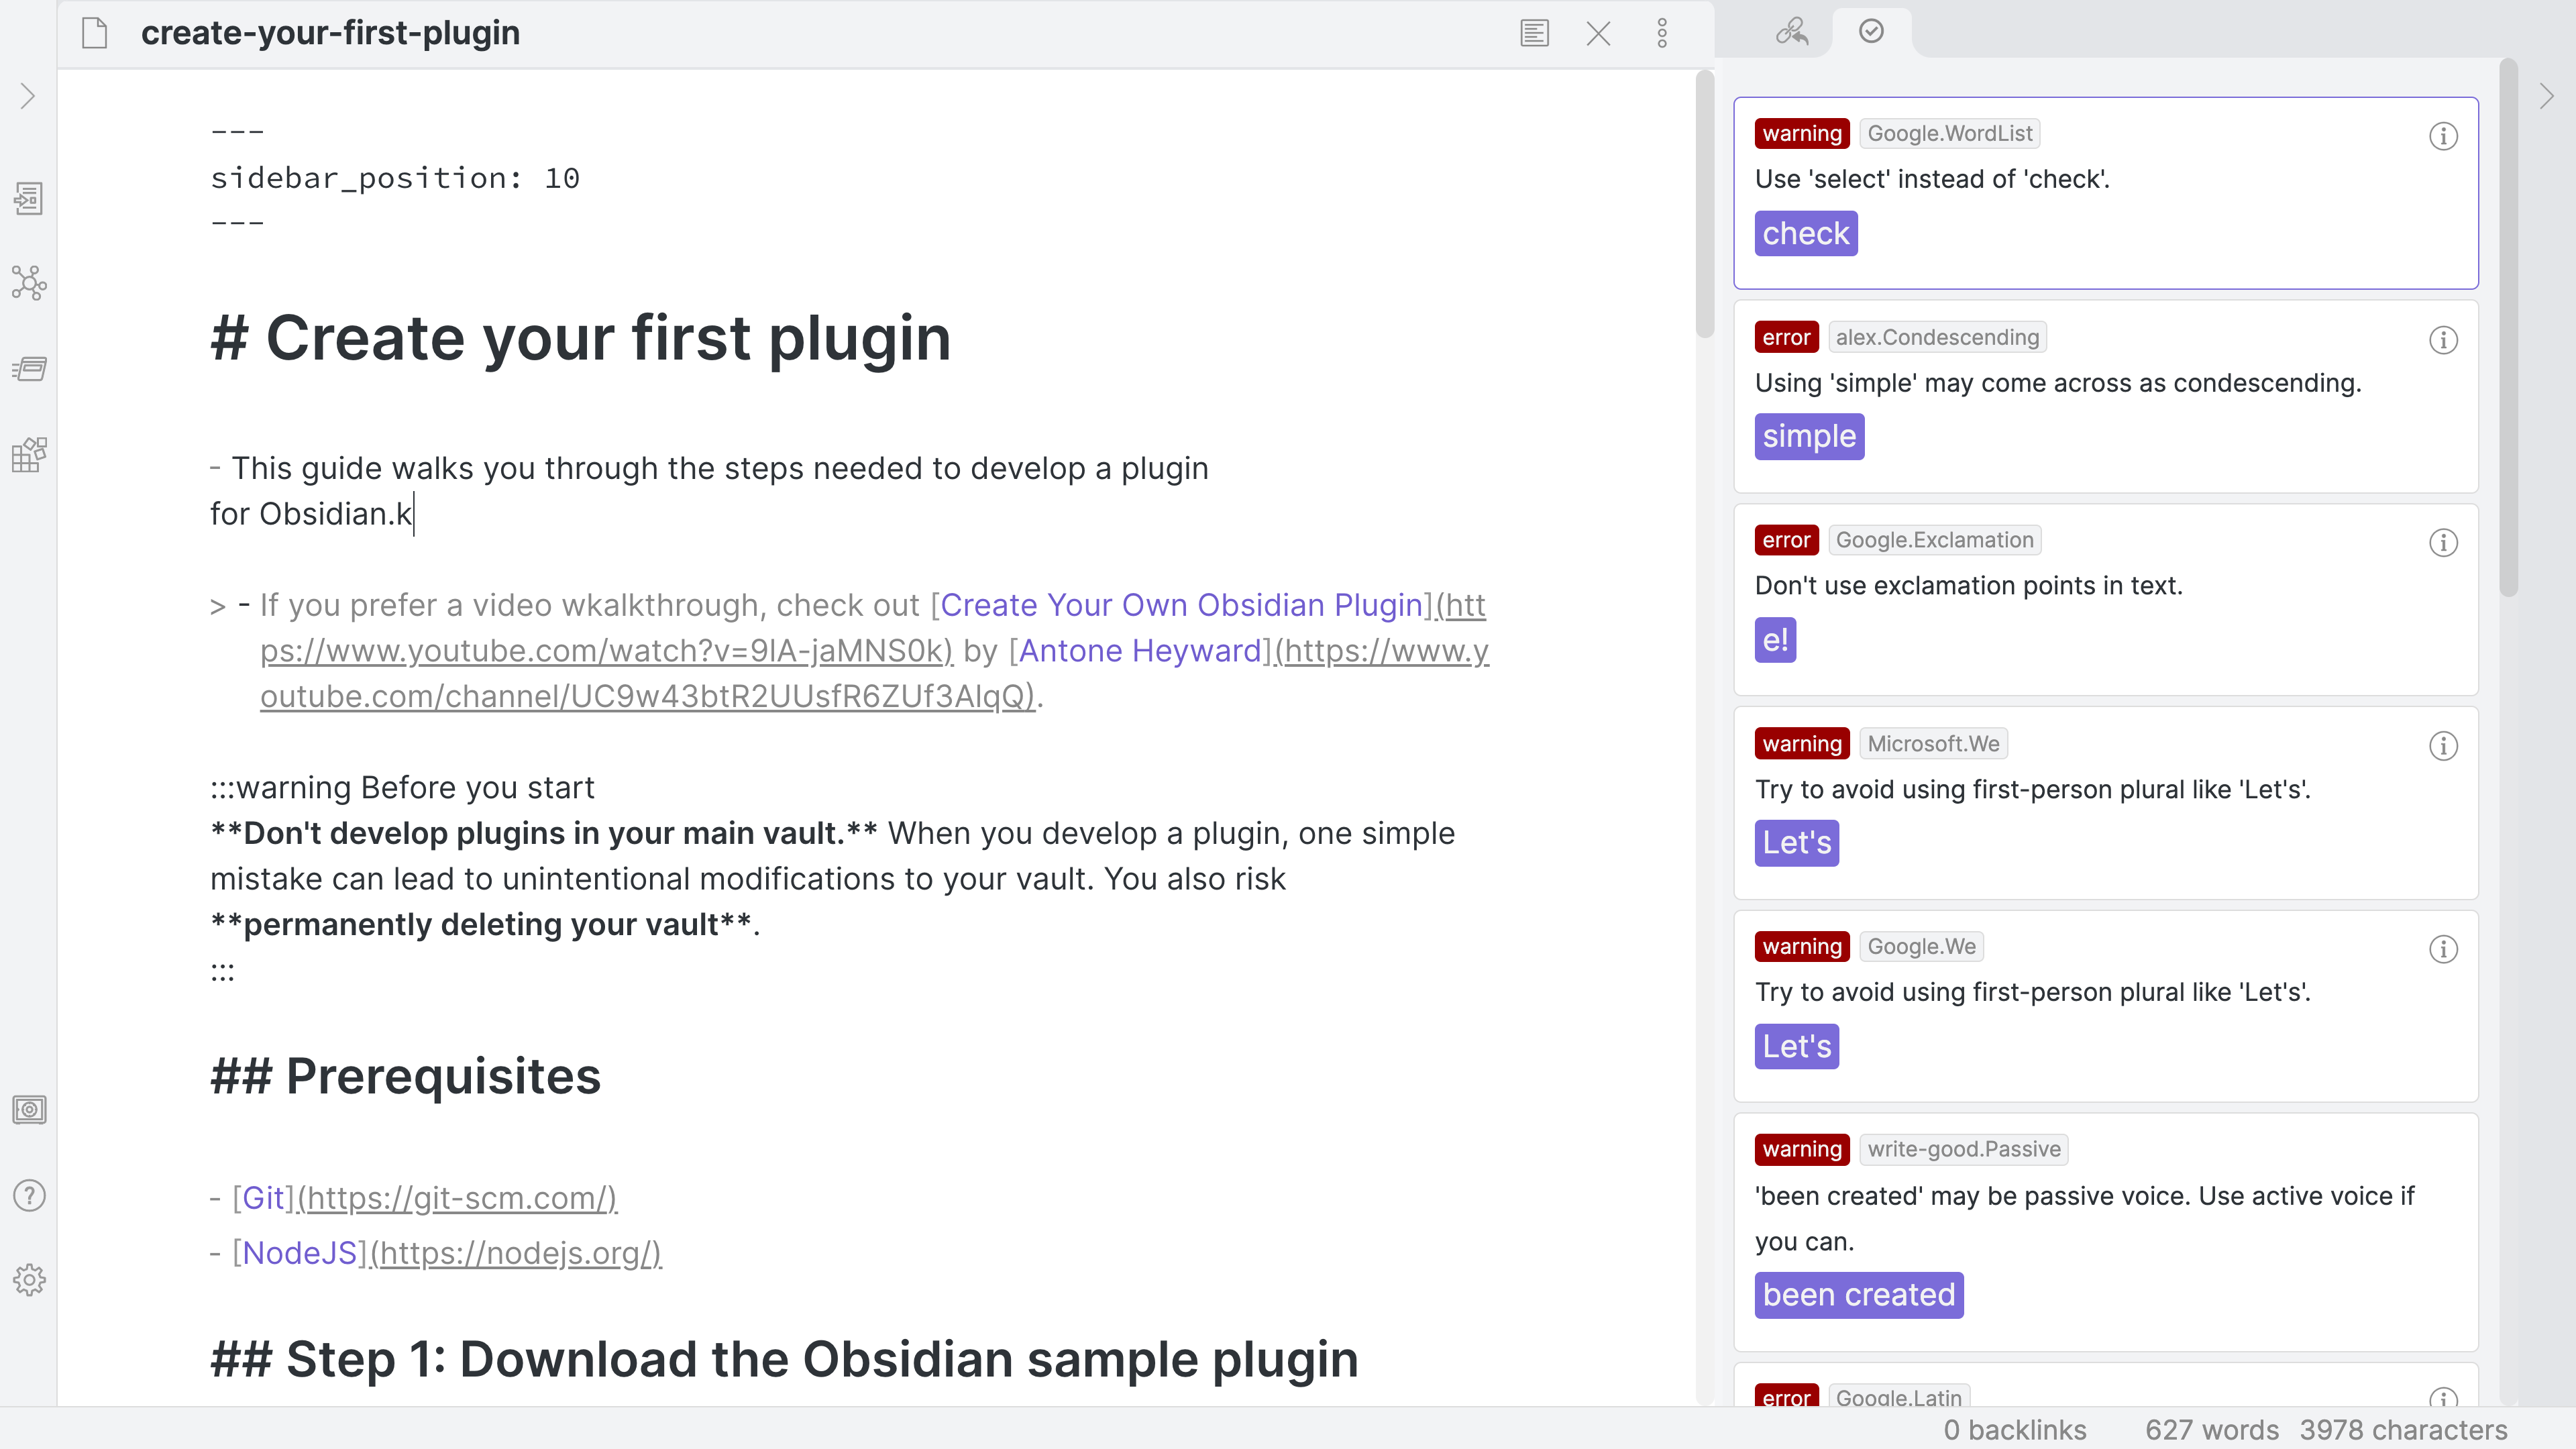
2025-10-22: This project is a fork from the original obsidian-vale which was created by Marcus Olsson and was archived Jun 1, 2023.
Features
- Real-time linting: Vale analyzes your prose as you write
- Inline feedback: Underlined text shows issues directly in the editor
- Click-to-navigate: Click underlines to jump to panel details, or click panel alerts to highlight in editor
- Smart underlines: Decorations automatically update and stay positioned as you edit
- Multiple severity levels: Error, warning, and suggestion styles
- Interactive tooltips: Hover over underlined text for details and suggested fixes
- Custom rules: Use Vale's extensive style library or create your own
- Managed or custom Vale: Let the plugin manage Vale or use your own installation
Installation
Using BRAT
- Navigate to BRAT repository
- Using the instructions found in the BRAT repository, install BRAT plugin to your Obsidian
- Add this repository as an install source in BRAT
Manual installation
- Download the latest release from GitHub Releases
- Extract
main.js,manifest.json, andstyles.cssto{vault}/.obsidian/plugins/obsidian-vale/ - Reload Obsidian
- Enable the plugin in Settings → Community plugins
Configuring Vale
Managed mode
The plugin can automatically download and manage Vale for you:
- Open Settings → Vale
- Select Managed mode
- Click Install Vale to vault (downloads appropriate binary for your OS)
- Go to Styles and toggle ON desired style packages
Custom mode
Use your own Vale installation:
- Open Settings → Vale
- Select Custom mode
- Provide paths to your Vale binary and
.vale.iniconfig file - Go to Styles to see and enable your installed styles
Editor settings
- Check on note open: Automatically runs Vale when you open or switch to a note (enabled by default)
- Auto-check on changes: Automatically runs Vale after editing (disabled by default)
- Auto-open results pane: Opens the results pane automatically when running checks (disabled by default)
- Editor toolbar button: Show/hide the Vale check button in the editor toolbar
- Status bar: Show/hide check status at the bottom of the window
Rules
- Enable/disable styles: Toggle entire style packages in Styles
- Configure individual rules: Set severity or disable specific rules
- Manage exceptions: Add words to dictionary, ignore patterns
Usage
Check document
- Edit mode: Ensure your note is active and in Edit mode
- Command Palette:
Vale: Check document(or use configured hotkey) - Ribbon Icon: Click the Vale icon in the left sidebar to run a check
Underlined squiggly text indicates issues (click any underline to view details in the panel):
- Red underline: Errors
- Orange underline: Warnings
- Purple underline: Suggestions
View details and fix issues
Method 1: Hover Tooltip
- Hover over underlined text to see a tooltip with:
- Issue description
- Suggested fixes (click to apply)
- Actions (ignore, disable rule)
Method 2: Results Panel
- Open the Vale panel from the sidebar:
- Use
Vale: Check documentcommand to run check and open panel - Use
Vale: Open panelcommand to just open the panel
- Use
- Click an alert to jump to its location in the editor
- Review all issues in one place
Interactive navigation
The plugin provides seamless bidirectional navigation between the editor and results panel:
Click Underlines → Jump to Panel
- Click any underlined text in the editor to open the results panel
- The panel automatically scrolls to and highlights the corresponding alert
- Perfect for quickly viewing details about a specific issue
Click Panel Alerts → Highlight in Editor
- Click any alert in the results panel to scroll the editor to that location
- The underline is temporarily highlighted to show exactly where the issue is
- Makes it easy to review and fix issues one by one
Clear alerts
- Command Palette:
Vale: Clear alerts - Removes all underlines without fixing issues
- Useful when you want to focus on writing
Toggle alerts
- Command Palette:
Vale: Toggle alerts - Hides or shows all alert underlines
- Alerts remain in the panel even when hidden
Status bar
The status bar (bottom of window) shows real-time check status:
- "Vale: ready" - Plugin is ready to check documents
- "Vale: checking..." - A check is currently running
- "Vale: no issues" - Check complete with no issues found
- "Vale: X issue(s)" - Check complete with issues found (shows count)
Troubleshooting
No styles installed
Symptom: Vale runs but reports no issues (or "No styles found" error)
Solution (Managed mode):
- Go to Settings → Vale → Styles
- Toggle ON desired style packages (each style automatically downloads and installs when enabled)
- Configure individual rules in Rule Configuration as needed
Solution (Custom mode):
- Check your
.vale.inihas a validStylesPathsetting - Download styles to that path from Vale's style library
- Go to Settings → Vale → Styles to see your installed styles
- Toggle ON the styles you want to enable (this updates
BasedOnStylesin your.vale.ini)
Slow performance
Symptom: Typing lags, Obsidian becomes unresponsive during checks Solutions:
- Use manual checking: Only run checks when needed using the command or ribbon icon
- Reduce active rules: Disable unnecessary styles in Rule Configuration
- Check smaller sections: Clear alerts and check again after making changes
Underlines in wrong places
Symptom: Underlines don't move correctly when editing text Cause: Known edge case when edits occur during Vale check Solution:
- Clear alerts and re-check document
- This is rare and typically self-corrects
- Report persistent issues on GitHub with reproduction steps
Code blocks getting underlined
Symptom: Vale underlines text in code blocks or inline code Cause: Vale configuration or style issue Solution:
- Check your
.vale.iniincludesTokenIgnoresfor code:[*.md] TokenIgnores = (\$+[^\n$]+\$+), (`{3}[^`]+`{3}), (`[^`]+`) - Ensure Vale styles respect code syntax (most do by default)
Style management: managed vs custom mode
The Styles settings page behaves differently depending on which mode you are using:
| Action | Managed Mode | Custom Mode |
|---|---|---|
| Styles shown | Official Vale style library (8 styles) | Styles installed in your StylesPath directory |
| Toggle ON | Downloads, installs, and enables the style | Enables the style in .vale.ini only |
| Toggle OFF | Disables and uninstalls the style | Disables the style in .vale.ini only |
| Section heading | "Vale styles" | "Installed Styles" |
Managed mode is ideal if you want the plugin to handle everything for you. Toggling a style ON downloads it from the official repository, installs it, and configures your .vale.ini automatically.
Custom mode gives you full control. The plugin reads your existing StylesPath directory and displays whatever styles you have installed there. Toggling styles ON or OFF only updates the BasedOnStyles setting in your .vale.ini; it does not download or delete style files. To add new styles in Custom mode, download them from Vale's style library and place them in your StylesPath directory.
Note: If no styles appear in Custom mode, ensure your
.vale.inihas a validStylesPathpointing to a directory containing Vale style folders.
Vale resources
Vale is a powerful, open-source prose linter:
License
MIT License - see LICENSE file for details.
Acknowledgments
- Original obsidian-vale - The now archived original version of this repository by Marcus Olsson
- Vale - The amazing prose linter that powers this plugin
- Obsidian - The knowledge base that works on local Markdown files
- All contributors and users who provided feedback and bug reports
For plugin developers
Search results and similarity scores are powered by semantic analysis of your plugin's README. If your plugin isn't appearing for searches you'd expect, try updating your README to clearly describe your plugin's purpose, features, and use cases.