Fountain
approvedby bgrundmann
Write and view screenplays in Fountain format with index cards and lots of other features.
Fountain — write screenplays in obsidian
A plugin for writing screenplays in Fountain format inside Obsidian. Live formatting as you type, an editable index-card view, an outline-style sidebar, PDF export, rehearsal mode, snippets — basically the bits I kept wishing for whenever I tried to use Obsidian for actual scripts.
Highlights
- Live screenplay formatting as you type — follow Fountain syntax, the editor handles the formatting.
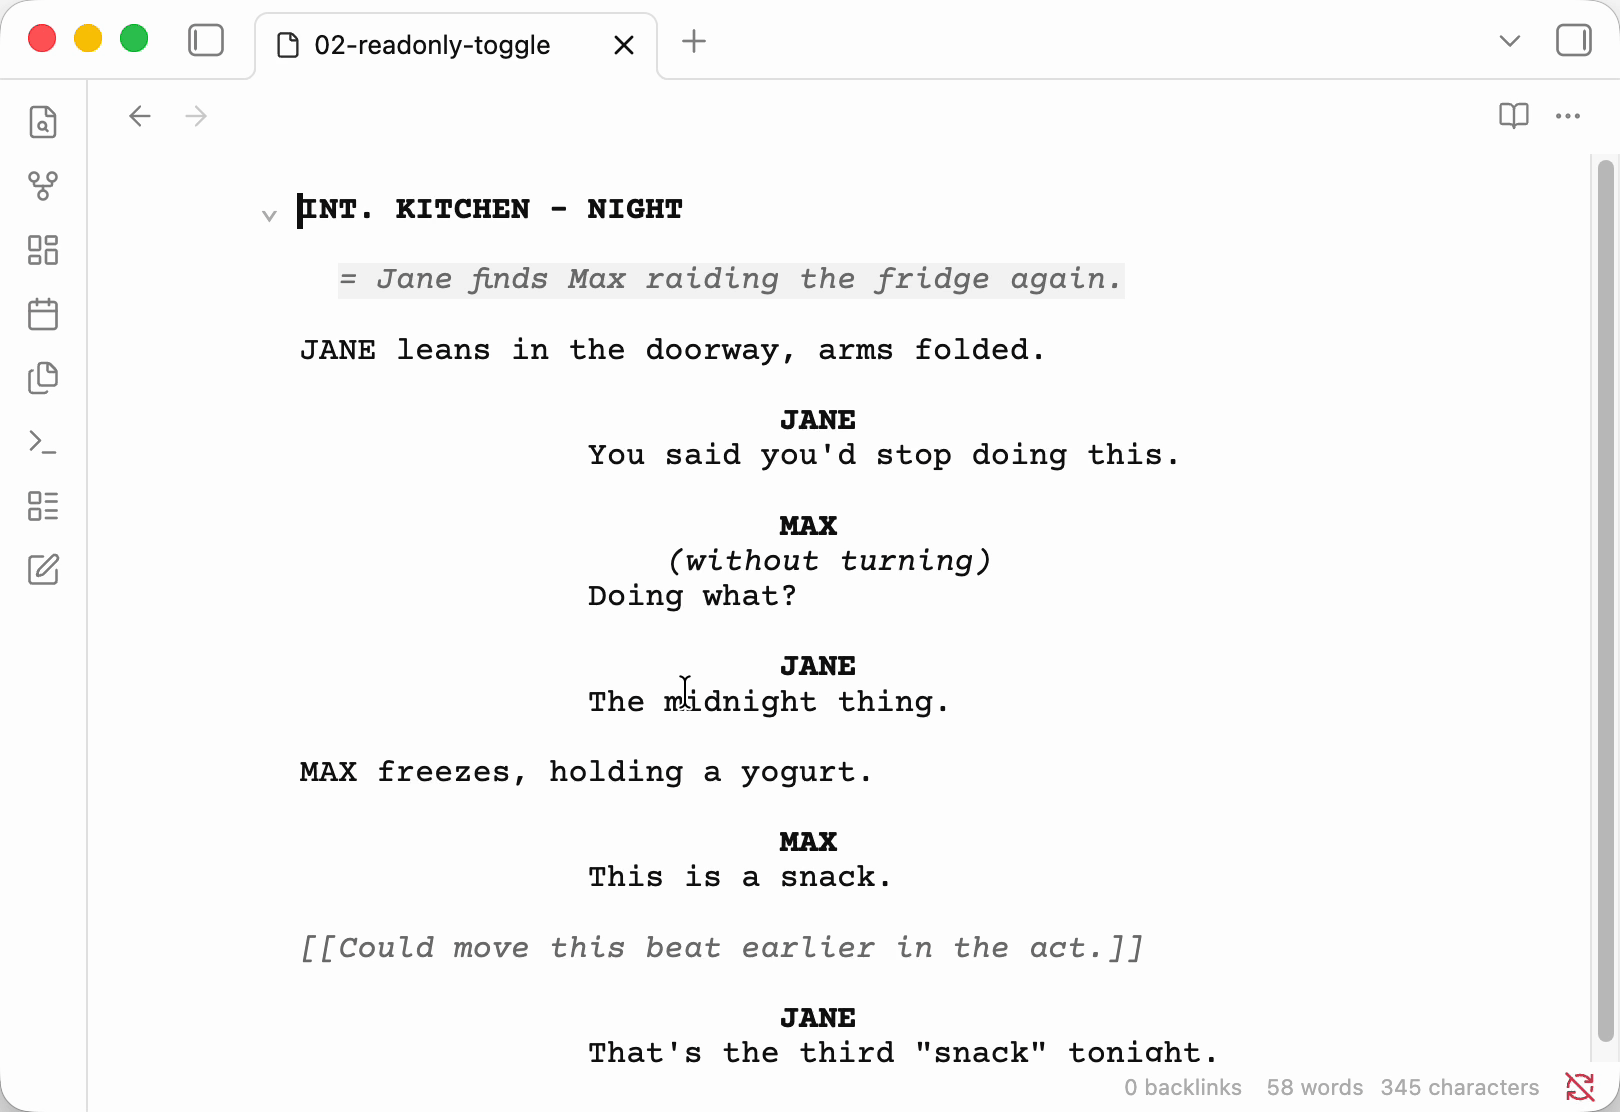
- Near-print readonly view with optional hiding of notes, synopsis, and boneyard.
- PDF export with configurable paper size, scene heading style, and synopsis/notes inclusion.
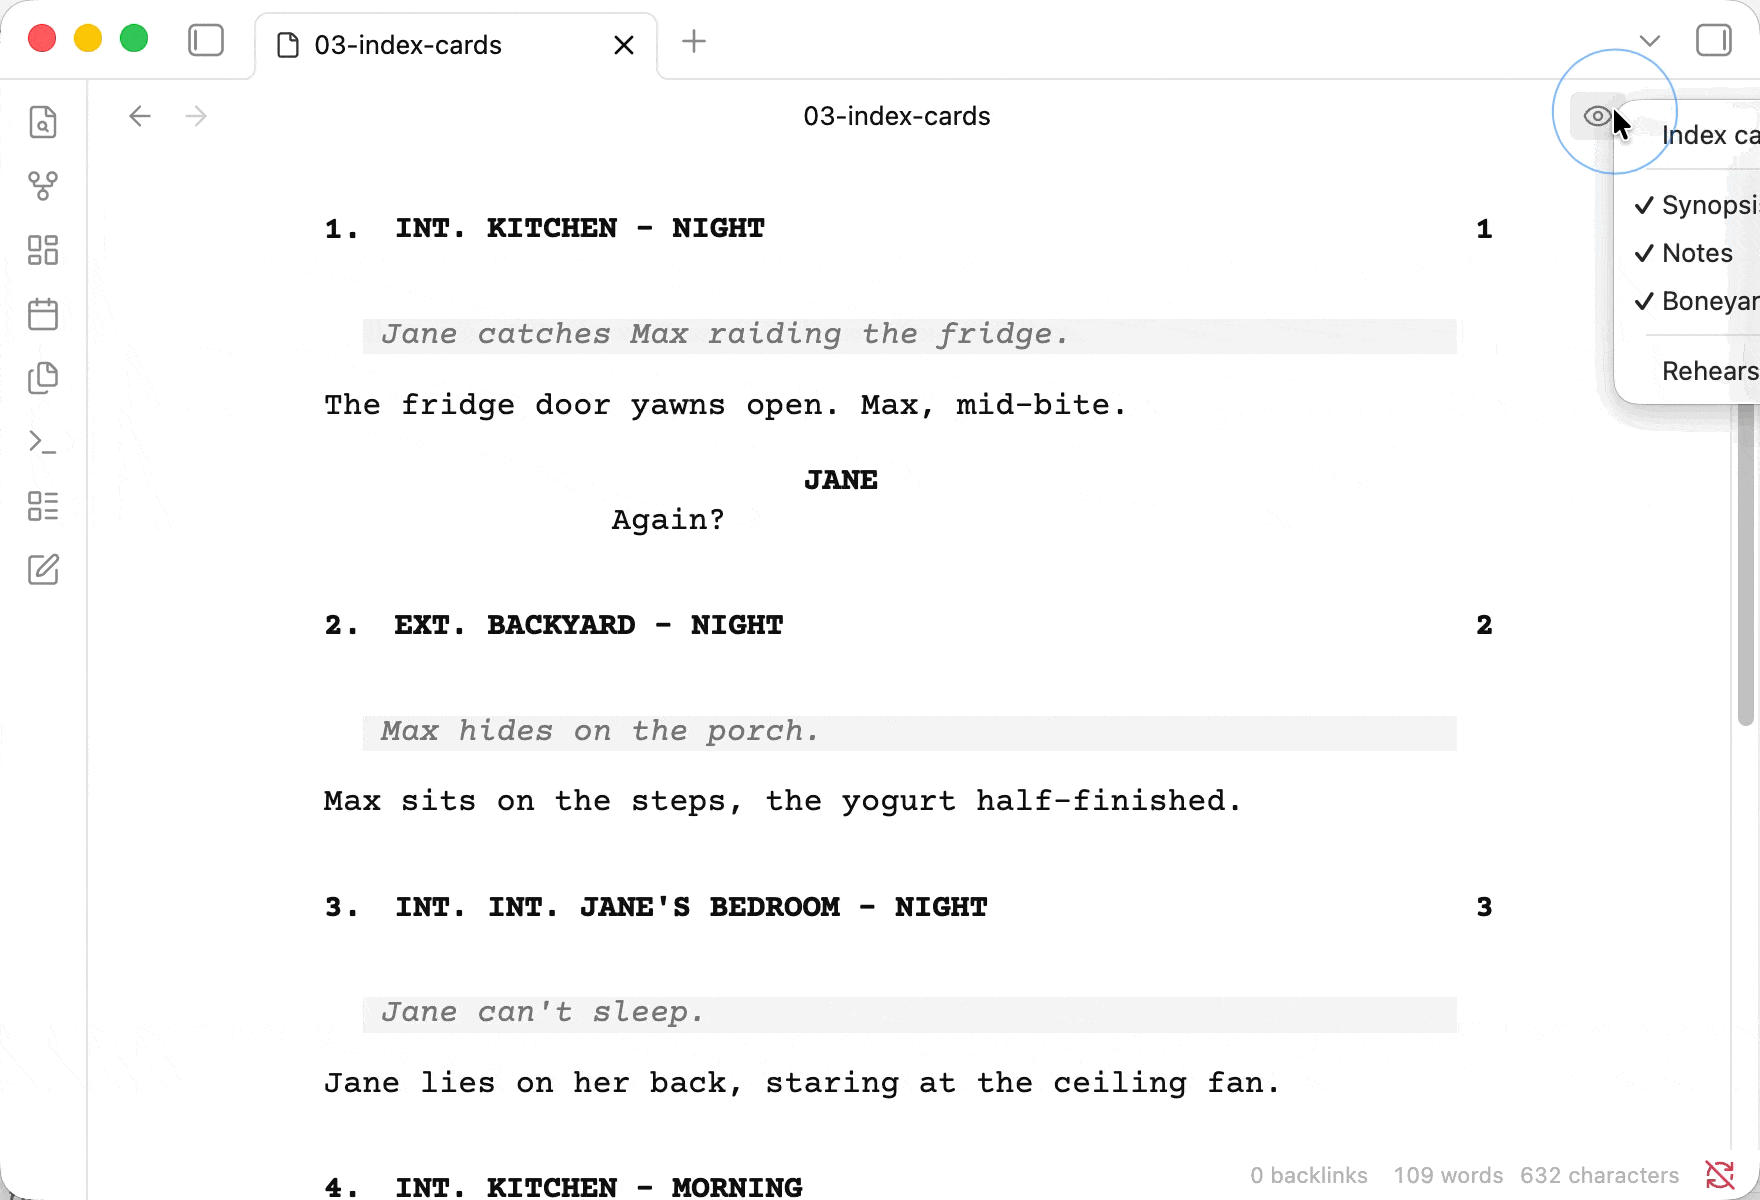
- Index card view — click a card to jump back to the editor at that scene; rename scene and section headings inline; insert scenes or sections at any position via hover gutters; change section depth or delete a section heading from the same rename input; drag-reorder across files; ⌘⇧I round-trips between cards and editor.
- Outline-style sidebar that doubles as a planning tree — sections, synopses, and per-scene todos, all click-to-jump.
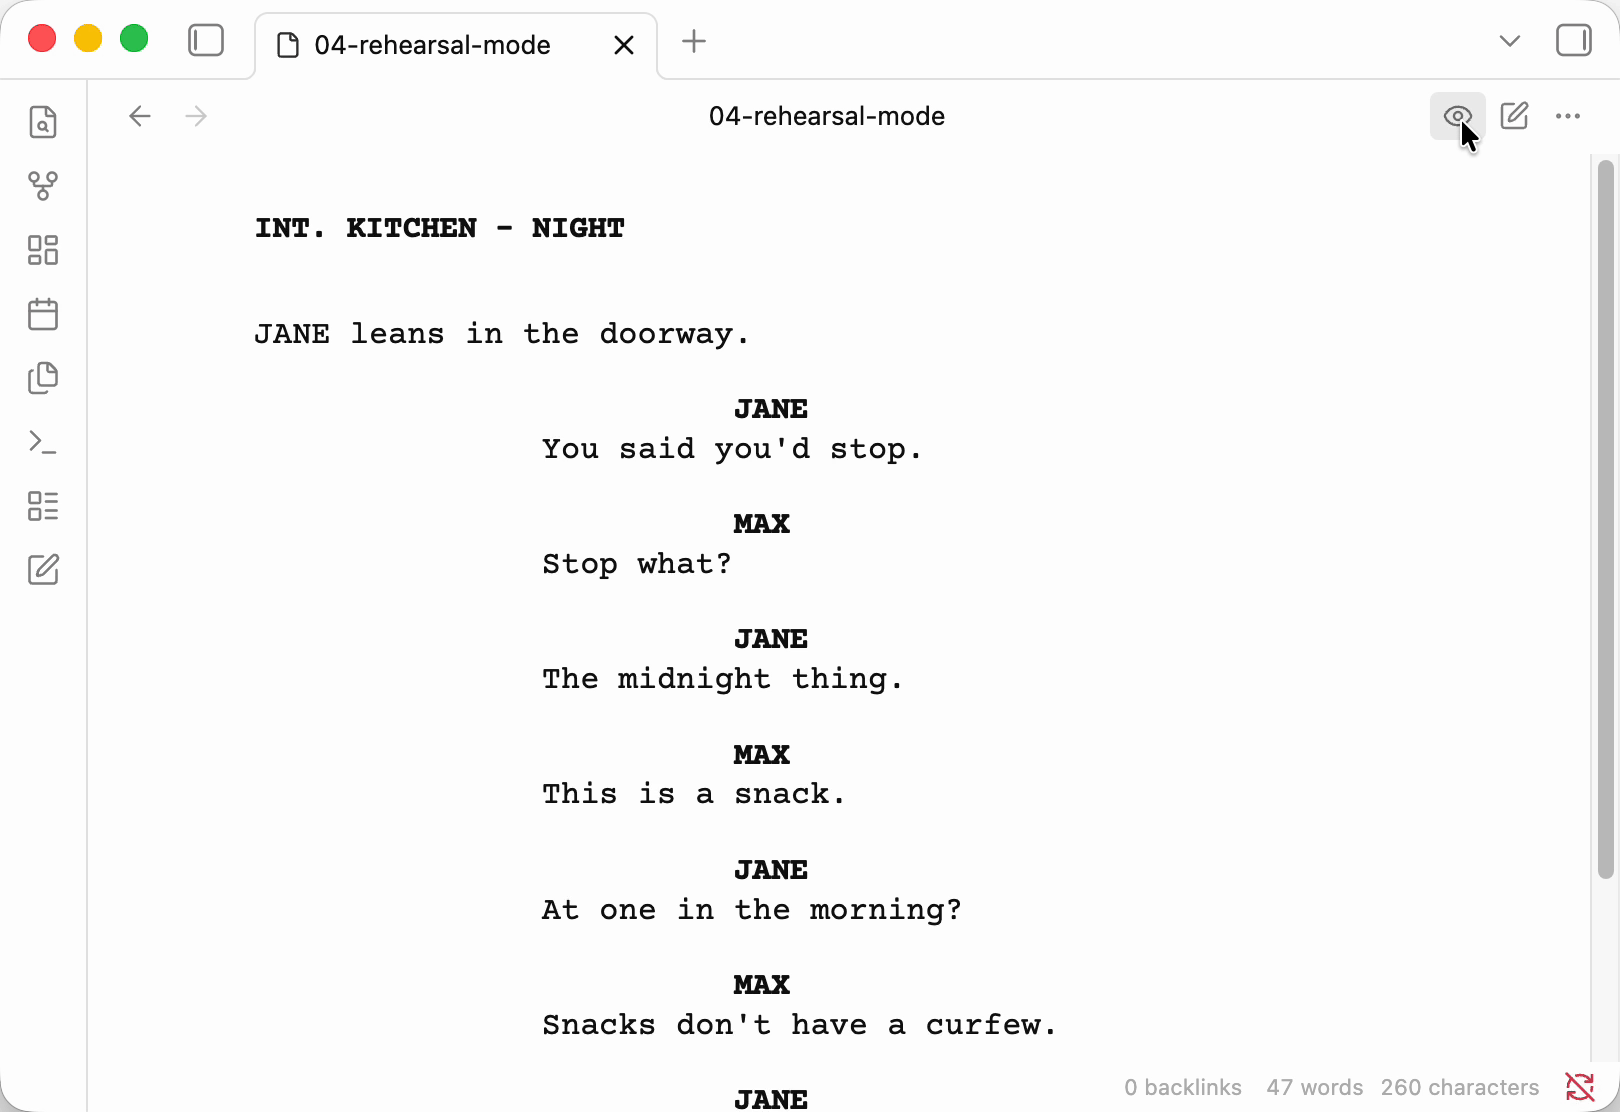
- Rehearsal mode that blacks out a character's dialogue, so you can actually rehearse from the script.
Quick overview
Type, watch it format:
Toggle between the editor and a near-print readonly view:
Reorder scenes by dragging index cards, then renumber them with two quick commands:
Rehearsal mode blacks out a character's dialogue:
Everything else
- scene numbers (
#1#,#1A#,#I-1-A#, etc.) displayed in bold on left and right margins, with commands to automatically add or remove scene numbers - content filtering/removal commands to create filtered script versions (remove character dialogue, scenes/sections, or element types)
- dual dialogue (
^marker on the second character) renders as two side-by-side columns in the readonly view and PDF; orphan or unpaired carets show in the editor in the theme's error color so you can see when a^had no effect - mark notes as todo
[[todo: This is a todo]] - snippets system for reusable content blocks (stored within the document)
- margin marks for script annotations (
[[@marker]]syntax) that appear in the margin during reading view - links to other vault files (
[[>target]]or[[>target|display text]]) — clickable in reading view, autocomplete in editor, automatically rewritten when the target is renamed - fountain code blocks support for embedding fountain scripts in regular markdown notes (reading mode only -- NOT in live preview)
- button in ribbon to create a new script (as scripts have .fountain extension)
- boneyard support (content after "# boneyard" header can be hidden)
- folding of scenes
- toggle spell check command (off by default to avoid distraction during creative writing)
- search and replace in editor (Cmd/Ctrl+F)
- toggle edit mode with Cmd/Ctrl+E (when a fountain file has focus)
- toggle index-card view with Cmd/Ctrl+Shift+I; the cursor and scroll position are preserved across the round-trip
- select the current scene as text with Cmd/Ctrl+Shift+L — composes with the system clipboard for delete (
⌘X) and duplicate (⌘C,↓,⌘V), or to cut a scene out and paste it into another file
Command reference
See here Command Reference.
Known Issues
Margin marks
- Multiple margin marks on the same line will overlap in the reading view.
The PDF export is probably not following industry standards
- That is I don't need it to follow industry standards. I just needed something that gave me a decent PDF.
- If you have stricter requirements, chances are you should use something like Highland Pro
- But if you can let me know exactly what you need, I promise to at least contemplate implementing it.
Compatibility with Custom File Extensions Plugin
⚠️ Important: This plugin is incompatible with the Custom File Extensions plugin when configured to handle .fountain files.
If you have Custom File Extensions plugin installed and configured to open .fountain files, the plugin may crash without obvious error messages. To fix this:
- Open Custom File Extensions plugin settings
- Remove
.fountainfrom the list of custom file extensions - Restart Obsidian
This plugin handles .fountain files natively and doesn't require Custom File Extensions to work properly.
Using the Index Card View
The index card view is the structural read on your script — a map you can rearrange. It is not a second editor; anything that changes scene contents (synopsis text, dialogue, action) lives in the editor.
Toggle (⌘⇧I)
Press Cmd/Ctrl+Shift+I to flip between the editor (or readonly script) and the index card view. The toggle remembers where you came from:
- From the editor → the card for the scene under the cursor scrolls into view.
- From the cards → the editor opens at the start of scene content of the topmost visible card. That's the first character after the heading's blank line — your synopsis if one exists, otherwise the first action / dialogue line.
A round-trip with no edits leaves you (approximately) where you started.
Click model
- Click anywhere on a card — jump back to the editor at that scene.
- Pencil icon (top-right) — rename the heading inline.
Entersaves,Esccancels, click outside also saves. - Pencil next to a section heading — same gesture, but the input shows the full
## Titleform so you can change depth or, by clearing the input, delete the section heading entirely. - Grip handle (top-left) — drag to reorder. Same drag works across open files.
- Todo lines on the card jump to the todo's exact location, not the scene heading.
Inserting scenes and sections
Hover the left edge of any card (or the right edge of the last scene in a section) to reveal a thin gutter with two stacked buttons: + inserts a new .SCENE HEADING placeholder, # inserts a new # section. The new card or heading auto-focuses its rename input so you can start typing immediately. Empty sections show a dashed + card as the persistent aim point.
A horizontal + section bar shows above the first section (when the doc starts with one) and at the bottom of the doc, so you can prepend or append a section without finding a specific card to anchor to.
Cut / copy / duplicate scenes
There is no per-card menu. Use Select current scene (Cmd/Ctrl+Shift+L) in the editor to set the selection to the whole scene, then compose with the system clipboard:
⌘⇧L,⌘X— delete a scene.⌘⇧L,⌘C,↓,⌘V— duplicate a scene.⌘⇧L,⌘X, switch file,⌘V— move a scene across files.
Drag a card into Snippets
Drag any card onto the snippets section in the sidebar to copy that scene as a new snippet. The original scene stays in the script (snippets are a library, not a destination). Cross-file drags are supported — the dragged scene lands in the destination script's # Snippets section.
Using the Table of Contents
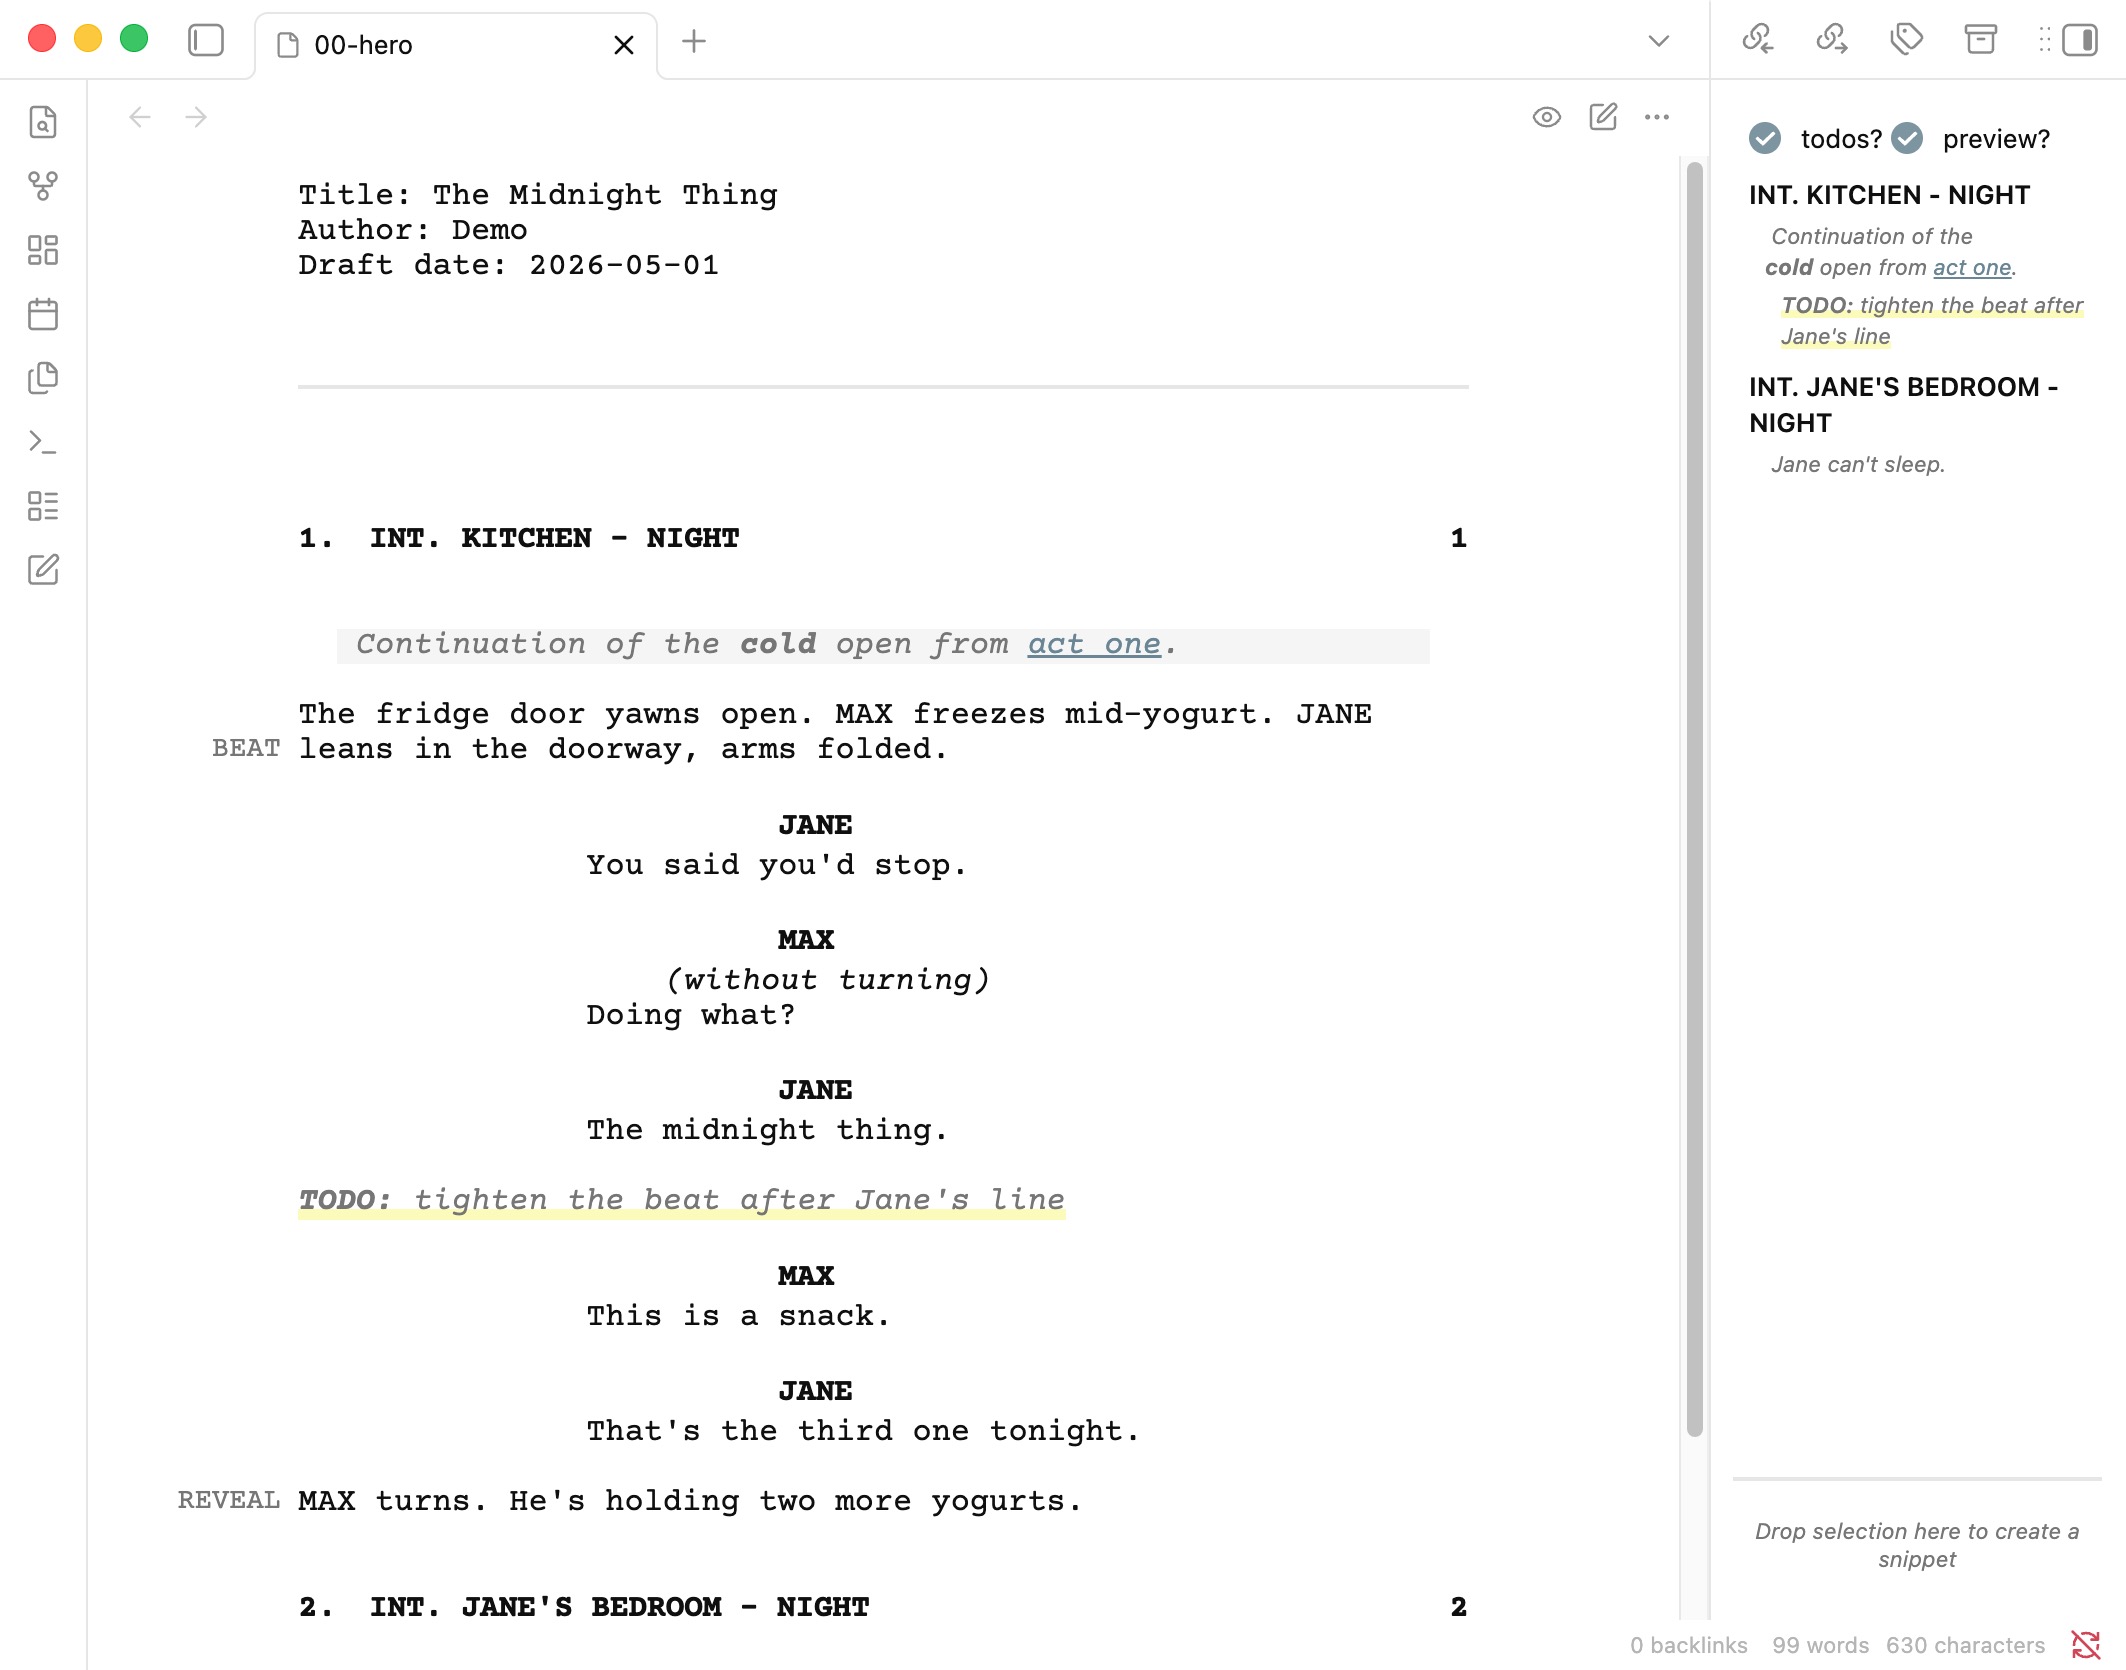
The TOC sidebar is where the planning side of the plugin lives. Open it on the right and you get a live outline of your script — sections, scenes, synopses, and todos in one tree.
What it shows
- Sections (
#,##, …) as a hierarchy, with their scenes nested inside. - Scene headings under each section.
- Synopsis lines (the
= ...Fountain syntax) shown as your outline. - Auto-previews for scenes without a synopsis — the first sentence or two of the scene, so the outline stays useful before you've written synopses.
- Todos (
[[todo: ...]]) listed under their containing scene.
Click any of them to jump to that location in the script.
Toggles
At the top of the sidebar:
- todos? — show or hide per-scene todos. On by default.
- preview? — show or hide synopsis lines and auto-previews. Off by default, so the outline starts as a plain scene list — turn it on when you want detail.
Using Margin Marks
Margin marks are special annotations that render as single words in the page margin during reading view, allowing you to quickly scan for specific moments in your script.
Syntax
Use [[@marker_word]] where the marker word is alphanumeric with underscores (no spaces):
The magician waves the wand, the ball disappears. [[@effect]]
The audience gasps. [[@laugh]]
The lights dim. [[@lights]]
Common Use Cases
Magic/Performance Scripts: Mark effects with [[@effect]]
Comedy Scripts: Mark jokes with [[@setup]], [[@punchline]], [[@laugh]]
Drama Scripts: Mark emotional beats with [[@tension]], [[@release]], [[@revelation]]
Technical Scripts: Mark cues with [[@lights]], [[@sound]], [[@music]]
How It Works
- In reading view: Margin marks appear as small labels in the right margin
- In editor view: Margin marks are displayed inline with distinct styling
Using Links
Link to other files in your vault — other fountain scripts, markdown character notes, research documents, etc. Obsidian's standard [[wiki-links]] can't be used inside fountain files because Fountain already uses [[ ]] for notes (comments), so this plugin uses a > prefix:
INT. KITCHEN - DAY

JANE enters, holding the file from earlier. [[>act-one|earlier scenes]]

JANE
(to herself)
This changes everything.

= See [[>characters/jane.md]] for backstory.
Syntax
[[>target]]— display the target as the link text[[>target|display text]]— show custom text for the link
The target is resolved the same way as Obsidian's wiki-links — by basename or path, with or without file extension. So [[>jane]], [[>jane.md]], and [[>characters/jane]] all resolve to characters/jane.md if that's the closest matching file.
How It Works
- Reading view: Links render as styled, clickable text. Click to navigate; Mod/Ctrl-click opens in a new tab.
- Editor: Links are syntax-highlighted to stand out from plain notes. Typing
[[>triggers autocomplete with vault file names — pick one and the closing]]is added for you. - PDF export: Links are notes (a Fountain
[[ ]]with a>prefix), so they follow the Hide notes option in the PDF dialog. With Hide notes off, the link's display text (or target name) renders inline as plain text. With Hide notes on, links are omitted along with every other note. Use plain prose if you want the word to remain in a notes-hidden export. - Rename: When a linked file is renamed, every
[[>...]]in your fountain files is updated automatically — preserving the form you originally used (basename vs full path, with/without extension).
Limitations
- Links can only appear where Fountain notes already work — inside action, dialogue, lyrics, and the like. They can't be embedded inside scene headings or character lines, since those are parsed as single tokens.
.fountainfile links don't appear in Obsidian's backlinks pane or graph view. The Obsidian plugin API doesn't yet expose link metadata for non-markdown file types.
Using Scene Numbers
Scene numbers follow the Fountain specification and allow you to number your scenes for production purposes. They appear in bold on both the left and right margins of your script.
Syntax
Add scene numbers at the end of any scene heading using the format #content#:
INT. HOUSE - DAY #1#

EXT. PARK - NIGHT #2A#

INT. OFFICE - MORNING #I-1-A#

FLASHBACK - INT. CHILDHOOD HOME #110A#
Supported Formats
The plugin supports all Fountain specification scene number formats:
- Numeric:
#1#,#42#,#999# - Alphanumeric:
#1A#,#1a#,#2B#,#A1# - Complex:
#I-1-A#,#1.5#,#1-2-3# - With periods:
#1.#,#2.1#
How It Renders
In Reading View: Scene numbers appear in bold on both margins
2A. INT. HOUSE - DAY 2A
In PDF Export: Scene numbers are positioned in the left and right margins with proper spacing to avoid text overlap
Scene Numbering Commands
The plugin provides two commands to help manage scene numbers automatically:
Add Scene Numbers
- Adds sequential scene numbers starting from #1# to scenes that don't already have them
- When encountering existing numeric scene numbers (like #6#), continues numbering from that number + 1
- Preserves non-numeric scene numbers (like #5A#) but doesn't let them affect the sequential counter
- Example: If you have scenes A, B #5A#, C, D #6#, E → becomes A #1#, B #5A#, C #2#, D #6#, E #7#
Remove Scene Numbers
- Removes all scene numbers from all scenes in the document
- Processes scenes safely to maintain proper text formatting
Access these commands through Obsidian's command palette (Cmd/Ctrl+P) when a fountain file is open.
Notes
- Scene numbers are completely optional - scenes without numbers work exactly as before
- Scene numbers must appear at the very end of the scene heading line
- Only alphanumeric characters, dashes, and periods are allowed inside the
#markers - Whitespace around scene numbers is automatically handled
Content Filtering Commands
The plugin provides three commands to create filtered versions of your scripts, perfect for creating actor sides, technical scripts, or focused drafts.
Remove Character Dialogue
Create a version of your script with specific characters' dialogue removed:
- Interactive modal with scrollable character list
- "Select All" toggle for bulk operations
- Creates a filtered copy by default (e.g., "Script (filtered).fountain")
Remove Scenes and Sections
Selectively remove structural elements from your script:
- Hierarchical tree view with visual indentation
- Checking a section auto-selects all nested content
- Unchecking any item automatically unchecks parent sections
- Shows anonymous scenes (scenes without headings) as "(anonymous scene)"
Remove Element Types
Filter out specific fountain element types:
- Remove action lines, transitions, synopsis, notes, scene headers, etc.
- Keep only the elements you need for your specific use case
Safety Features
- Default behavior: Creates a new filtered copy, preserving your original
- Unique naming: Automatically handles file naming (filtered, filtered 2, etc.)
- Optional direct editing: Can modify the current file if explicitly chosen
- Warning: Direct modification has no undo in readonly mode
Access these commands through Obsidian's command palette (Cmd/Ctrl+P) when a fountain file is open.
Using Snippets
The snippets feature allows you to store blocks of content within your fountain document for two main purposes:
Reusable Content: Store frequently used elements like:
- Recurring dialogue patterns or catchphrases
- Action descriptions for similar locations or situations
Temporary Stash: Use snippets as a holding area for uncertain content:
- Scenes you're not sure belong in the current draft
- Alternative dialogue or action that you want to compare
- Cut scenes that might be useful later
- Experimental content you're workshopping
Unlike the boneyard (which hides content completely), snippets remain visible in the sidebar, making them perfect for content you're actively reconsidering or might want to quickly reintegrate.
Setting up Snippets
Snippets are stored at the end of your fountain document in a special section:
# Snippets

EXT. COFFEE SHOP - DAY

The usual busy morning crowd fills the cozy coffee shop.

===

WAITRESS
(approaching)
What can I get you today?

===

FADE TO BLACK:
Creating Snippets
Method 1: Direct editing
- Scroll to the end of your document and add a
# Snippetssection - Add your reusable content blocks, separating each with
===(page breaks)
Method 2: Keyboard shortcuts
- Select any text in your script (outside the snippets section)
- Press Cmd/Ctrl+Shift+X to move the selection to snippets
- Press Cmd/Ctrl+Shift+C to copy the selection to snippets (keeping the original)
Method 3: Drag and drop
- Select text in your script and drag it into the snippets area in the sidebar
Using Snippets
- Open the Table of Contents panel in the right sidebar
- The bottom section shows your available snippets as scaled-down previews
- Click on any snippet to jump to its location in the document for editing
- Drag and drop snippets from the sidebar into your script to insert them
- Snippets are copied (not moved) when dragged, so they remain available for reuse
Important Notes
- Everything after
# Snippetsis considered snippet content, even other section headers - Snippets are hidden from the main script when boneyard hiding is enabled
Why did I do this?
This is the result of me realising that https://github.com/Darakah/obsidian-fountain isn't a thing anymore when I setup a new vault.
And obsidian-fountain-editor only solves the editing of markdown files marked as fountain in the header. But doesn't give you a readonly view, and treats fountain notes as links. Which for most people is probably a feature, but for me is primarily annoying, as I do have lots of scripts with fountain notes in them. And while I do want and use synopsis they for me do not do the same thing.
So at first I quickly threw together fountain-js and the css written by Bluemoondragon07 at the obsidian forum.
Than I started adding more features and eventually got fully nerdsniped into writing my own parser (because fountain-js does not give you offsets in the source and it's not a trivial fix because of the way it handles boneyards by pre-processing the source).
Once I got that far I realised that I wanted the ability to integrate the editor and the readonly view, so I ended up taking over the functionality of obsidian-fountain-editor as well.
So here we are. Hopefully this is useful to more people than just me ;-) If it is let me know.
For plugin developers
Search results and similarity scores are powered by semantic analysis of your plugin's README. If your plugin isn't appearing for searches you'd expect, try updating your README to clearly describe your plugin's purpose, features, and use cases.