by Horizon Vector
Size table columns to their content, let wide tables use the free space in the pane, and drag column edges to set widths that are saved with the note.
Gridlock Tables
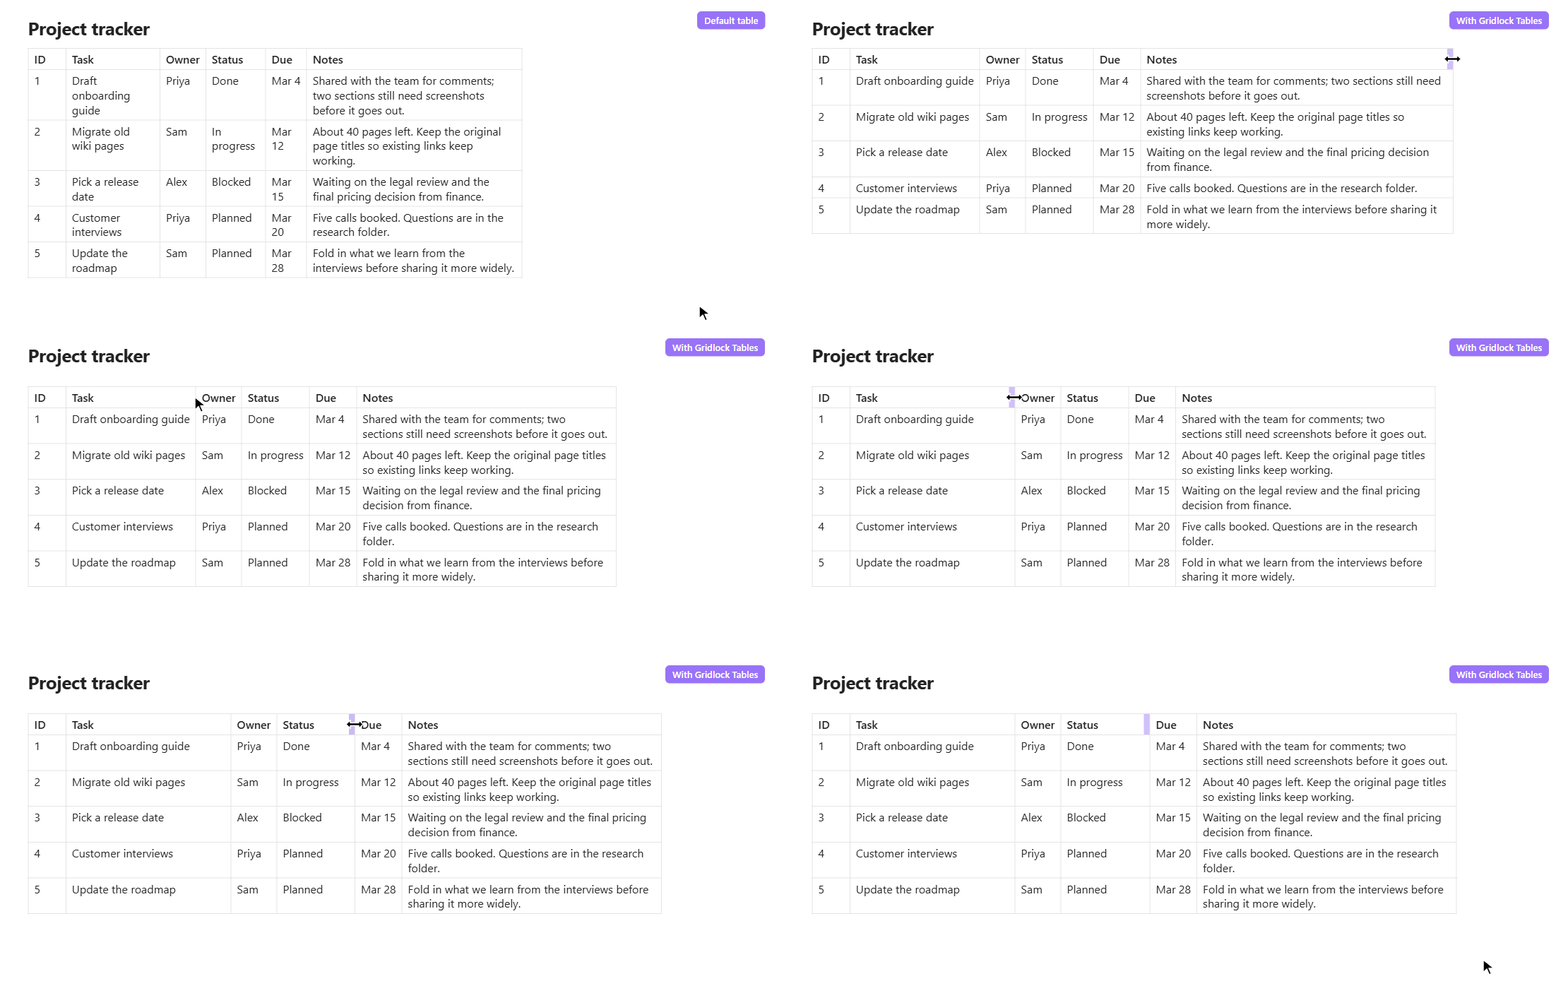
Gridlock Tables makes Markdown tables easier to read and arrange. Columns size to what's in them, a wide table uses the free space in your pane, and when you drag a column to a width you like, it stays that way.
It works in Reading view and Live Preview.
Why I made this
I keep a lot of notes in tables, and I missed how tables behave in OneNote: a short column stays short, a long one wraps, and you can grab a column edge and set the width yourself. Obsidian's tables are clean and simple, and I wanted to keep that while adding a little more control. Gridlock leaves your Markdown as ordinary Markdown and only changes how the table is laid out.
| Default tables | With Gridlock | |
|---|---|---|
| Column widths | Set automatically by the layout | Sized to their content, within a minimum and maximum you choose |
| Wide tables | Stay within the readable line width and scroll sideways inside it | Grow into the free space beside the readable line, and scroll sideways only when they run out of room |
| Resizing a column | Not available | Drag a column edge, or double-click it to fit the content |
| Remembering widths | Not available | Saved with the note by default, so they survive renames, moves and sync |
| Look and feel | Follows your theme | Follows your theme, with optional font, size and spacing controls through Style Settings |
Using it
Install the plugin and your tables pick up the new layout straight away. There is nothing to set up unless you want to.
- Resize a column: with a mouse, hover over any column edge until the cursor changes, then drag. On a touch screen, drag the handle at the right edge of the header cell. The other columns keep their current width, so the table grows or shrinks by the amount you drag, as in OneNote. From then on that table's columns keep their widths when you edit the text; delete the width comment to go back to automatic sizing.
- Fit a column to its content: double-click (or double-tap) the column edge.
- Go back to automatic widths: delete the width comment above the table (see below). Widths saved in plugin data can't be reset yet.
Where resized widths are saved
When you resize a column, Gridlock writes the widths into the note as an HTML comment above the table, followed by a blank line:
<!-- gridlock-cols: 12ch auto 40ch -->

| Col A | Col B | Col C |
There is one value per column: a width in characters (ch), or auto for a
column that sizes to its content. Other Markdown apps ignore the comment, so
your notes stay portable and the widths travel with the note. Live Preview
hides the comment until your cursor is on it; Source mode always shows it.
If you'd rather keep your Markdown untouched, set Save column widths to In plugin data, and widths are stored in the plugin's own data instead.
Turning it off for one note
Add the gridlock-tables-off CSS class to a note's properties and its tables
render normally, while the plugin keeps working everywhere else:
---
cssclasses: [gridlock-tables-off]
---
Settings
- Enable plugin: turn Gridlock off everywhere without uninstalling it.
- Minimum column width / Maximum column width (4 to 120 characters, defaults 6 and 60): a short column never shrinks to a sliver, and a column of long text wraps instead of taking over the table.
- Save column widths: In the note (default) or In plugin data.
- Hide width comments in Live Preview (default on): turn this off if you'd rather see the width comment while you edit.
Style Settings
If you use the Style Settings plugin, a Gridlock Tables section lets you change the table font, header font, text size, header text size, header weight, line height, and cell padding. Anything you leave alone keeps following your theme.
Installing
In Obsidian, open Settings → Community plugins → Browse, search for Gridlock Tables, then install and enable it.
Gridlock needs Obsidian 1.14.4 or newer.
Feedback
Found a bug or have an idea? Please open an issue.
Development
npm install
npm run dev     # watch build to main.js
npm run build   # typecheck + production build
npm run lint
npm test
Design notes and the reasoning behind the layout are in
docs/research/feasibility.md.
License
MIT
For plugin developers
Search results and similarity scores are powered by semantic analysis of your plugin's README. If your plugin isn't appearing for searches you'd expect, try updating your README to clearly describe your plugin's purpose, features, and use cases.