Sidekick
pendingby Alex Vieira
Meet your AI sidekick — a second brain that brings agents, tools, skills, autocompletion, and smart workflows directly into your notes.
Sidekick

Your AI-powered second brain inside Obsidian. Chat with agents, run tools, fire triggers, search your vault with AI, and transform text — all without leaving your notes.
Sidekick connects to GitHub Copilot or your own AI provider and gives you a fully configurable assistant panel with agents, skills, MCP tool servers, prompt templates, triggers, ghost-text autocomplete, and an AI-powered editor.
Overview
The Sidekick panel sits in the right sidebar alongside your notes. Pick an agent, toggle skills and tools, then chat — responses stream in with full Markdown rendering and collapsible tool-call details.
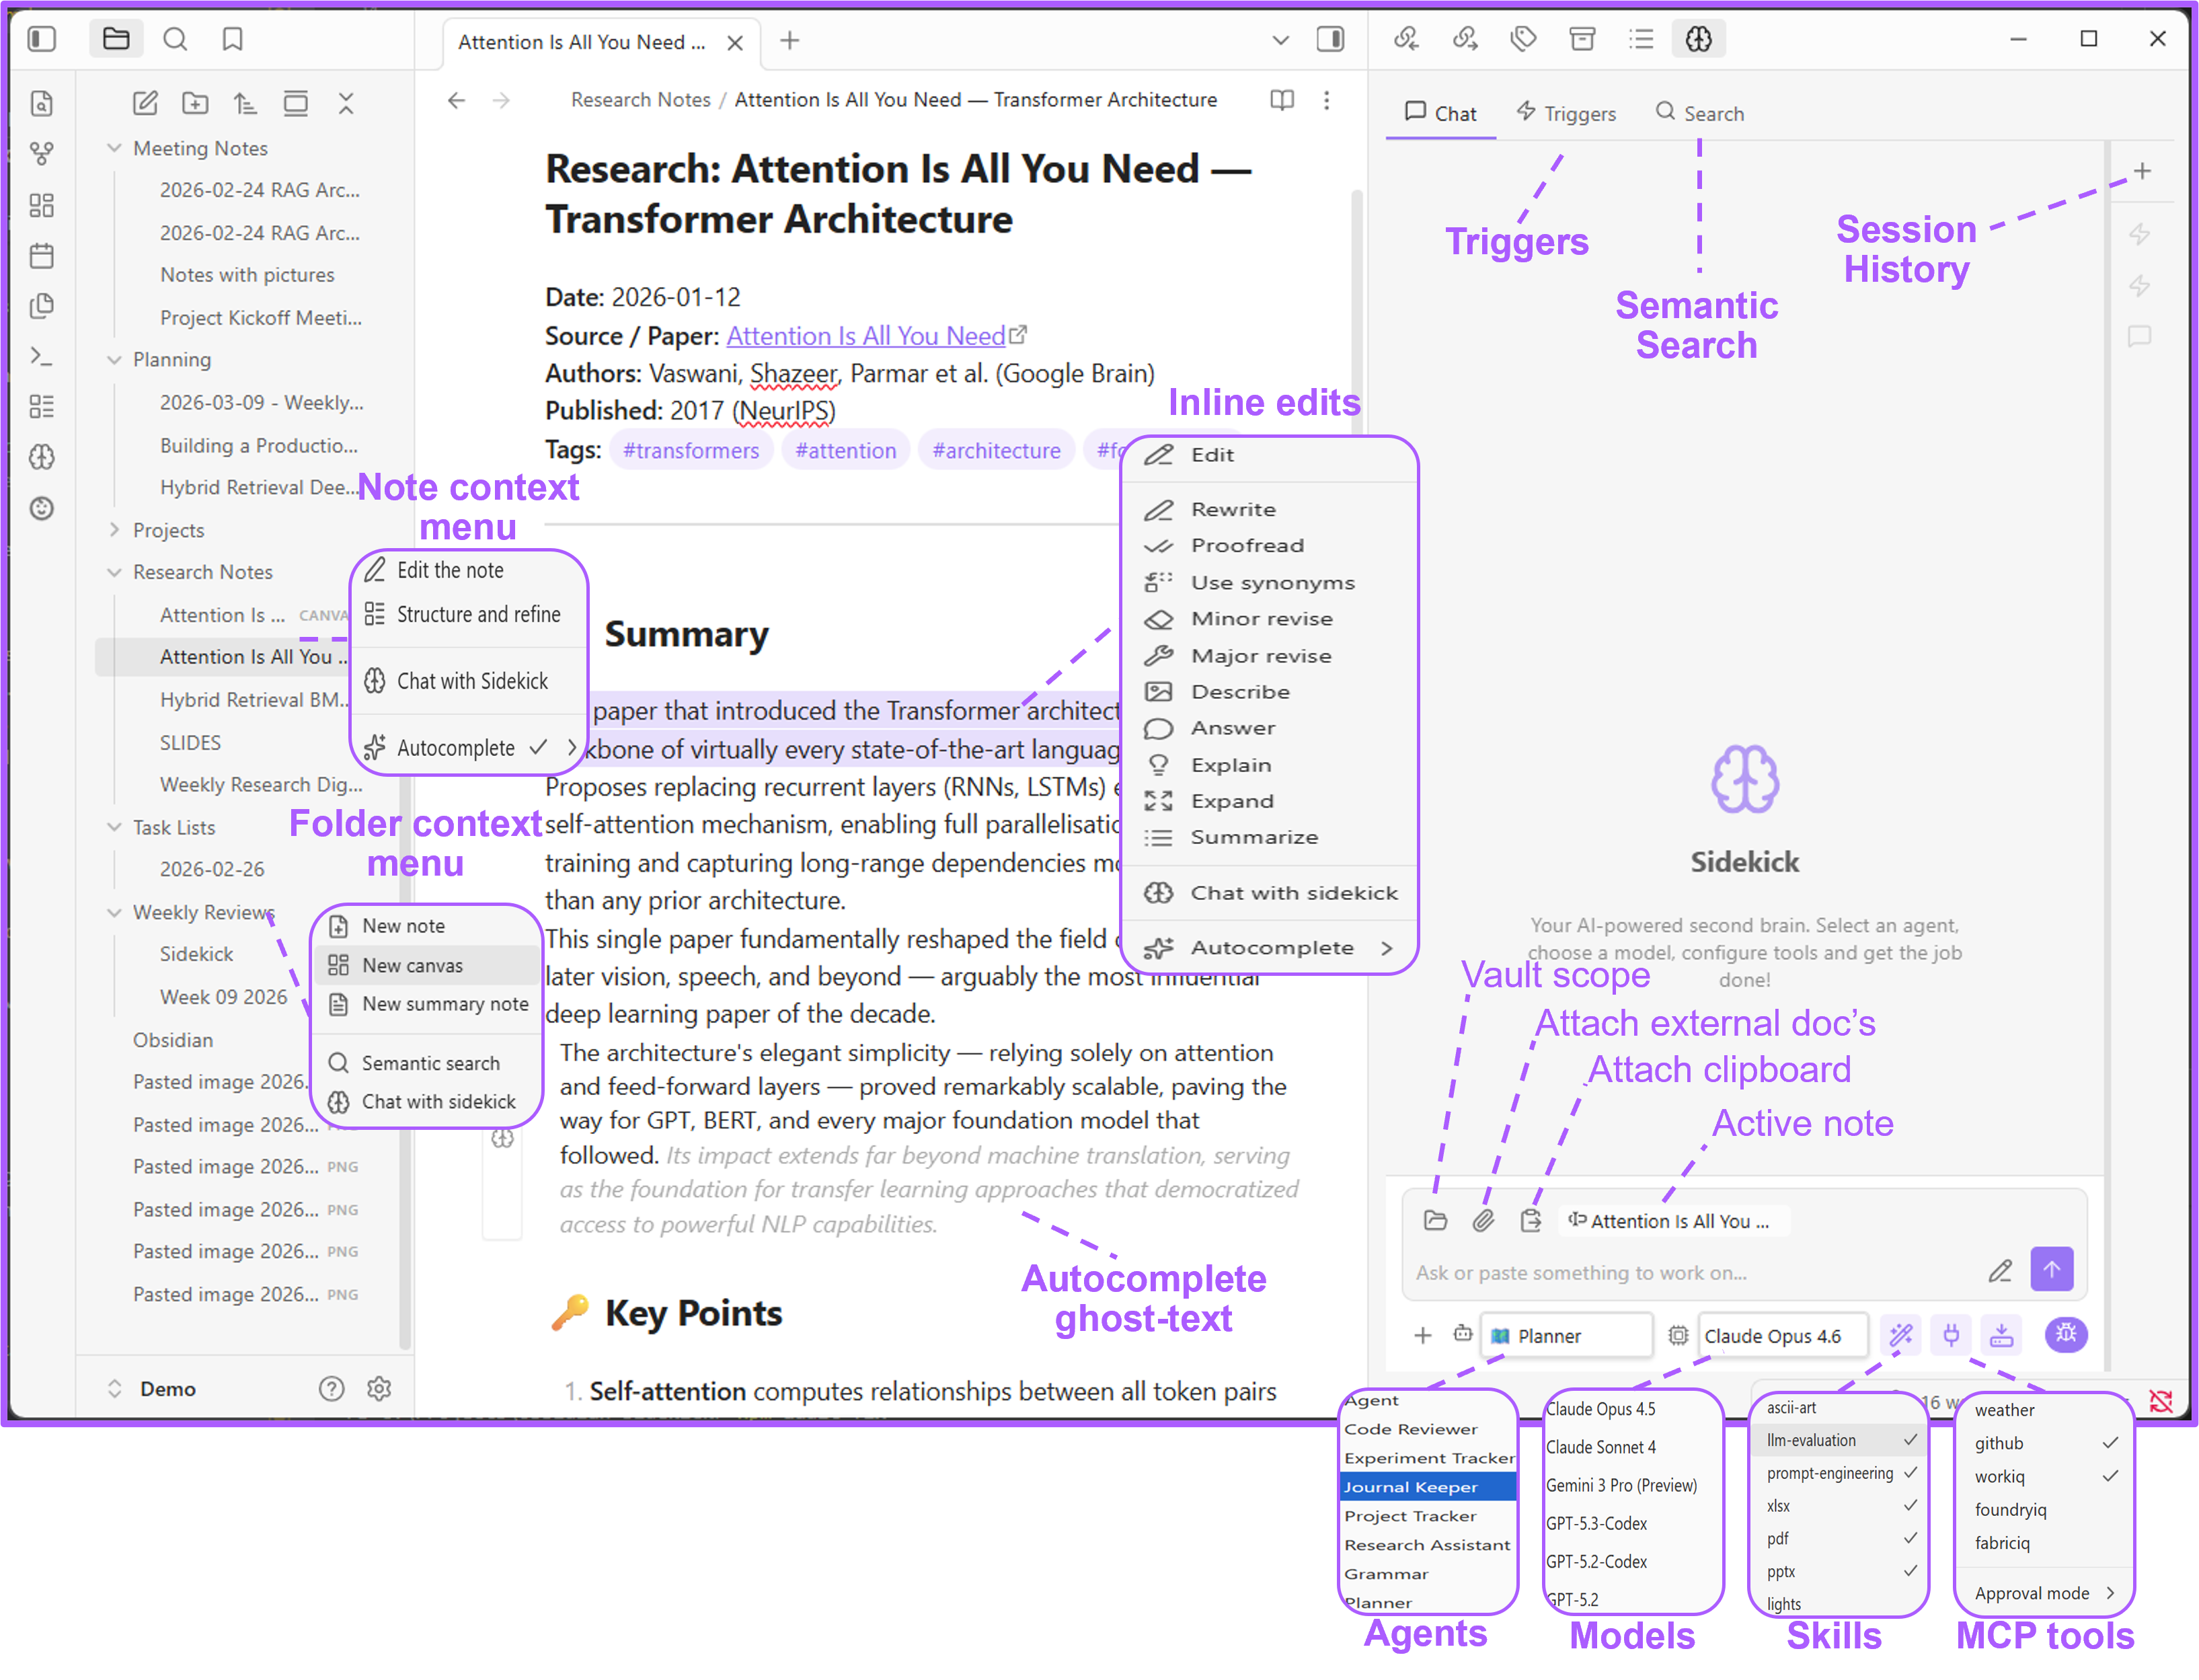
What you see above: the chat tab with an active agent, model selector, reasoning toggle, and a streamed response. The session sidebar on the right lists past conversations. Context-menu actions, ghost-text autocomplete, triggers, and search all work from the same panel.
[!CAUTION] With great power comes great responsibility. This plugin can execute tools, run CLI commands, and modify your files on your behalf. This software is provided as open-source without any warranty or support. Use at your own risk.
Quick start
- Install — Either:
- Via BRAT — Install the BRAT community plugin, then add
https://github.com/vieiraae/obsidian-sidekickas a beta plugin. BRAT handles downloads and updates automatically. - Manual — Download
main.js,styles.css, andmanifest.jsonfrom the latest release into<YourVault>/.obsidian/plugins/sidekick/. Then reload Obsidian and enable Sidekick in Settings → Community plugins.
- Via BRAT — Install the BRAT community plugin, then add
- Pick a provider — Open Settings → Sidekick. Use GitHub (built-in) with a Copilot subscription (set up the CLI), or choose a BYOK provider (OpenAI, Anthropic, Ollama, etc.). Click Test to verify. With Ollama or Microsoft Foundry Local you can work offline.
- Initialize — Under Sidekick settings, set a folder name (default:
sidekick) and click Initialize to scaffold the config structure:sidekick/ agents/ ← *.agent.md persona files skills/ ← subfolder per skill with SKILL.md tools/ ← mcp.json server config prompts/ ← *.prompt.md slash commands triggers/ ← *.trigger.md automated tasks - Open Sidekick — Click the brain icon in the ribbon, or run Open Sidekick from the command palette.
You're ready. Start chatting, or read on to unlock every feature.
Table of contents
- Setting up the Copilot CLI
- The Sidekick panel
- Agents
- Models
- Skills
- MCP Tools (MCP servers)
- Browser use
- CLI Tools
- Prompt templates
- Triggers
- Bots
- Inline edits
- Settings reference
- Using your vault with GitHub Copilot in VS Code or Copilot CLI
- Feedback
Setting up the Copilot CLI
If you chose the GitHub (built-in) provider, Sidekick talks to GitHub Copilot through its CLI. If you have GitHub Copilot in VS Code, the CLI is already installed.
Check it works:
copilot --version
If not found, look here:
| OS | Typical path |
|---|---|
| Windows | %LOCALAPPDATA%\Programs\copilot-cli\copilot.exe or %USERPROFILE%\.vscode\extensions\github.copilot-*\copilot\dist\ |
| Linux / macOS | ~/.local/bin/copilot or ~/.vscode/extensions/github.copilot-*/copilot/dist/ |
Authenticate (if needed):
copilot auth login    # browser-based flow
copilot auth status   # confirm you're logged in
Configure in Sidekick — Go to Settings → Sidekick → GitHub Copilot Client:
- Local CLI — Set the path to the binary (leave blank if it's on
PATH). Toggle Use Logged-in User or supply a GitHub Token. - Remote CLI — Enter the URL of a running CLI server and a GitHub Token.
Click Test.
The Sidekick panel
The panel lives in the right sidebar and has three tabs: Chat, Triggers, and Search.
Chat tab
A streaming AI conversation with full Markdown rendering. Type a message and press Enter to send (Shift+Enter for newlines).
Toolbar:
| Control | What it does |
|---|---|
| + | New conversation |
| ↻ | Reload all config files |
| Agent dropdown | Pick an agent — auto-selects its model, tools, and skills |
| Model dropdown | Switch AI model |
| Reasoning (brain icon) | Set reasoning effort (low / medium / high / xhigh) — appears when the selected model supports it |
| Skills (wand icon) | Toggle skills on/off |
| Tools (plug icon) | Toggle MCP servers on/off |
| Working dir (drive icon) | Set the working directory for file operations |
| Debug (bug icon) | Show tool calls, token usage, and timing |
Input bar:
| Button | What it does |
|---|---|
| Folder | Set a vault scope — limit which files and folders the AI can see |
| Paperclip | Attach files from your OS |
| Clipboard | Paste clipboard text as an attachment |
The active note is automatically included as context. The working directory follows the active note's parent folder.
Search tab
AI-powered semantic search across your vault. Toggle between basic mode (quick answers, minimal config) and advanced mode (pick an agent, model, skills, and tools for the search).
Triggers tab
View and manage all configured triggers. See which are enabled, their schedules, and recent firing history.
Session sidebar
The right edge of the panel lists your conversation sessions.
- Click a session to restore it.
- Right-click to rename or delete.
- Filter sessions with the search box.
- A green dot means a session is actively streaming.
- Trigger and search sessions run in the background and are tagged accordingly.
Sessions are auto-named as <Agent>: <first message>.
Agents
Agents live in sidekick/agents/ as *.agent.md files. Each one defines a persona with its own system prompt, preferred model, and access controls.
Example: grammar.agent.md
---
name: Grammar
description: Helps users improve their writing
model: Claude Sonnet 4.5
tools:
  - github
skills:
  - ascii-art
---

You are the **Grammar Assistant** — help users write clearly and correctly.
Frontmatter fields
| Field | Required | Description |
|---|---|---|
name | Yes | Display name in the agent dropdown |
description | No | Short purpose description |
model | No | Preferred model (auto-selected when the agent is chosen) |
tools | No | Which MCP servers to enable (see below) |
skills | No | Which skills to enable (see below) |
The Markdown body is the agent's system prompt, sent as context with every message.
How tools and skills work
| Frontmatter | Effect |
|---|---|
| Property omitted | All tools/skills enabled |
Property present but empty (tools:) | All tools/skills disabled |
| Property lists specific items | Only those items enabled |
This lets you create focused agents. A writing agent with tools: (empty) has no tool access. A general-purpose agent with no tools property gets everything.
You can always override the agent's defaults by toggling individual items in the toolbar menus.
Models
With GitHub Copilot, all built-in models are available out of the box — or bring your own API key to onboard models from OpenAI, Anthropic, Ollama, Microsoft Foundry, and other OpenAI-compatible providers.
BYOK providers
Use your own API key instead of (or alongside) GitHub Copilot. Go to Settings → Sidekick → Models and pick a provider:
| Provider | Type | Default endpoint |
|---|---|---|
| GitHub (built-in) | — | Via Copilot CLI |
| OpenAI | openai | https://api.openai.com/v1 |
| Microsoft Foundry | azure | Your Azure endpoint |
| Anthropic | anthropic | https://api.anthropic.com |
| Ollama | openai | http://localhost:11434/v1 |
| Microsoft Foundry Local | openai | Local Foundry model server |
| Other OpenAI-compatible | openai | Any compatible endpoint |
Fill in Base URL, Model name (e.g. gpt-5.4, claude-opus-4.6, llama3.2), and either an API key or Bearer token. Choose the Wire API format (Completions or Responses). Click Test.
The model name appears in both the chat and inline operations model dropdowns.
Note: Streaming is automatically disabled for Microsoft Foundry Local.
Skills
Skills are subfolders inside sidekick/skills/, each containing a SKILL.md file that provides domain-specific knowledge to the AI.
Example: sidekick/skills/ascii-art/SKILL.md
---
name: ascii-art
description: Generates stylized ASCII art text using block characters
---

# ASCII Art Generator

Generate ASCII art representations of text using block-style Unicode characters.
Toggle skills on/off from the wand icon in the toolbar.
Browse and download additional community skills from skills.sh. Just drop them into your sidekick/skills/ folder.
MCP Tools (MCP servers)
Configure external tool servers in sidekick/tools/mcp.json. Sidekick supports stdio (local process) and HTTP/SSE (remote) MCP servers.
Example: mcp.json
{
  "servers": {
    "github": {
      "type": "http",
      "url": "https://api.githubcopilot.com/mcp/"
    },
    "workiq": {
      "command": "npx",
      "args": ["-y", "@microsoft/workiq", "mcp"]
    },
    "my-local-tool": {
      "command": "node",
      "args": ["./my-tool/index.js"],
      "env": { "API_KEY": "..." }
    }
  }
}
github— GitHub Copilot's built-in MCP endpoint.workiq— Microsoft Work IQ: query Microsoft 365 data (emails, meetings, documents, Teams) with natural language. Requires Node.js 18+ and admin consent (admin guide).
The format also accepts "mcpServers" as the top-level key. Toggle servers from the plug icon.
Keeping secrets out of mcp.json
Use input variables to avoid hardcoding API keys. Define an "inputs" array and reference values with ${input:variable-id}:
{
  "inputs": [
    {
      "type": "promptString",
      "id": "api-key",
      "description": "API key for my tool server",
      "password": true
    }
  ],
  "servers": {
    "my-tool": {
      "command": "node",
      "args": ["./my-tool/index.js"],
      "env": { "API_KEY": "${input:api-key}" }
    }
  }
}
This follows the VS Code MCP input variable format.
| Property | Required | Description |
|---|---|---|
type | Yes | Input prompt type (e.g. "promptString") |
id | Yes | Unique ID referenced as ${input:id} |
description | Yes | Prompt text shown to the user |
password | No | Mask input and store securely (false by default) |
Sidekick prompts for missing values at load time. Manage stored values in Settings → Sidekick → MCP input variables. Password values are kept in Obsidian's local storage and never written to data.json.
Additional MCP tools
The mcp-sidekick repository maintains ready-to-use MCP servers for Spotify, Microsoft To Do, Weather, and more (with additional tools planned).
To use them:
Add the servers to your sidekick/tools/mcp.json:
{
	"servers": {
		"spotify": {
			"type": "stdio",
			"command": "npx",
			"args": ["-y", "@mcp-sidekick/spotify"],
			"env": {
				"SPOTIFY_CLIENT_ID": "${input:spotify-client-id}",
				"SPOTIFY_CLIENT_SECRET": "${input:spotify-client-secret}",
				"SPOTIFY_REDIRECT_URI": "http://127.0.0.1:3000/callback"
			}
		},
		"microsoft-todo": {
			"type": "stdio",
			"command": "npx",
			"args": ["-y", "@mcp-sidekick/microsoft-todo"],
			"env": {
				"MICROSOFT_TODO_CLIENT_ID": "${input:microsoft-todo-client-id}",
				"MICROSOFT_TODO_CLIENT_SECRET": "${input:microsoft-todo-client-secret}",
				"MICROSOFT_TODO_REDIRECT_URI": "http://localhost:3000/callback"
			}
		},
		"weather": {
			"type": "stdio",
			"command": "npx",
			"args": ["-y", "@mcp-sidekick/weather"]
		}
	},
	"inputs": [
		{
		"type": "promptString",
		"id": "spotify-client-id",
		"description": "Spotify Client ID",
		"password": true
		},
		{
		"type": "promptString",
		"id": "spotify-client-secret",
		"description": "Spotify Client Secret",
		"password": true
		},
		{
		"type": "promptString",
		"id": "microsoft-todo-client-id",
		"description": "Microsoft To Do Client ID",
		"password": true
		},
		{
		"type": "promptString",
		"id": "microsoft-todo-client-secret",
		"description": "Microsoft To Do Client Secret",
		"password": true
		}
	]
}
Tool approval
In Settings → Sidekick → Tools approval:
- Allow — Tool calls run automatically.
- Ask — Confirm each tool call in a modal.
Browser use
Give Sidekick control of a real browser — navigate pages, click elements, fill forms, take screenshots, and extract content — all driven by AI through the Playwright MCP server.
1. Install the browser extension
Install the Playwright MCP Bridge extension on any Chromium browser (Edge, Chrome).
2. Add the Playwright MCP server
In sidekick/tools/mcp.json, add the playwright-extension server:
{
  "servers": {
    "playwright-extension": {
      "command": "npx",
      "args": ["@playwright/mcp@latest", "--extension"]
    }
  }
}
By default, Playwright connects to Chrome. To use a different browser, set the PLAYWRIGHT_MCP_BROWSER environment variable:
{
  "servers": {
    "playwright-extension": {
      "command": "npx",
      "args": ["@playwright/mcp@latest", "--extension"],
      "env": { "PLAYWRIGHT_MCP_BROWSER": "msedge" }
    }
  }
}
Supported values: chrome (default), msedge.
3. Use it
Open the browser with the extension active, then ask Sidekick to browse, search, or interact with web pages. The AI will use the Playwright tools to control the browser on your behalf.
CLI Tools
Sidekick can invoke command-line tools directly from the chat — any CLI available on your system can be called by the AI as part of a conversation. This is useful for automating workflows that involve external services or local utilities.
Google Workspace CLI
The Google Workspace CLI provides access to Drive, Gmail, Calendar, and every Workspace API from the command line. Once installed, the AI can search your email, create calendar events, manage Drive files, and more — all through natural language.
To get the most out of it, add the companion Google Workspace CLI skills to your sidekick/skills/ folder. These skills teach the AI how to use the CLI effectively, including authentication, available commands, and best practices.
Obsidian CLI
The Obsidian CLI can also be invoked from the chat — an inception effect where Sidekick drives Obsidian itself. This is useful for searching tags, querying properties, listing tasks, and performing vault operations that go beyond what the AI can do with file access alone.
You can add the obsidian-cli skill to your sidekick/skills/ folder to enable full command reference.
Prompt templates
Prompt templates are *.prompt.md files in sidekick/prompts/. They act as reusable slash commands.
Example: en-to-pt.prompt.md
---
agent: Grammar
description: Translate English → Portuguese
---
Translate the provided text from English to Portuguese.
How to use
- Type
/in the chat input. - Filter and select a prompt with arrow keys + Enter or Tab.
- The prompt content is prepended to your message. If it specifies an
agent, that agent is auto-selected.
| Frontmatter | Required | Description |
|---|---|---|
agent | No | Auto-select this agent |
description | No | Shown in the dropdown for context |
Triggers
Triggers run tasks automatically in the background. Define them as *.trigger.md files in sidekick/triggers/.
Example: daily-planner.trigger.md
---
name: Daily planner
description: Prepares a daily plan each morning
agent: Planner
cron: "0 8 * * *"
enabled: true
---
Help me prepare my day — surface asks, recommend actions, and prioritize.
| Field | Required | Description |
|---|---|---|
name | No | Display name (defaults to filename) |
description | No | Short purpose description |
agent | No | Agent to use (its model and system prompt apply) |
cron | No | Cron expression (min, hour, dom, month, dow). Checked every 60 s. |
glob | No | Glob pattern matching vault paths — fires on file create/modify/rename |
enabled | No | Active by default (true) |
A cron and/or glob must be configured. Trigger sessions appear in the sidebar tagged with [trigger]. File-change triggers include the changed file path as context.
Bots
Connect external messaging platforms to Sidekick so you can chat with your agents from anywhere — not just inside Obsidian. Each bot type runs as a background service, forwarding messages to the AI and sending replies back.
Telegram
Turn a Telegram bot into a front-end for your Sidekick agents. Messages you send in Telegram are processed by Sidekick using your configured agent, model, skills, and MCP tools — then the response is sent back to the chat.
1. Create a Telegram bot
- Open Telegram and message @BotFather.
- Send
/newbotand follow the prompts to choose a name and username. - BotFather gives you a bot token — copy it.
2. Configure in Sidekick
Go to Settings → Sidekick → Bots:
| Setting | Description |
|---|---|
| Bot ID | Your bot's username (e.g. myassistant_bot) — informational only |
| Bot token | The token from BotFather (stored securely) |
| Allowed users | Comma-separated Telegram user IDs (required — see below) |
| Default agent | Which agent responds to incoming messages |
Finding your Telegram user ID
The Allowed users field requires numeric Telegram user IDs (not usernames). To find yours:
- Message @userinfobot on Telegram — it replies with your user ID.
- Alternatively, message @RawDataBot and look for
"id"in the"from"section.
Add each authorized user’s ID separated by commas, e.g. 123456789, 987654321. The bot silently ignores messages from anyone not in the list.
3. Connect
Click Connect next to the Telegram heading. The status updates to show your bot's username. Click Disconnect to stop.
How it works
- Sidekick uses long-polling to receive messages — no webhooks or public URLs needed.
- Each Telegram chat (or forum topic) gets its own conversation session with full history.
- File attachments (photos, documents, audio, video) are downloaded and passed to the AI.
- The bot supports
/newto reset the session and/helpfor usage info. - All configured MCP tools, skills, and the default agent's system prompt are available.
- MCP input variables (API keys, etc.) are resolved from your stored values — configure them in Settings → Sidekick → MCP input variables before connecting.
- Use the Sessions App from VS Code Insiders to review conversation history and see which tools were invoked.
Note: The bot runs only while Obsidian is open and the connection is active.
Inline edits
Editor context menu
Right-click in any note → Sidekick to access inline AI actions. The menu adapts based on whether you have text selected.
With text selected
| Action | What happens |
|---|---|
| Edit | Opens the Edit modal with tone, format, and length controls |
| Rewrite | Improves clarity and readability |
| Proofread | Fixes grammar, spelling, and punctuation |
| Use synonyms | Swaps words for variety |
| Minor revise | Polishes without changing meaning |
| Major revise | Significantly reworks structure and flow |
| Describe | Explains what the text conveys |
| Answer | Responds to a question in the text |
| Explain | Breaks down in simple terms |
| Expand | Adds detail and depth |
| Summarize | Creates a concise summary |
| Chat with sidekick | Opens chat with the selection as context |
| Autocomplete | Toggle ghost-text autocomplete |
Quick actions replace the selected text in-place using the Inline operations model.
Without a selection
| Action | What happens |
|---|---|
| Edit the note | Opens the Edit modal for the whole note |
| Structure and refine | Restructures and improves the entire note |
| Chat with sidekick | Opens the chat panel |
| Autocomplete | Toggle ghost-text autocomplete |
File and folder context menu
Right-click a file or folder in the vault explorer → Sidekick.
Markdown files: Edit the note, Structure and refine, Chat with sidekick, Autocomplete.
Folders: New note (AI-generated), New summary note (summarizes all notes in the folder), Chat with sidekick.
Images: Insert extracted content below, or Replace with extracted content — uses AI to pull text from images.
Edit modal
A dedicated modal for fine-grained text transformation. Open it via Edit in the context menu.
| Control | Options |
|---|---|
| Task | Rewrite, Proofread, Use synonyms, Minor revise, Major revise, etc. |
| Tone | Professional, Casual, Enthusiastic, Informational, Confident, Technical, Funny |
| Format | Single paragraph, List, Table, Headings, Code blocks, JSON, and more |
| Length | Slider — shorter to longer |
| Choices | How many alternatives to generate |
| Edit prompt | Free-text instruction to guide the transformation |
Each control can be toggled on/off individually. Preview alternatives and pick the one you want.
Ghost-text autocomplete
Get inline AI suggestions as you type — like GitHub Copilot, but for your notes.
- Enable in Settings → Sidekick → Enable ghost-text autocomplete.
- Start typing in any note. Suggestions appear as dimmed text ahead of your cursor.
- Tab to accept, Escape to dismiss, double-click to accept.
Uses the Inline operations model. Works with all providers.
Vault scope
Limit what the AI can see. Click the folder icon in the chat input bar to open the vault scope modal, then select specific files and folders. Only scoped content will be included as context — useful for focusing the AI on a project or topic.
Settings reference
Settings → Sidekick
GitHub Copilot Client
| Setting | Default | Description |
|---|---|---|
| Type | Local CLI | Local CLI or Remote CLI |
| Path | (empty) | Copilot CLI binary path. Blank = use PATH. |
| URL | (empty) | CLI server URL (Remote mode) |
| Use Logged-in User | On | Use OS-level GitHub auth (Local mode) |
| GitHub Token | (empty) | PAT for manual auth |
Models
| Setting | Default | Description |
|---|---|---|
| Provider | GitHub (built-in) | GitHub, OpenAI, Microsoft Foundry, Anthropic, Ollama, Foundry Local, or Other |
| Base URL | (per provider) | API endpoint |
| Model name | (empty) | Model ID (e.g. gpt-4o, claude-sonnet-4) |
| API key | (empty) | x-api-key header |
| Bearer token | (empty) | Authorization header |
| Wire API | Completions | Completions or Responses |
Sidekick settings
| Setting | Default | Description |
|---|---|---|
| Inline operations model | Default | Model for context-menu actions and autocomplete |
| Sidekick folder | sidekick | Root folder for agents, skills, tools, prompts, triggers |
| Tools approval | Ask | Allow (auto) or Ask (confirm each call) |
| Ghost-text autocomplete | Off | Inline AI suggestions in the editor |
| Reasoning effort | (unset) | Low / Medium / High / XHigh — when supported by the model |
| Search mode | Basic | Basic (quick) or Advanced (full agent/model/skills/tools config) |
| Search agent | (empty) | Default agent for the Search tab |
Bots
| Setting | Default | Description |
|---|---|---|
| Telegram → Bot ID | (empty) | Bot username (informational) |
| Telegram → Bot token | (empty) | BotFather token (stored securely) |
| Telegram → Allowed users | (empty) | Comma-separated user IDs (required) |
| Telegram → Default agent | (none) | Agent used for bot responses |
| Telegram → Connect / Disconnect | Disconnected | Start or stop the Telegram bot |
Folder structure overview
<YourVault>/
  sidekick/
    agents/
      grammar.agent.md
    skills/
      ascii-art/
        SKILL.md
    tools/
      mcp.json
    prompts/
      en-to-pt.prompt.md
    triggers/
      daily-planner.trigger.md
Using your vault with GitHub Copilot in VS Code or Copilot CLI
Your Sidekick agents, skills, prompts, and tools can also work with GitHub Copilot in VS Code (or the Copilot CLI). The trick is creating a .github symbolic link that points to your sidekick folder — Copilot automatically picks up instructions, agents, and MCP config from .github/.
Create the symlinks
Open a terminal at your vault root and run:
Windows (PowerShell — run as Administrator):
New-Item -ItemType SymbolicLink -Path ".github" -Target "sidekick"
New-Item -ItemType SymbolicLink -Path ".vscode" -Target "sidekick\tools"
Windows (Command Prompt — run as Administrator):
mklink /D .github sidekick
mklink /D .vscode sidekick\tools
macOS / Linux:
ln -s sidekick .github
ln -s sidekick/tools .vscode
What this enables
With the symlinks in place, opening your vault folder in VS Code or GitHub Copilot CLI gives Copilot access to:
- Agents (
sidekick/agents/*.agent.md) — available as Copilot chat participants - Skills — referenced by agents as instruction files
- MCP servers (
sidekick/tools/mcp.json) — Copilot discovers and uses them automatically - Prompts (
sidekick/prompts/*.prompt.md) — usable as reusable prompt files
This means you can author your agents and tools once in Sidekick and use them seamlessly in both Obsidian, VS Code and GitHub Copilot CLI.
Feedback
Found a bug or missing a feature? Open an issue — all feedback is welcome. If you find Sidekick useful, give the repo a star — it helps others discover it.

For plugin developers
Search results and similarity scores are powered by semantic analysis of your plugin's README. If your plugin isn't appearing for searches you'd expect, try updating your README to clearly describe your plugin's purpose, features, and use cases.