AI Terminal
unlistedby atman-33
Launch AI agents (GitHub Copilot CLI, OpenCode) in external terminals directly from Obsidian with customizable command templates.
Obsidian AI Terminal
Launch external terminal sessions with AI agents (GitHub Copilot CLI or OpenCode) directly from Obsidian. Execute custom commands with context-aware placeholders from the command palette or context menus.
Features
- Customizable Command Templates: Define multiple command presets with placeholders for dynamic content
- Context-Aware Execution: Launch terminals with file paths, selections, and custom prompts automatically inserted
- Multiple Access Points: Execute commands from the command palette, file context menu, or editor context menu
- Windows Terminal Support: Launch PowerShell sessions in Windows Terminal (MVP)
- Flexible Placeholder System: Use file paths, vault root, selection, and custom prompts in your commands
- Command Editor UX: Full-width multi-line fields and unsaved changes warning
- Direct Prompt UX: Optional prompt persistence and clickable placeholder insertion
- Settings Reset: Restore all settings to defaults with a confirmation dialog
Installation
Requirements
- Obsidian Desktop (Windows only for MVP)
- Windows Terminal installed (Download)
- AI CLI tools (optional, user-installed):
🧪 Install via BRAT
- Install the BRAT plugin from the Community Plugins browser
- In Obsidian settings, go to Community Plugins → BRAT → Add Beta Plugin
- Paste this repo URL:
https://github.com/atman-33/obsidian-ai-terminal - BRAT will download the latest release and keep it auto-updated
- Enable AI Terminal from the plugin list
💻 Manual Installation
- Download the latest release files from GitHub Releases:
main.jsmanifest.jsonstyles.css
- Create plugin folder and place the files in:
<VaultFolder>/.obsidian/plugins/ai-terminal/ - Enable the plugin in Obsidian Settings → Community Plugins
Configuration
Agent Configuration
Manage the AI agents available for your commands and direct prompts in Settings → AI Terminal.
- Add Agent: Click "Add new agent"
- Configure:
- Name: Display name (e.g., "GPT-4", "Local LLM")
- ID: Internal identifier
- Description: Optional details
- Use: Reference these agents in templates via
<agent>or select them in the Direct Prompt dialog.
Direct Prompt Settings
Configure Direct Prompt behavior in Settings → AI Terminal → Direct prompt:
- Remember last prompt (optional): When enabled, the Direct Prompt dialog reuses your last prompt text.
- Clickable placeholders: In the Direct Prompt dialog, click placeholders to insert resolved values at the cursor.
Command Templates
Configure command templates in Settings → AI Terminal:
- Add Command: Click "Add Command" to create a new template
- Edit Properties:
- ID: Unique identifier (lowercase, hyphens only)
- Name: Display name in menus
- Command Template: Shell command with placeholders
- Default Prompt: Default text for
<prompt>placeholder - Default Agent: Default value for
<agent>placeholder - Enabled: Toggle to show/hide in menus
- Save: Changes persist immediately
Available Placeholders
Use these placeholders in command templates - they're replaced automatically based on context:
| Placeholder | Description | Example |
|---|---|---|
<file> | Filename only | readme.md |
<path> | Absolute file path | C:\Users\...\readme.md |
<relative-path> | Path relative to vault root | docs/readme.md |
<dir> | Directory containing the file | C:\Users\...\docs |
<vault> | Vault root directory | C:\Users\...\MyVault |
<selection> | Selected text (editor only) | User's selected text |
<prompt> | Prompt text | From default or input |
<agent> | Agent name | From default or input |
Note: Unavailable placeholders are replaced with empty strings.
Working Directory
When launching a terminal, the working directory is always set to the vault root, regardless of whether the command is executed from the command palette, file context menu, or editor. This ensures consistent access to all files and directories within your vault using relative paths.
- File paths are still passed as placeholders (
<path>,<dir>, etc.) so AI agents can identify the target file - Directory of the file remains accessible via the
<dir>placeholder - Use relative paths from vault root in your commands for multi-file operations
Example: If your vault is at C:\Users\john\MyVault and you execute a command on docs/readme.md, the terminal working directory will be C:\Users\john\MyVault (not C:\Users\john\MyVault\docs).
Example Templates
GitHub Copilot CLI - Interactive Mode:
copilot -i "<prompt>"
Default prompt: Fix issues in <file>
OpenCode - Code Review:
opencode -a <agent> -p "Review this code: <selection>"
Default agent: gpt-4
Custom Script with File Context:
python analyze.py --file "<path>" --vault "<vault>"
Usage
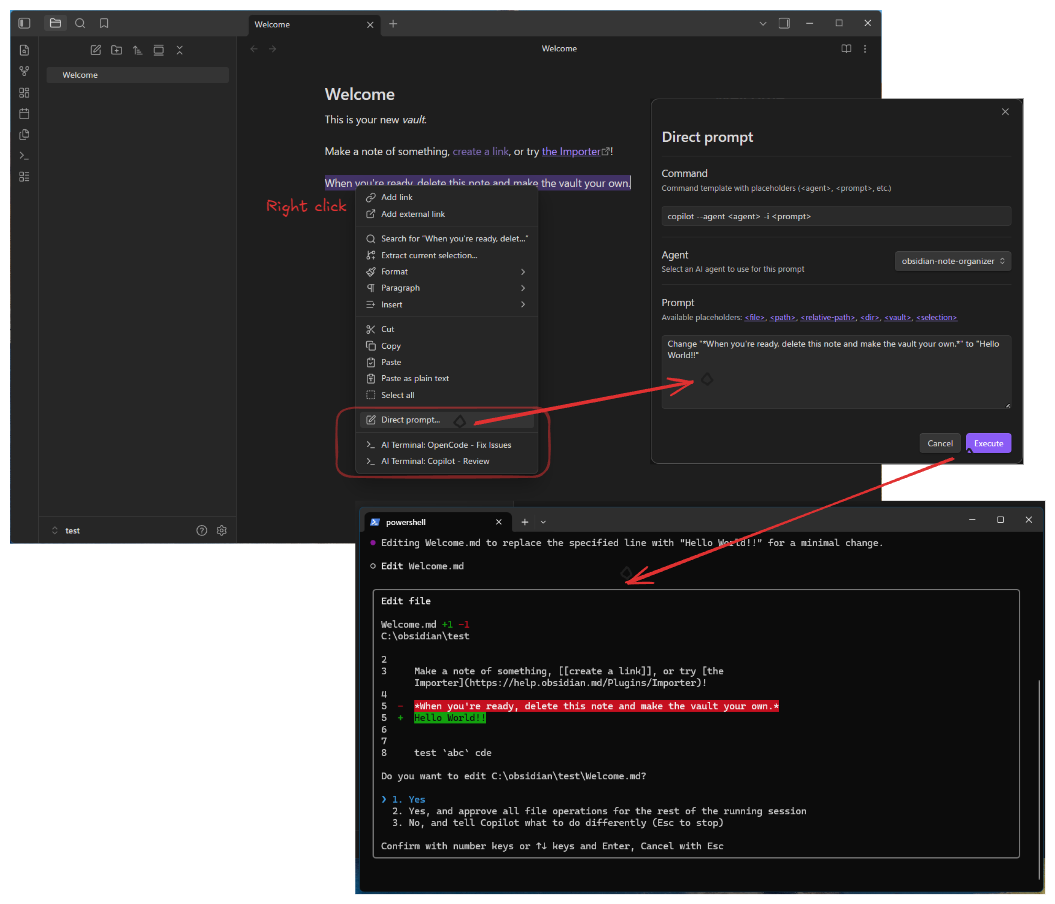
Direct Prompt Execution
Launch an ad-hoc command without creating a saved template:
- Open Command Palette (
Ctrl/Cmd+P) and select "AI Terminal: Open direct prompt"- Or use the context menu on a file/editor
- Command: Verify/edit the command template (defaults to saved preference)
- Agent: Select an agent from your configured list
- Prompt: Enter your instruction (supports placeholders like
<file>,<selection>)- Click placeholders in the description to insert resolved values at the cursor
- If enabled, the last prompt is restored automatically
- Execute: Click to launch the terminal
From Command Palette
- Press
Ctrl+P(orCmd+Pon Mac) - Type "AI Terminal:"
- Select a command from the list
- Windows Terminal launches with the command
From File Context Menu
- Right-click a file in the file explorer
- Hover over "AI Terminal"
- Select a command
- Terminal launches with file context
From Editor Context Menu
- Right-click in the editor (optionally select text first)
- Hover over "AI Terminal"
- Select a command
- Terminal launches with file and selection context
Security Best Practices
Command Injection Prevention
- All placeholder values are Base64-encoded before execution
- PowerShell commands use
-EncodedCommandfor safety - Never disable escaping or modify the launcher code
Safe Command Templates
✅ Safe:
copilot -i "<prompt>"
python script.py --file "<path>"
⚠️ Dangerous (avoid shell metacharacters in templates):
rm -rf <dir>  # Deletion commands
cat <file> | sh  # Piping to shell
eval "<prompt>"  # Arbitrary code execution
Trust Your Templates
- Only add command templates you understand
- Review templates before enabling
- Be cautious with templates from untrusted sources
Troubleshooting
Windows Terminal Doesn't Launch
Symptoms: Error message "Windows Terminal not found" or "Cannot find wt.exe"
Solutions:
- Install Windows Terminal: https://aka.ms/terminal
- Ensure
wt.exeis in your PATH - Try running
wt.exefrom Command Prompt to verify installation
Commands Don't Appear in Menus
Symptoms: AI Terminal submenu is empty or commands are missing
Solutions:
- Check Settings → AI Terminal → ensure commands are Enabled
- Reload Obsidian after changing settings
- Verify command IDs are unique
Placeholders Not Replaced
Symptoms: Command contains literal <file> or <path> text
Solutions:
- Ensure you're launching from correct context (file/editor menus for file placeholders)
- Check that file is saved (unsaved files may not have paths)
- Review placeholder spelling (case-sensitive)
Special Characters in Filenames
Symptoms: Commands fail with files containing spaces, quotes, or special characters
Solutions:
- Plugin uses Base64 encoding to handle special characters automatically
- If issues persist, check AI CLI tool compatibility with file paths
AI CLI Tool Not Found
Symptoms: Terminal launches but shows "command not found" error
Solutions:
- Install the AI CLI tool:
- GitHub Copilot CLI:
npm install -g @githubnext/github-copilot-cli - OpenCode: Follow installation instructions
- GitHub Copilot CLI:
- Ensure the tool is in your PATH
- Test the tool in a regular terminal first
Permission Errors
Symptoms: "Access denied" or permission-related errors
Solutions:
- Run Obsidian as administrator (last resort)
- Check file/folder permissions in vault
- Verify Windows Terminal has necessary permissions
Platform Support
Current Support (MVP)
- ✅ Windows 10/11 with Windows Terminal
- ✅ PowerShell 5.1+ or PowerShell Core 7+
Future Roadmap
- WSL (Windows Subsystem for Linux) support
- Linux native terminal support
- macOS Terminal.app support
- Custom terminal preferences per command
Development
Building from Source
# Install dependencies
npm install

# Development mode (watch for changes)
npm run dev

# Production build
npm run build
Project Structure
src/
  main.ts                    # Plugin entry point
  settings.ts                # Settings UI and storage
  types.ts                   # TypeScript interfaces
  commands/
    command-manager.ts       # Command template management
    command-executor.ts      # Command execution orchestration
  placeholders/
    context-collector.ts     # Context gathering
    placeholder-resolver.ts  # Placeholder substitution
  terminal/
    terminal-launcher.ts     # Terminal launching
    path-converter.ts        # Path utilities
  ui/
    command-editor.ts        # Command template editor modal
Testing
# Run tests
npm test

# Run linter
npm run lint
Contributing
Contributions are welcome! Please:
- Fork the repository
- Create a feature branch
- Follow existing code style
- Add tests for new features
- Submit a pull request
License
MIT License - see LICENSE file for details
Support
- Report issues: GitHub Issues
- Documentation: This README
- Obsidian API: https://docs.obsidian.md
Acknowledgments
- Inspired by GitHub Copilot CLI and OpenCode
- Built with Obsidian Plugin API
- Thanks to the Obsidian community for feedback and testing
For plugin developers
Search results and similarity scores are powered by semantic analysis of your plugin's README. If your plugin isn't appearing for searches you'd expect, try updating your README to clearly describe your plugin's purpose, features, and use cases.