PlantUML Integrator
approvedby fangface-hub
Render PlantUML code blocks and .puml embeds with dependency-aware cache invalidation. - This plugin has not been manually reviewed by Obsidian staff.
Obsidian PlantUML Integrator
An Obsidian plugin that renders PlantUML diagrams and is ready for Community Plugins publication.
Features
- Render PlantUML code blocks (
plantuml,puml) in Markdown preview. - Render
.pumlembedded files. - Cache include dependency trees and auto re-render when included files are modified.
- Right-click each rendered diagram to clear cache and re-render only that diagram.
- Select rendering mode: remote server endpoint or local PlantUML server.
- Align rendered diagrams left, center, or right, with optional per-diagram overrides.
Code block rendering image

Render Modes
Server mode (default)
Uses a remote PlantUML-compatible HTTP endpoint (e.g. kroki.io).
Configure PlantUML server URL in settings (default: https://kroki.io/plantuml/svg).
Local jar mode
Runs a local PlantUML PicoWeb server and sends requests to it.
This mode does not invoke java directly from the plugin; you must start the server yourself.
Why? Due to platform security constraints, Obsidian plugins cannot spawn external processes. Instead, the plugin communicates with a running PlantUML server via HTTP.
Starting the local server:
java -jar "<path-to-plantuml.jar>" -picoweb
The server listens on port 8080 by default.
Start the local server automatically at user login:
You can register the PlantUML PicoWeb command as a per-user startup entry so it is launched when you sign in.
Windows (HKCU Run):
$runKey = 'Registry::HKEY_CURRENT_USER\Software\Microsoft\Windows\CurrentVersion\Run'
$javaCommand = 'javaw.exe'
$javaExe = (Get-Command $javaCommand -ErrorAction SilentlyContinue | Select-Object -First 1 -ExpandProperty Source)
if (-not $javaExe) { $javaExe = $javaCommand }
$jarPath = 'C:\path\to\plantuml.jar'
$command = '"' + $javaExe + '" -jar "' + $jarPath + '" -picoweb'
New-Item -Path $runKey -Force | Out-Null
Set-ItemProperty -Path $runKey -Name 'PlantUML PicoWeb' -Value $command
macOS (LaunchAgent):
mkdir -p ~/Library/LaunchAgents
cat > ~/Library/LaunchAgents/com.user.plantuml.picoweb.plist <<'EOF'
<?xml version="1.0" encoding="UTF-8"?>
<!DOCTYPE plist PUBLIC "-//Apple//DTD PLIST 1.0//EN" "http://www.apple.com/DTDs/PropertyList-1.0.dtd">
<plist version="1.0">
   <dict>
      <key>Label</key>
      <string>com.user.plantuml.picoweb</string>
      <key>ProgramArguments</key>
      <array>
         <string>/usr/bin/java</string>
         <string>-jar</string>
         <string>/path/to/plantuml.jar</string>
         <string>-picoweb</string>
      </array>
      <key>RunAtLoad</key>
      <true/>
      <key>KeepAlive</key>
      <true/>
   </dict>
</plist>
EOF
launchctl load ~/Library/LaunchAgents/com.user.plantuml.picoweb.plist
Linux (systemd user service):
mkdir -p ~/.config/systemd/user
cat > ~/.config/systemd/user/plantuml-picoweb.service <<'EOF'
[Unit]
Description=PlantUML PicoWeb server

[Service]
ExecStart=/usr/bin/java -jar /path/to/plantuml.jar -picoweb
Restart=on-failure

[Install]
WantedBy=default.target
EOF
systemctl --user daemon-reload
systemctl --user enable --now plantuml-picoweb.service
Check whether the login startup registration is active:
Windows:
(Get-ItemProperty -Path 'Registry::HKEY_CURRENT_USER\Software\Microsoft\Windows\CurrentVersion\Run' -Name 'PlantUML PicoWeb').'PlantUML PicoWeb'
macOS:
launchctl list | grep com.user.plantuml.picoweb
Linux:
systemctl --user status plantuml-picoweb.service
Remove the login startup registration:
Windows:
Remove-ItemProperty -Path 'Registry::HKEY_CURRENT_USER\Software\Microsoft\Windows\CurrentVersion\Run' -Name 'PlantUML PicoWeb'
macOS:
launchctl unload ~/Library/LaunchAgents/com.user.plantuml.picoweb.plist
rm ~/Library/LaunchAgents/com.user.plantuml.picoweb.plist
Linux:
systemctl --user disable --now plantuml-picoweb.service
rm ~/.config/systemd/user/plantuml-picoweb.service
systemctl --user daemon-reload
Replace the Java executable and JAR path with values that match your environment.
Plugin settings:
Settings screen image
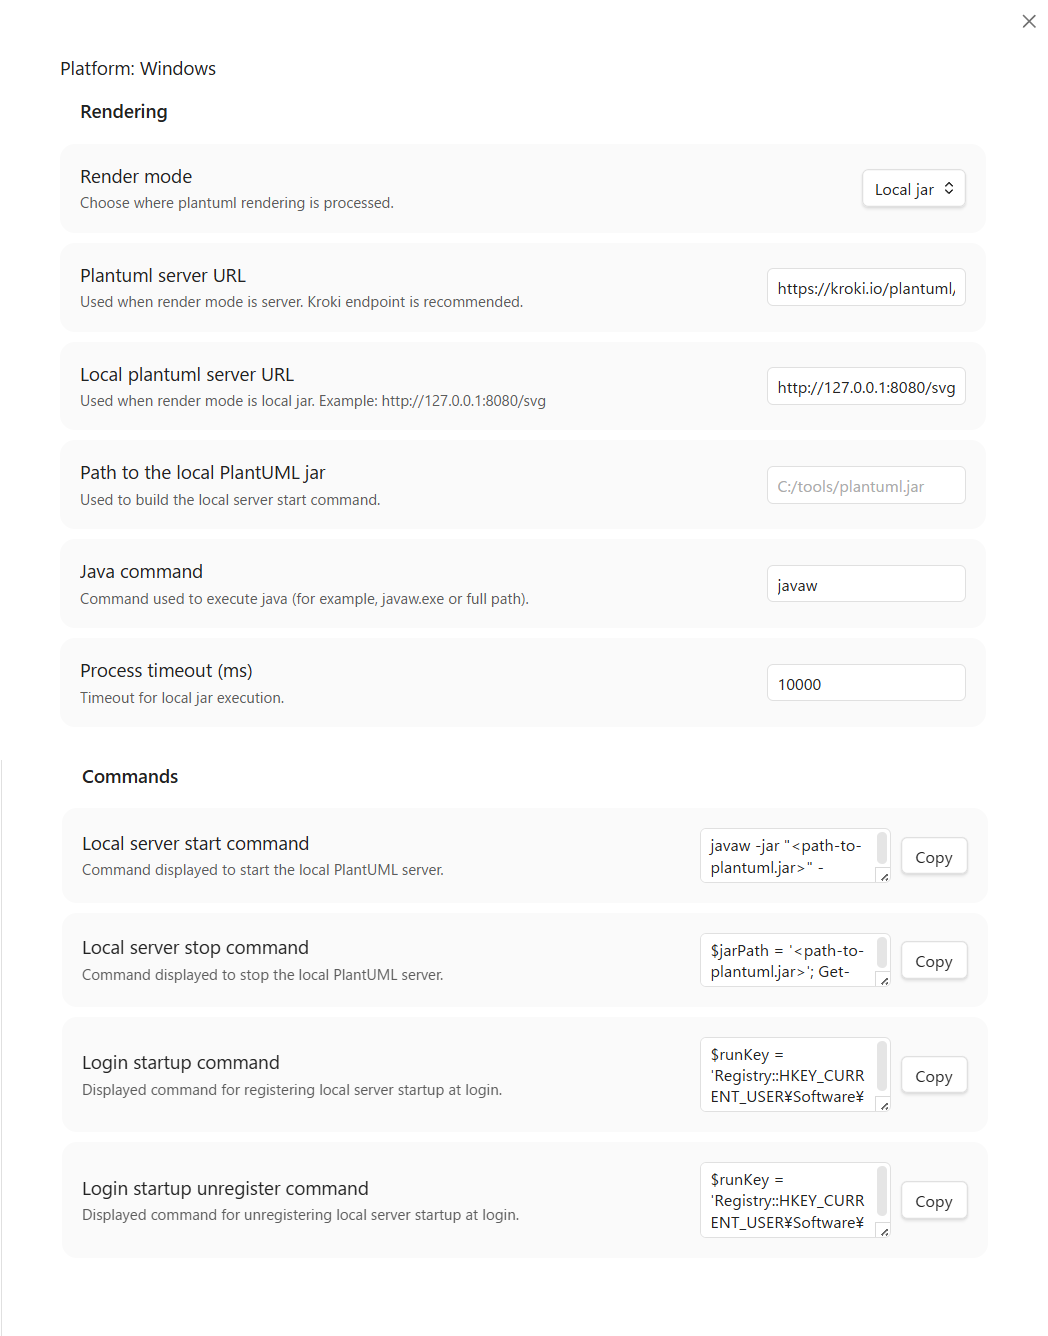
| Setting | Description | Default |
|---|---|---|
| Render mode | Choose where plantuml rendering is processed. | Server |
| Default diagram alignment | Places rendered diagrams inside the rendering area. | Left |
| Plantuml server URL | Used when render mode is server. Kroki endpoint is recommended. | https://kroki.io/plantuml/svg |
| Local plantuml server URL | Used when render mode is local JAR. Example: http://127.0.0.1:8080/svg | http://127.0.0.1:8080/svg |
| Path to the local plantuml jar | Used to build the local server start command. | (empty) |
| Java command | Command used to execute java (for example, javaw.exe or full path). | javaw.exe |
| Process timeout (ms) | Timeout for local jar execution. | 10000 |
| Local server start command | Copy this command to start the local plantuml server. | Auto-generated from Java command and Path to the local plantuml jar |
| Local server stop command | Copy this command to stop the local plantuml server. | Platform-specific auto-generated value |
| Login startup command | Displayed command for registering local server startup at login. | Platform-specific auto-generated value |
| Login startup unregister command | Displayed command for unregistering local server startup at login. | Platform-specific auto-generated value |
Convenience feature: Right-click any rendered diagram and select Copy local server start command to copy the javaw.exe -jar ... command to the clipboard.
Per-diagram alignment: Add a PlantUML comment to override the default horizontal alignment for one diagram. PlantUML ignores the comment, and other Markdown rendering tools can reuse the same horizontal-align metadata.
Recommended placement:
' horizontal-align: center
@startuml
Alice -> Bob: Hello
@enduml
The metadata comment does not have to be the first line. It can appear before or after @startuml; the plugin scans the whole PlantUML source for a standalone horizontal-align comment line. For readability, placing it near the top of the diagram is recommended.
This is also valid:
@startuml
' horizontal-align: center
Alice -> Bob: Hello
@enduml
Supported values are left, center, and right.
Per-diagram HTML metadata (@meta): You can also add a PlantUML block comment with @meta and data-* keys.
Example:
/'
   @meta
   data-align="center"
   data-width="80%"
   data-theme="dark"
'/
@startuml
Alice -> Bob: Hello
@enduml
Supported metadata:
| Metadata | Meaning | Example |
|---|---|---|
| data-align | Horizontal alignment override for SVG placement. | "left", "center", "right" |
| data-width | SVG width inside the container. When specified, responsive max-width: 100% is disabled for that diagram. | "80%", "600px", "original" |
| data-margin | Outer margin for the diagram container. | "12px" |
| data-background | Background color for the diagram container. | "#fff" |
| data-zoom | Diagram zoom scale. | "1.2" |
| data-interactive | Adds data-interactive attribute to the rendered container. | "true" |
| data-theme | Adds data-theme attribute to the rendered container. | "dark" |
Notes:
data-aligntakes precedence overhorizontal-alignwhen both are present.data-width="original"keeps the SVG at its original size.data-themeanddata-interactiveare exposed as HTMLdata-*attributes so you can style or script them.
If the server is not running, the plugin shows the start command in the error message.
Security and Permissions
Clipboard Access
This plugin uses clipboard access exclusively for user-initiated copy operations (clipboard-write only):
When clipboard is accessed:
- Right-click any rendered diagram → Copy local server start command: Copies the Java command to start the PlantUML server
- Settings screen → Local server start command field → Right-click → Copy: Copies the auto-generated start command
- Settings screen → Copy login startup command: Copies the platform-specific command to register the server for auto-start
- Settings screen → Copy login startup unregister command: Copies the command to remove auto-start registration
- Settings screen → Copy local server stop command: Copies the command to stop the PlantUML server
Important:
- Clipboard is never accessed automatically or in the background
- Access only occurs when the user explicitly clicks a "Copy" button or menu item
- No clipboard reads are performed
- No data is written to the clipboard except the commands specified above
Build
-
Install dependencies:
npm install -
Build:
npm run build
Development
Watch mode:
npm run dev
Copy manifest.json, main.js, and styles.css to your Obsidian vault plugin folder.
Lint
Run lint checks:
npm run lint
Run lint checks with auto-fix:
npm run lint:fix
npm run lint:fix only applies ESLint auto-fixes and does not update version files.
Community Plugin Release
-
Verify
manifest.jsonfields:id,name,author,description, andversion. -
Run
npm run lint:fix. -
Run
npm run lintto verify the plugin meets Obsidian guidelines. This will check:- TypeScript code for sentence-case UI text
- Plugin manifest structure and configuration
- Other Obsidian plugin best practices
-
Bump the version based on the type of release:
- For bug fixes (patch):
npm run version:patch(e.g.,0.1.12→0.1.13) - For new features (minor):
npm run version:minor(e.g.,0.1.12→0.2.0) - For breaking changes (major):
npm run version:major(e.g.,0.1.12→1.0.0)
This updates
package.json,manifest.json, andversions.jsontogether. - For bug fixes (patch):
-
Run
npm run buildto generatemain.js. -
Create a GitHub Release with the same tag as the
manifest.jsonversion (for example,0.1.0). -
The GitHub Actions workflow automatically:
- Generates release notes from git commits since the previous tag
- Creates artifact attestations for
main.jsandstyles.cssto establish provenance - Verifies all release requirements (manifest fields, permissions, assets)
- Attaches release notes and attestations to the GitHub Release
-
Attach the following 3 files as release assets:
manifest.jsonmain.jsstyles.css
-
Submit a registration PR to the Obsidian community plugin list repository.
Artifact Attestations
Each GitHub Release includes artifact attestations for main.js and styles.css. These attestations cryptographically verify the provenance of the release assets, proving they were built from the source repository.
Verifying attestations:
Users can verify the authenticity and provenance of release assets using the GitHub CLI:
gh attestation verify <artifact-file> --owner fangface-hub --repo obsidian_plantuml_integrator
Learn more: Using artifact attestations to establish provenance for builds
Version Management
This project follows Semantic Versioning (MAJOR.MINOR.PATCH).
Version Bump Commands
-
Major version bump (breaking changes):
npm run version:majorBumps major version and resets minor and patch to 0 (e.g.,
0.1.12→1.0.0) -
Minor version bump (new features):
npm run version:minorBumps minor version and resets patch to 0 (e.g.,
0.1.12→0.2.0) -
Patch version bump (bug fixes):
npm run version:patchBumps patch version only (e.g.,
0.1.12→0.1.13)
What the version commands do
Each version bump command automatically updates:
package.json- Package versionmanifest.json- Plugin manifest versionversions.json- Version history with minimum Obsidian version
When bumping major or minor versions, lower version numbers reset to 0 per semantic versioning standards.
GitHub Actions (Release ZIP)
- Workflow file:
.github/workflows/release-zip.yml - Trigger (manual):
workflow_dispatch - Trigger (automatic):
release.published - Output ZIP:
${id}-${version}.zipcontainingmanifest.json,main.js,styles.css, andversions.json - Output destination: uploaded as a workflow artifact
- Release behavior: automatically attached to the GitHub Release when triggered by release publish
Version Bump Checklist
- Run
npm run version:patch - Verify the updated version in
manifest.jsonandversions.json npm run build- Create a git tag and GitHub Release
Support the Project
If you find this plugin helpful, consider sponsoring the project:

For plugin developers
Search results and similarity scores are powered by semantic analysis of your plugin's README. If your plugin isn't appearing for searches you'd expect, try updating your README to clearly describe your plugin's purpose, features, and use cases.